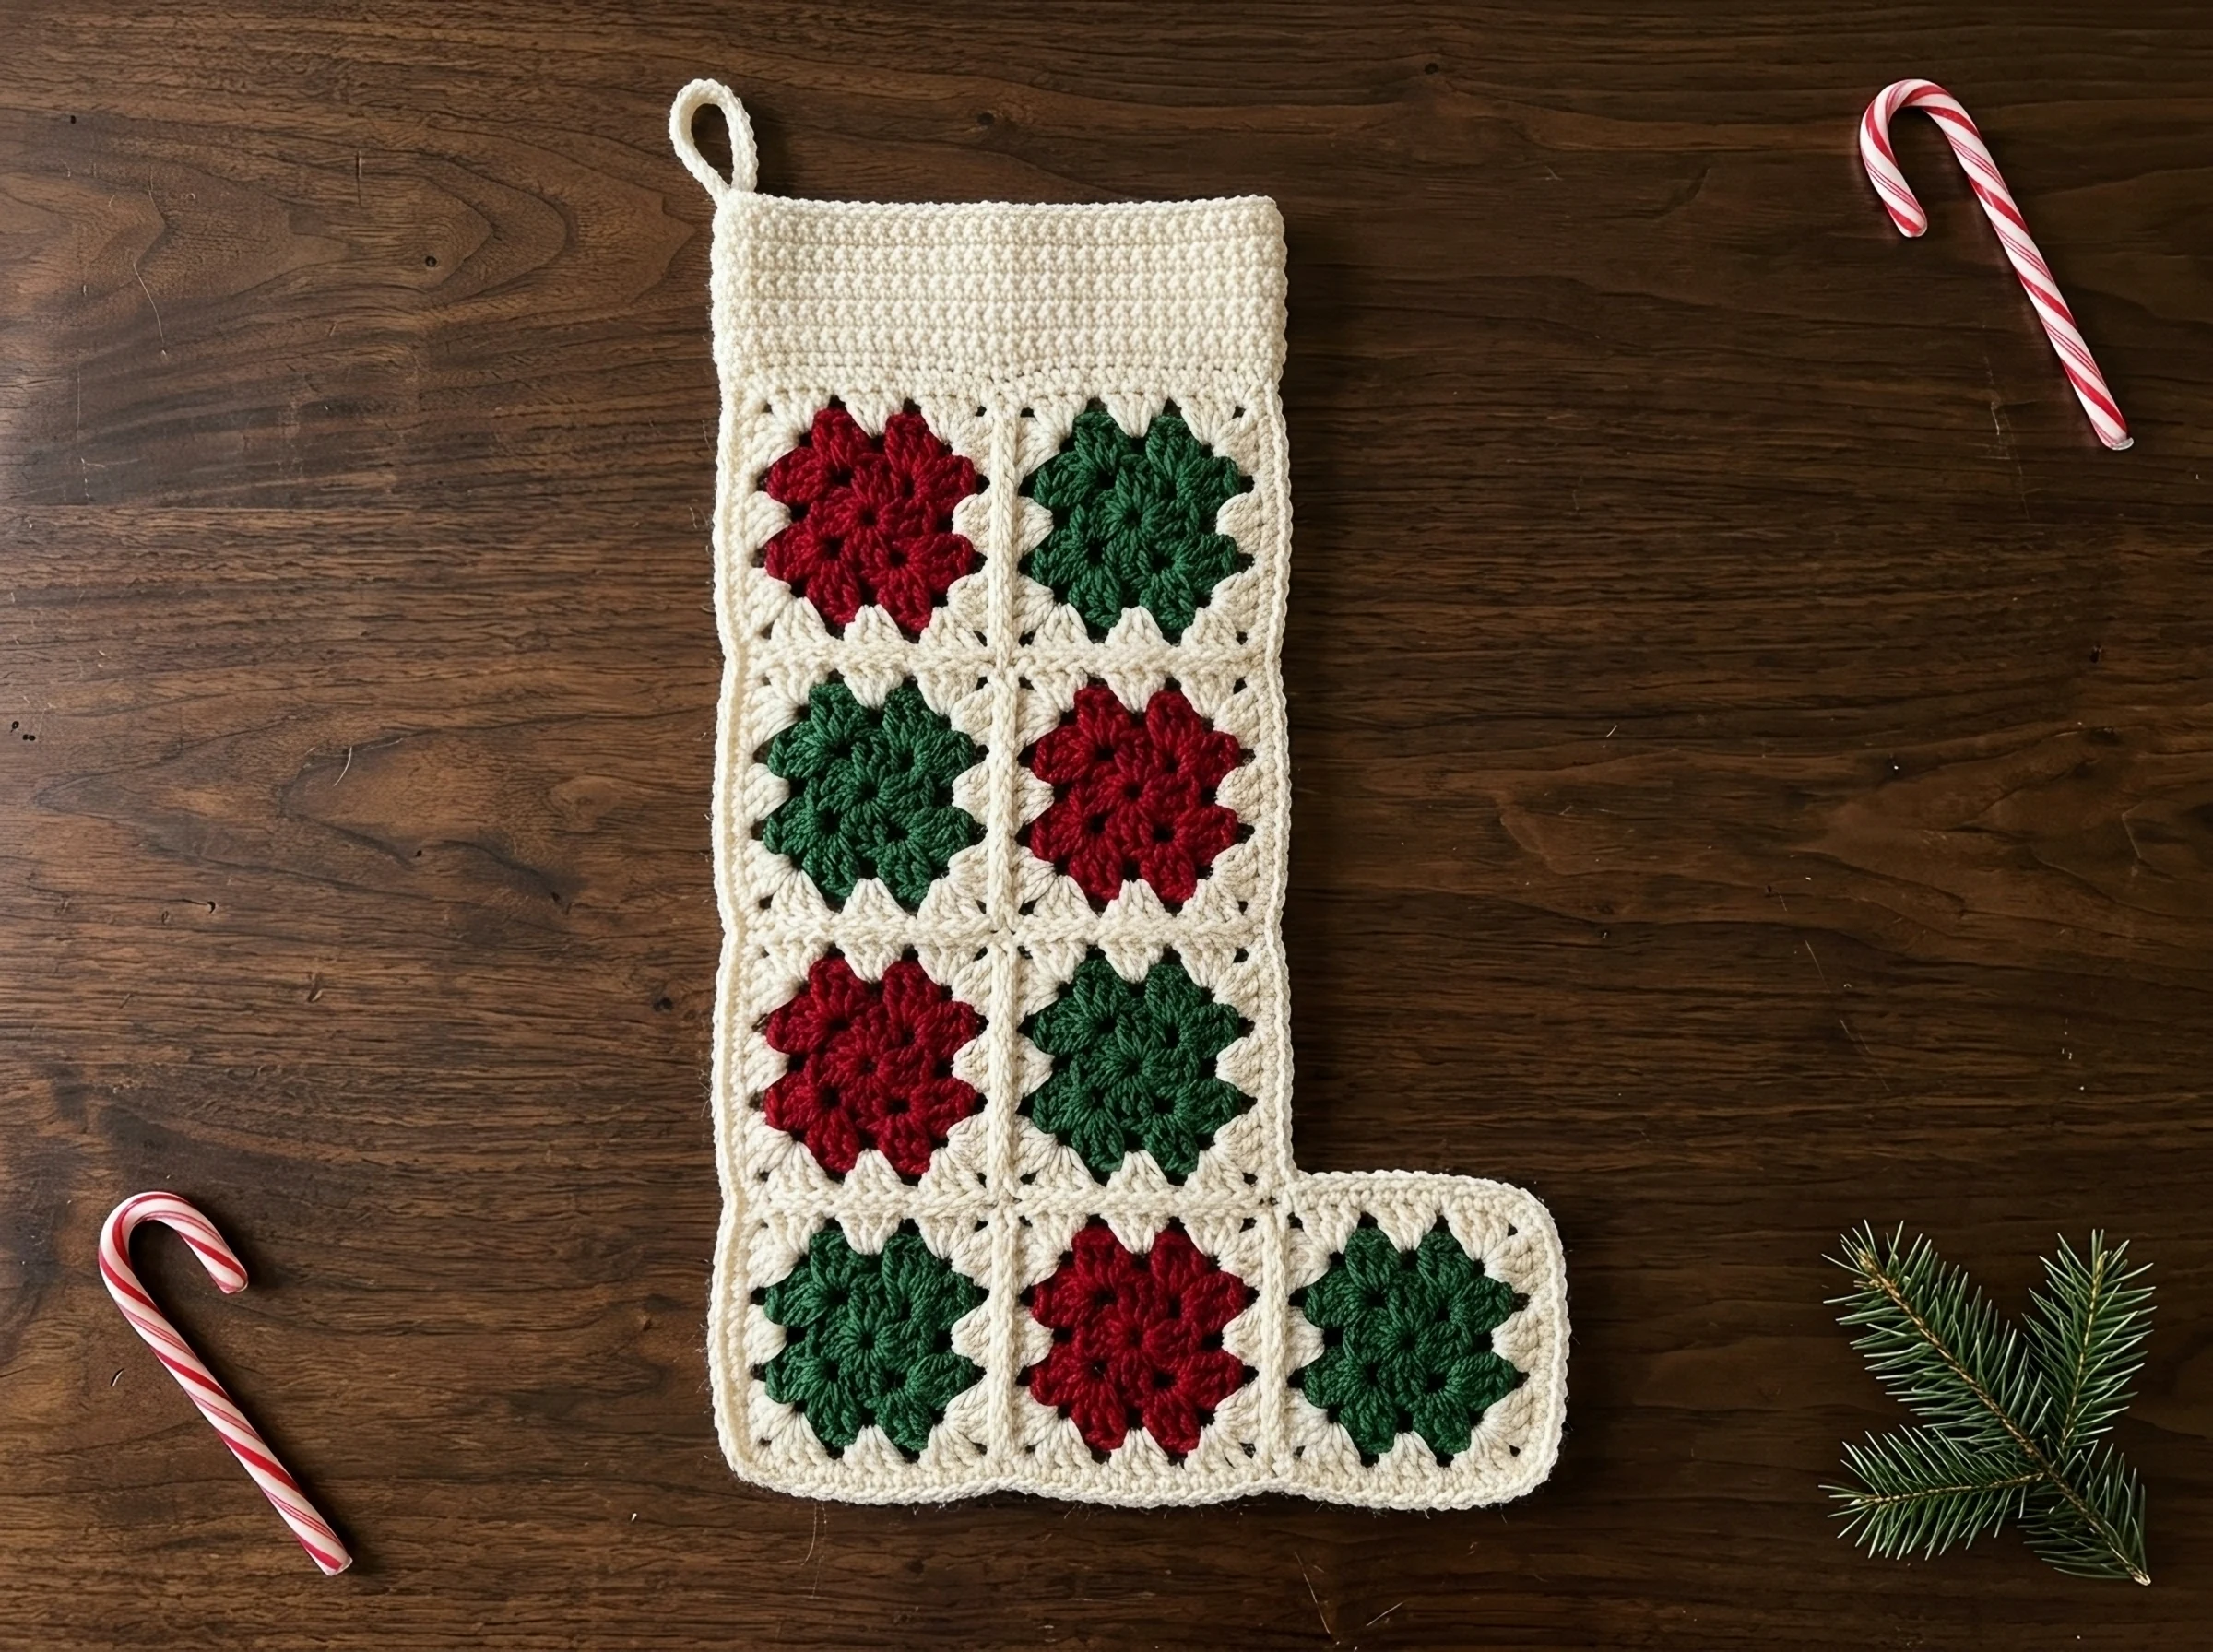
Free granny square Christmas stocking pattern · about 8 in wide and 17 1/4 in tall · worsted yarn in red, green and cream, US H-8 hook.
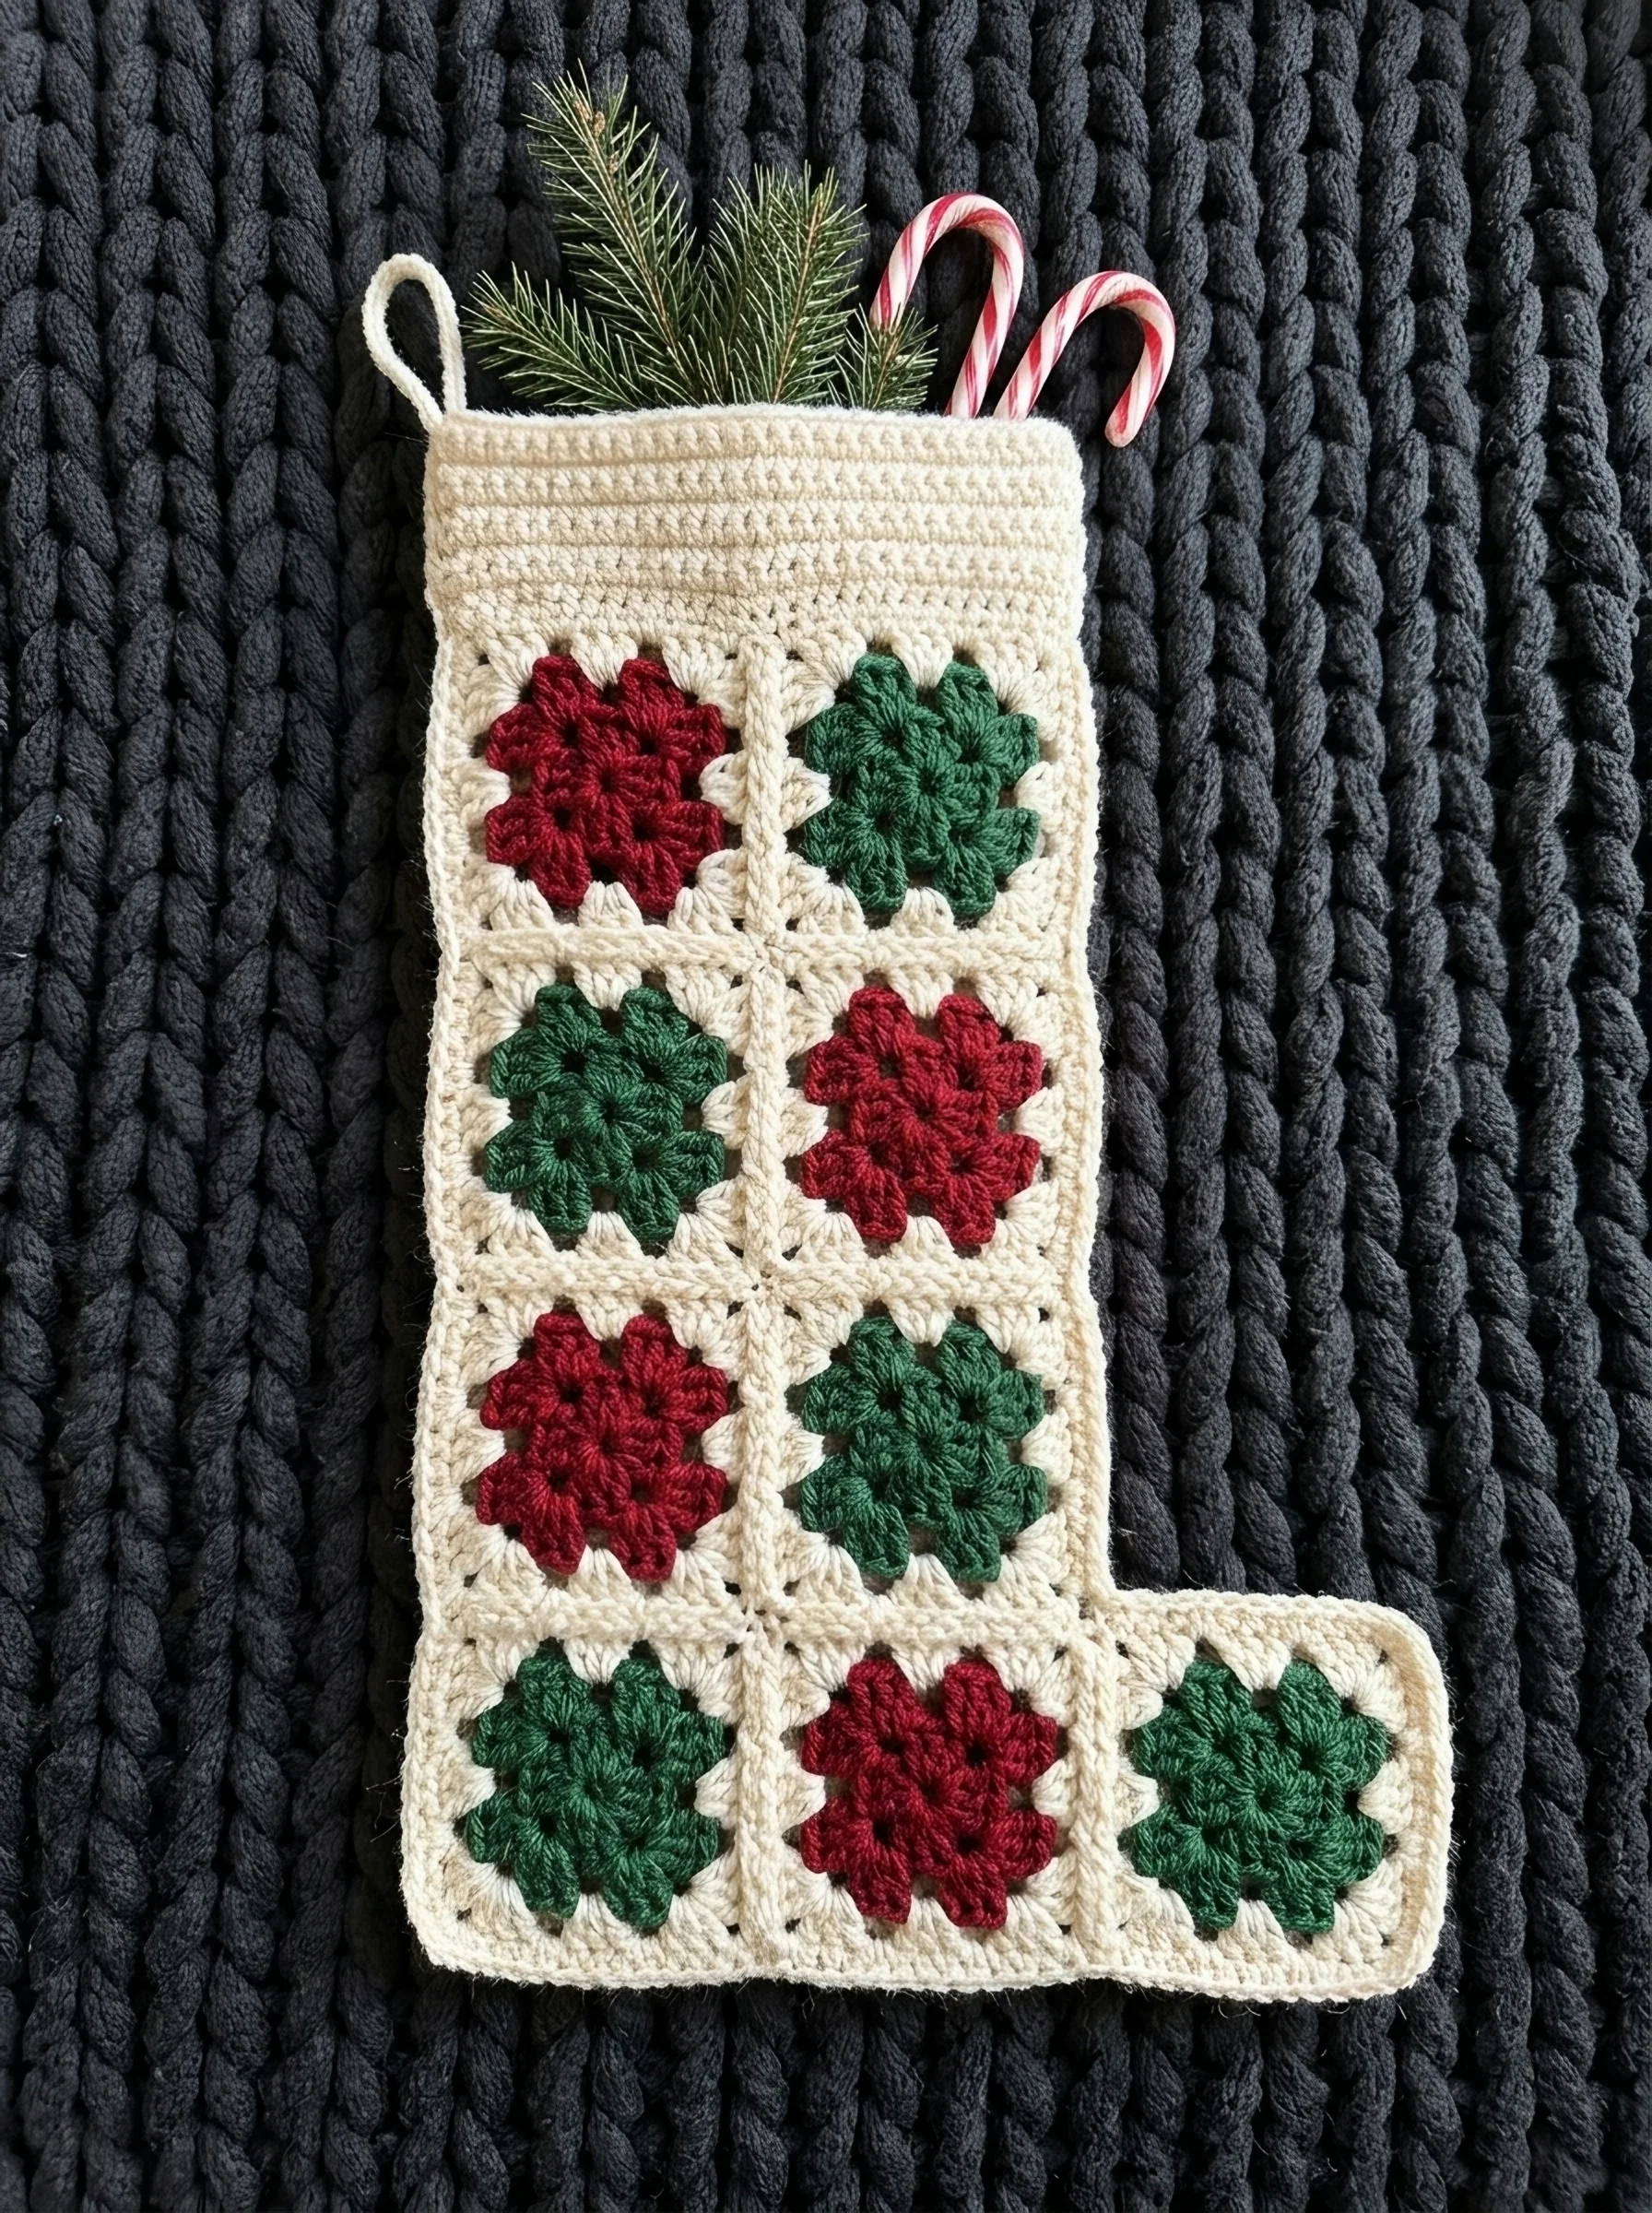
This granny square Christmas stocking is a crochet Christmas stocking pattern made of one small square, worked 18 times. Each square has a cranberry red or pine green center and a cream outer round; joined in a checkerboard, they make a modern, blocky stocking with a square heel and toe.
You join the squares into a front and a back panel, hold them together and close them with one cream row, then add a cream cuff and a hanging loop. Every round of the square, the joining row and the cuff were checked by our stitch simulator.
- Finished size
- About 8 in wide at the leg, 17 1/4 in tall with the cuff, foot about 11 1/2 in long (estimated)
- Yarn
- Worsted weight (#4): about 50 yd red, 60 yd green, 170 yd cream (estimated, with a 30 % margin)
- Hook
- US H-8 (5.0 mm)
- Gauge
- Suggested only: one 3-round square = about 3 3/4 in from side to side
- Squares
- 18: 8 red centers, 10 green centers
- Time
- About 8 to 10 hours: 18 squares, 22 seams, the joining row, the cuff and about 120 ends to weave in (estimated, not timed)
- Skills
- ch, sl st, sc, hdc, dc, joining squares with a slip-stitch seam

Which square goes where
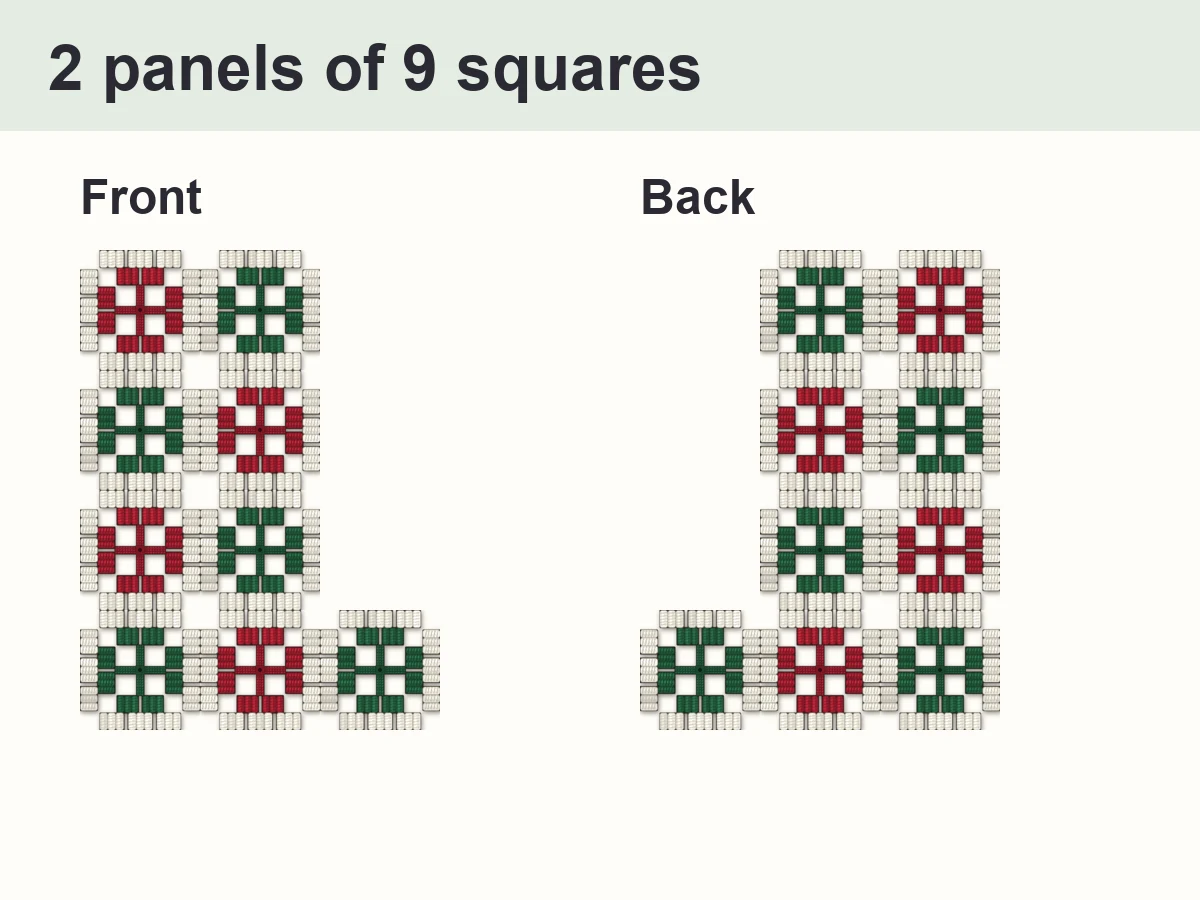
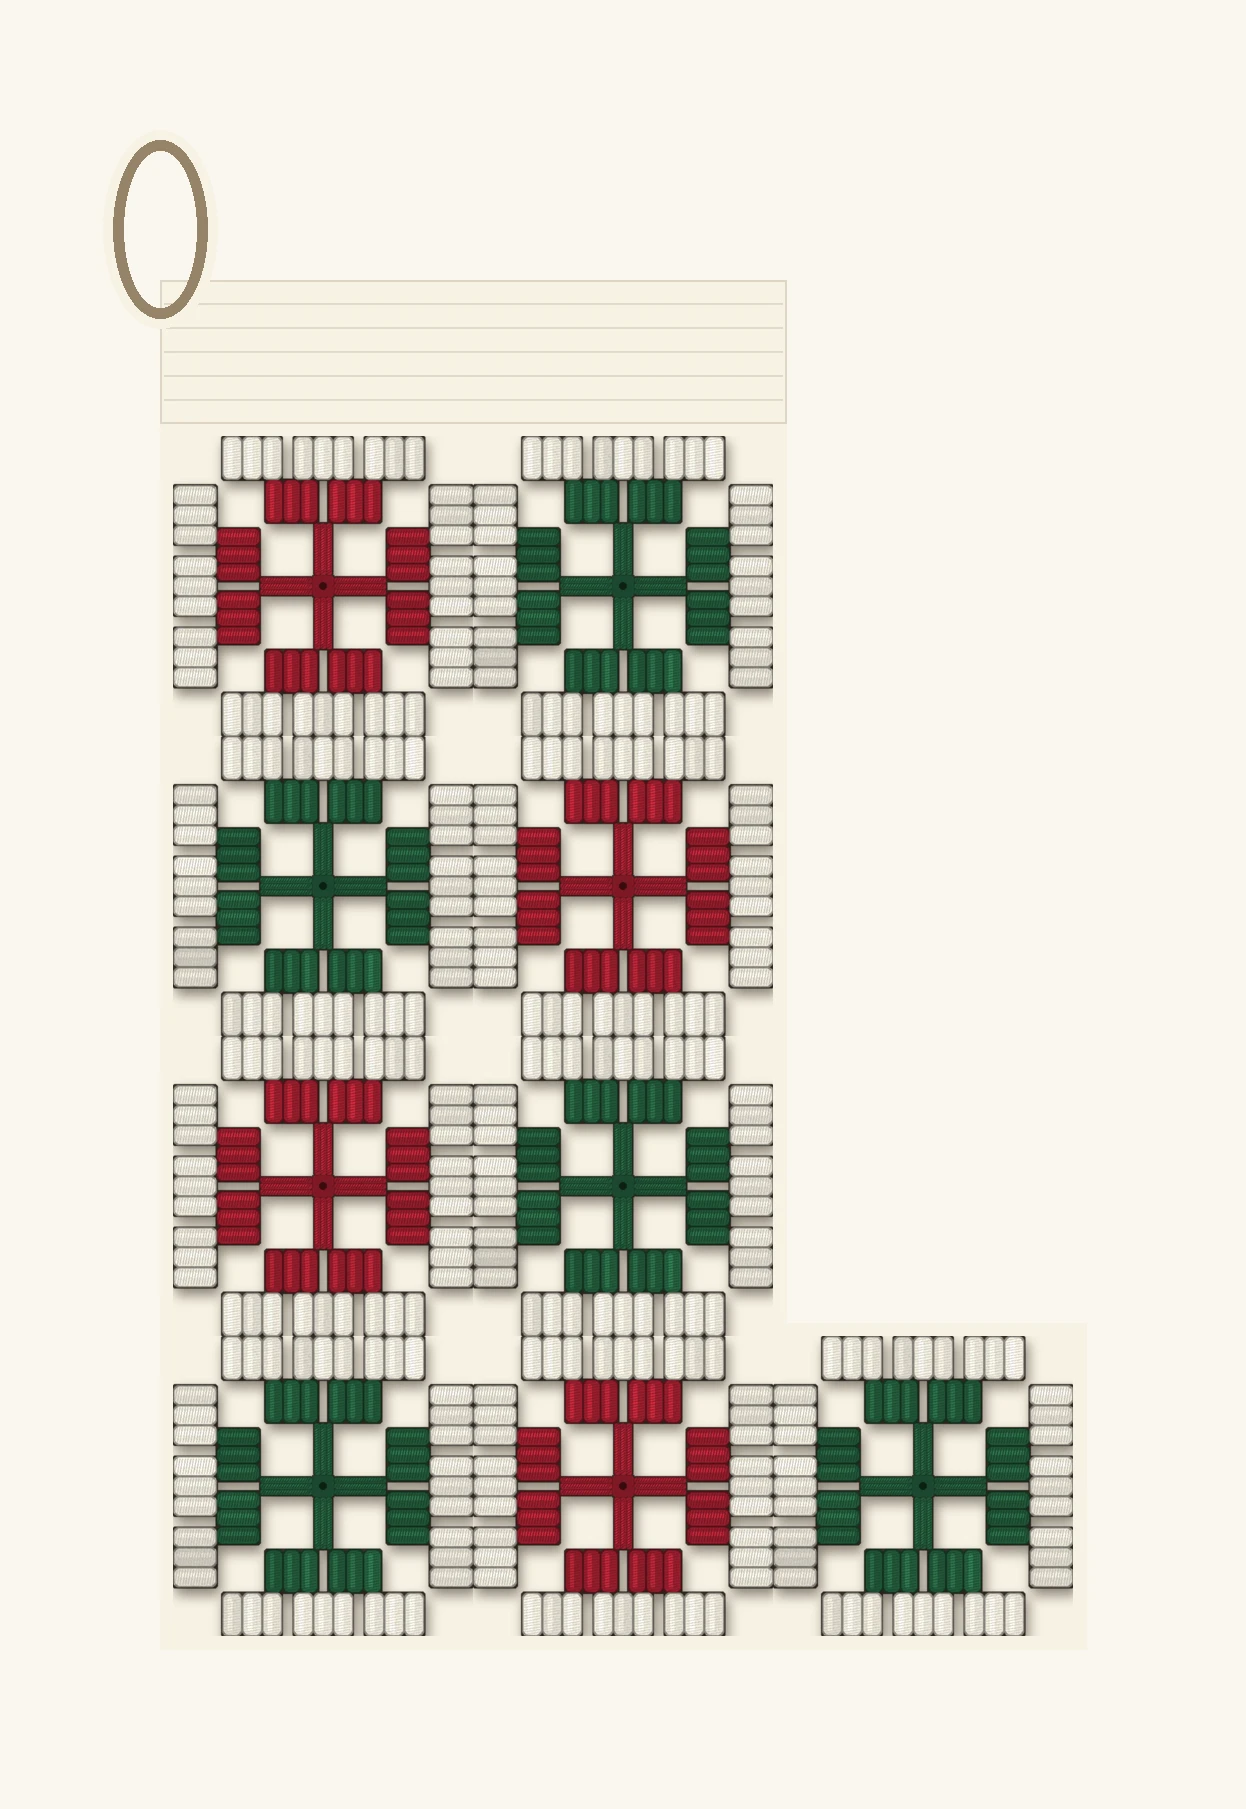
Front panel, right side facing you: center colors, top row first, left to right (— = no square)
- Row 1
- cranberry red, pine green, —
- Row 2
- pine green, cranberry red, —
- Row 3
- cranberry red, pine green, —
- Row 4
- pine green, cranberry red, pine green
Back panel, right side facing you: center colors, top row first, left to right (— = no square)
- Row 1
- —, pine green, cranberry red
- Row 2
- —, cranberry red, pine green
- Row 3
- —, pine green, cranberry red
- Row 4
- pine green, cranberry red, pine green
✓ CookZya original design · Stitch counts checked round by round — Stitch counts checked round by round by our simulator. This pattern has not been crocheted and swatched by a person: size, yarn and time are estimates, and your stocking will differ a little.
Materials
- Color R — cranberry red, about 50 yd
- Color G — pine green, about 60 yd
- Color W — cream, about 170 yd
- Yarn needle, scissors, stitch markers.
Notes
- US crochet terms. ch = chain, sl st = slip stitch, sc = single crochet, hdc = half double crochet, dc = double crochet, sp = space, st(s) = stitch(es), rep = repeat, Rnd = round, sc2tog = single crochet 2 together.
- Magic ring: wrap the yarn twice around two fingers, insert the hook under the strands, pull up a loop and ch 1 to lock it. Prefer a chain ring? Ch 4, sl st in the first ch.
- Ch 3 (counts as a dc): the 3 chains at the start of a round stand in for the first dc; you join in the top (3rd chain) of it.
- Sc2tog over 2 corner sps: insert the hook in the first sp, yarn over and pull up a loop, insert the hook in the next sp, yarn over and pull up a loop, yarn over and pull through all 3 loops.
- Block all 18 squares to the same size before joining: pin each square to 3 3/4 in, mist it and let it dry.
Charts and plans
Granny square
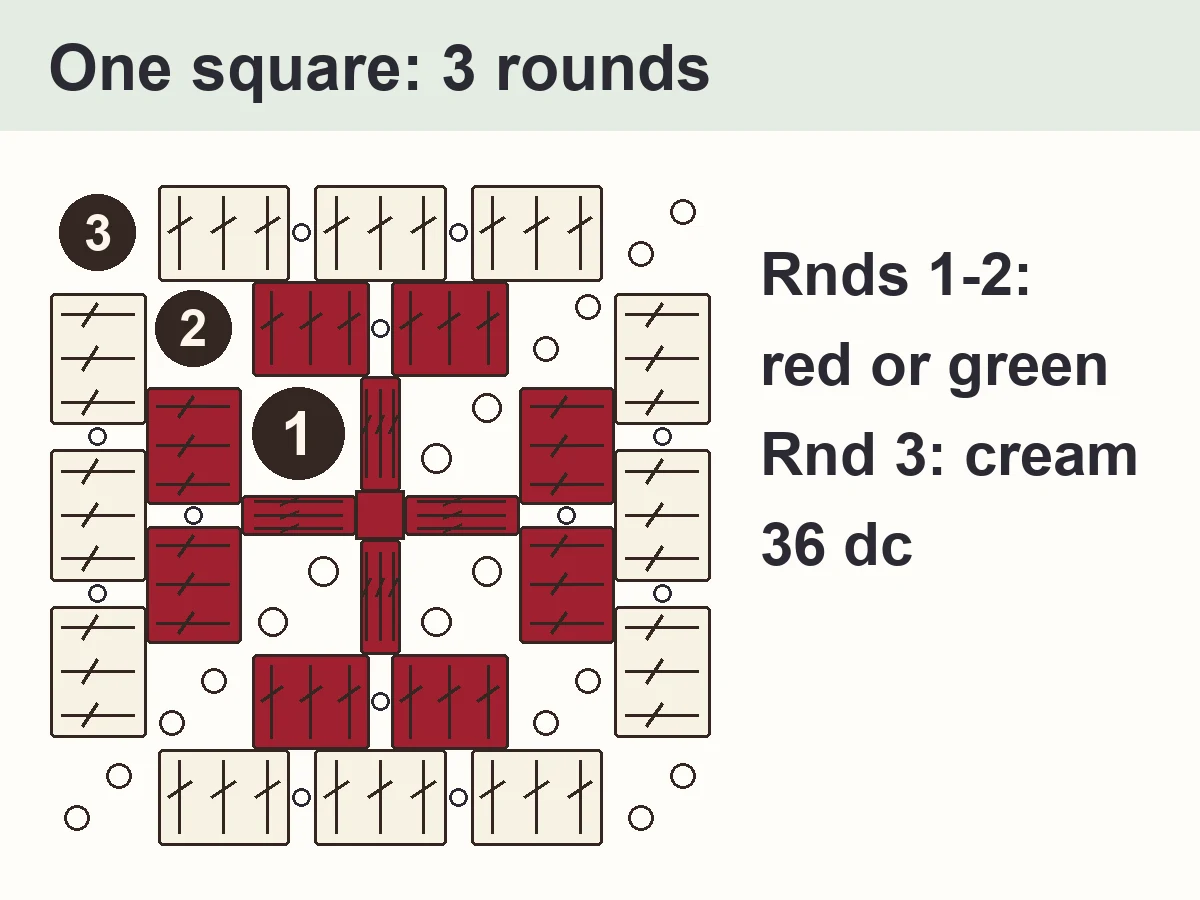
Make 8 squares with red centers and 10 with green centers. Right side facing you; you never turn.
- With red or green (see the panel charts), make a magic ring. Ch 3 (counts as the first dc), 2 dc in the ring, ch 2. *3 dc in the ring, ch 2; rep from * 2 more times. Pull the tail to close the ring. Join with sl st in the top of the beginning ch-3 (12 dc in 4 groups, 4 ch-2 corner sps). 12 dc, 4 ch-2 sps
- Sl st in each of next 2 dc and in the next ch-2 sp. Ch 3 (counts as a dc), (2 dc, ch 2, 3 dc) in the same sp, ch 1 (it goes over the 3 dc of Rnd 1), *(3 dc, ch 2, 3 dc) in the next ch-2 sp, ch 1; rep from * 2 more times. Join with sl st in the top of the beginning ch-3 (24 dc in 8 groups, 4 ch-2 corner sps, 4 ch-1 sps). Fasten off, leaving a 6-inch tail. 24 dc, 4 ch-2 sps, 4 ch-1 sps
- Join cream with sl st in any ch-2 corner sp. Ch 3 (counts as a dc), (2 dc, ch 2, 3 dc) in the same sp, ch 1, *3 dc in the next ch-1 sp, ch 1, (3 dc, ch 2, 3 dc) in the next ch-2 sp, ch 1; rep from * 2 more times. Last side: 3 dc in the next ch-1 sp, ch 1. Join with sl st in the top of the beginning ch-3 (36 dc in 12 groups, 4 ch-2 corner sps, 8 ch-1 sps). Fasten off, leaving a 6-inch tail. 36 dc, 4 ch-2 sps, 8 ch-1 sps
Joining row
After joining the squares of each panel (see How to join).
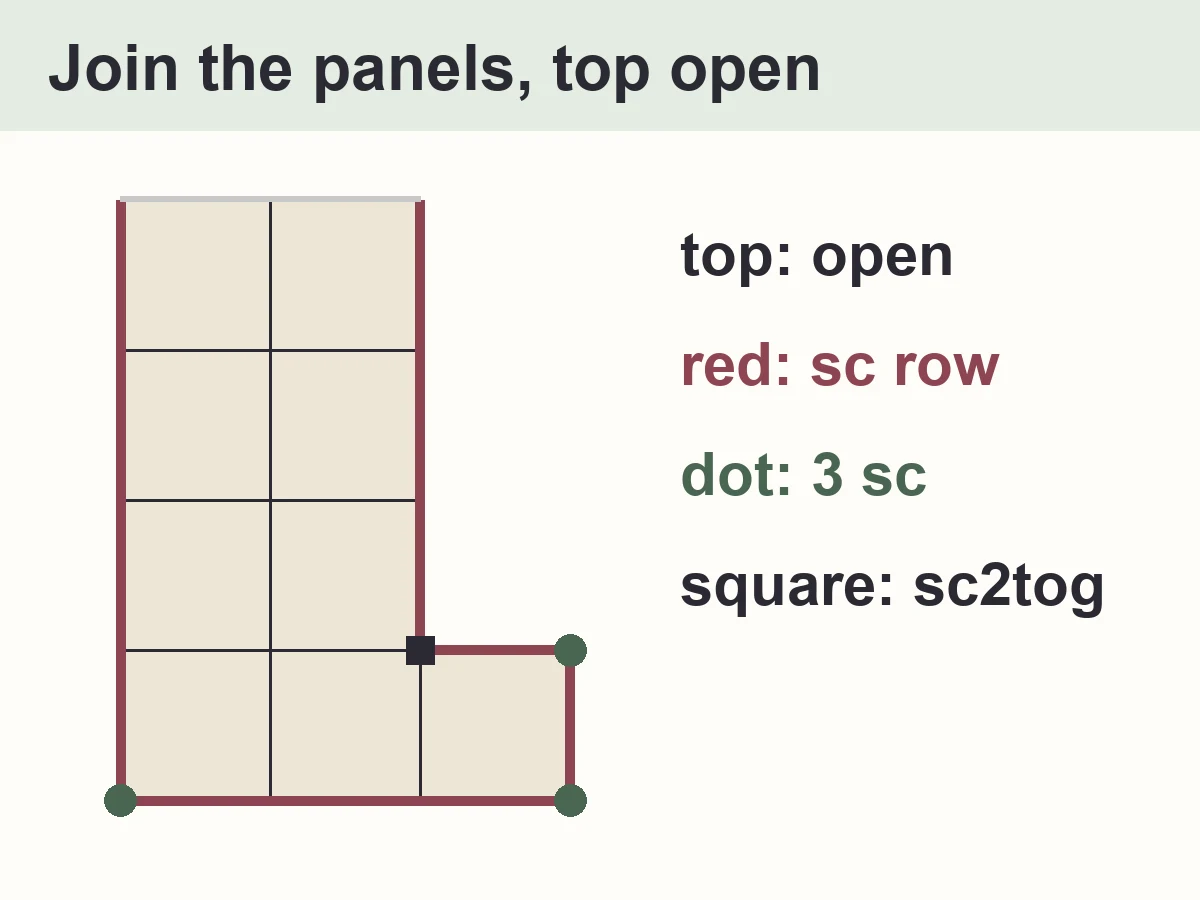
- Hold the 2 panels wrong sides together, edges even, the front facing you, the toe to your right. Join cream through both layers at the top corner of the heel side (the left side). Ch 1 (does not count as a stitch). Work every stitch through both layers: sc in each dc and in each ch-1 sp; at a seam between 2 squares, 1 sc in each of the 2 corner sps. In order: 1 sc in the corner sp at the top of the heel side; down the heel side (the long left edge, the back of the leg: 4 squares): 50 sc; 3 sc in the corner sp; along the sole (3 squares): 37 sc; 3 sc in the corner sp; up the end of the toe (1 square): 11 sc; 3 sc in the corner sp; along the top of the toe (1 square): 11 sc; sc2tog over the top-left corner sp of the toe square and the bottom-right corner sp of the leg square at the inner corner of the L; up the instep side (the right edge of the leg, above the toe: 3 squares): 37 sc; 1 sc in the corner sp at the top of the instep side. Do not join and do not turn (158 sc). The top stays open. Do not fasten off: go straight on to Cuff Rnd 1. 158 sc
Cuff
Around the top opening, in cream.
- Turn the stocking so the opening is at the top and the front faces you; the hook is at the top of the instep side (right). Ch 1 (does not count as a stitch), sc in the top of the last sc you made. Working along the top of the front panel, then the back panel: sc in each dc and in each ch-1 sp, 1 sc in each of the 2 corner sps of the middle seam of each panel, and 1 sc in the top of the first sc of the joining row on the heel side, between the panels. Join with sl st in the first sc (50 sc). The cuff stands straight up; it is not folded over. 50 sc
- Ch 2 (does not count as a stitch), hdc in the same st and in each st around. Join with sl st in the first hdc (50 hdc). 50 hdc
- Ch 2 (does not count as a stitch), hdc in the same st and in each st around. Join with sl st in the first hdc (50 hdc). 50 hdc
- Ch 2 (does not count as a stitch), hdc in the same st and in each st around. Join with sl st in the first hdc (50 hdc). 50 hdc
- Ch 2 (does not count as a stitch), hdc in the same st and in each st around. Join with sl st in the first hdc (50 hdc). 50 hdc
- Ch 2 (does not count as a stitch), hdc in the same st and in each st around. Join with sl st in the first hdc (50 hdc). Fasten off. 50 hdc
Hanging loop
On the heel side.
- Join cream with sl st in the 26th hdc of the last cuff round (right above the heel-side seam). Ch 16, sl st in the same st to make the hanging loop. Fasten off and weave the tail through the loop chain to strengthen it. ch 16
How to join the squares

1 Lay out each panel
2 Join the squares of each panel
3 Join the 2 panels
4 Add the cuff and the loop
5 Weave in and block
Finishing
Check that every end is woven in and every seam is closed. A stocking is decoration: do not fill it with heavy gifts.
Design notes
- The checkerboard is symmetric enough that the back panel is just the front mirrored.
- Joining the panels with one cream row hides the seam in the cream outer rounds of the squares.
Tips
- Make all the red-center squares first, then the green ones: fewer color changes.
- Weave in the ends of each square as you finish it.
- Mark the toe with a stitch marker so both panels face the right way.
Common mistakes
- Laying out the back panel the same way as the front: the toes would point in opposite directions.
- Working into the top of the stitches instead of into the spaces on the square rounds.
- Pulling the slip-stitch seams tight: the panels pucker.
Make it your own
- All red or all green centers for a calmer stocking.
- A taller leg: add one row of 2 squares to each panel (the joining row then has 26 more sc).
- Name tag: embroider a name on the cuff with a yarn needle.
Care
- Follow the yarn label; hand wash and dry flat is safest for a decoration.
More granny square patterns
- How to Crochet a Granny Square — new to granny squares? Start here, one picture per round
- Granny Square Christmas Tree Ornament — 3 small squares folded into a tree for the same mantel
- Christmas Granny Square Blanket — the same Christmas colors on a blanket
FAQ
How do you make a granny square Christmas stocking?
Crochet 18 three-round granny squares (8 with red centers, 10 with green), join them into 2 L-shaped panels of 9, hold the panels wrong sides together and close them with one cream sc row, then add a 6-round cream cuff and a hanging loop.
How many granny squares do I need for a Christmas stocking?
18 three-round squares: 9 for the front and 9 for the back (8 with red centers, 10 with green centers).
How big is this granny square stocking?
About 8 in wide and 17 1/4 in tall with the cuff, with worsted yarn and a US H-8 hook (an estimate: your tension decides).
How much yarn do I need?
About 50 yd of red, 60 yd of green and 170 yd of cream worsted weight yarn, estimates with a 30 % margin.
Can I sell the stockings I make?
Yes, you may sell what you crochet. Please don't sell or repost the pattern; link to this page.
Copyright
© 2026 CookZya. Free for personal use: you may make and sell what you crochet. Please don't sell, copy or repost this pattern; link to it instead.