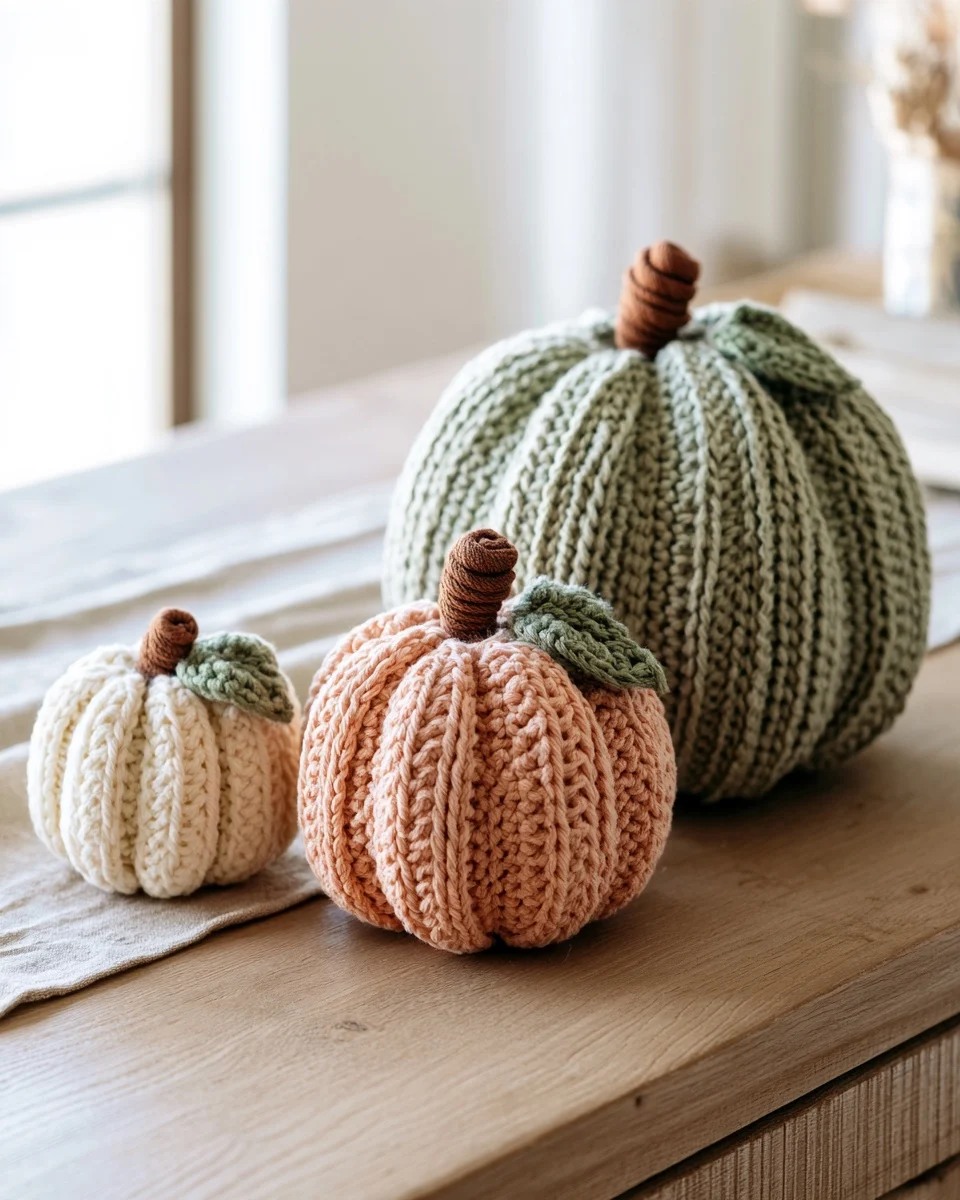
This easy crochet pumpkin starts as a flat rectangle. Each row has short stitches at both ends and taller double crochets in the middle, all worked in the back loop so that ribs form on their own. Sew it into a tube, gather the bottom, stuff it, then gather the top: the taller middle pushes out into a round pumpkin.
There are three sizes, one per yarn weight: Small is about 4 in across and 3.5 in tall in worsted, Medium is about 6 in across and 5 in tall in bulky and Large is about 8 in across and 7 in tall in super bulky. Make one of each for a fall table or a mantel.
Every stitch count was checked by our stitch simulator; the pattern has not been crochet-tested yet. Tick each row as you go — your progress stays saved in this browser.
- Sizes
- Small, Medium and Large — one yarn weight each
- Level
- Easy — sc, hdc and dc in rows, then simple sewing
- Time
- About 1 to 2 hours, estimated (not timed)
- Gauge
- Suggested only, not swatched: 16 sc = 4 in in worsted weight, 12 sc = 4 in in bulky weight, 8 sc = 4 in in super bulky weight
- Other materials
- Fiberfill stuffing, yarn needle, scissors
Sizes
Small — about 4 in across and 3.5 in tall
- Yarn
- Worsted weight (#4)
- Hook
- US H-8 (5.0 mm)
- Stitches per row
- 24 (sc 5 · hdc 4 · dc 6 · hdc 4 · sc 5)
- Rows
- 30
- Yarn needed
- about 45 yd main color, 5 yd brown, 5 yd green
- Finished size
- about 4 in across and 3.5 in tall (approximate)
- Check before seaming
- about 12.5 in, measured along the center (dc) band
Medium — about 6 in across and 5 in tall
- Yarn
- Bulky weight (#5)
- Hook
- US J-10 (6.0 mm)
- Stitches per row
- 26 (sc 5 · hdc 4 · dc 8 · hdc 4 · sc 5)
- Rows
- 34
- Yarn needed
- about 75 yd main color, 5 yd brown, 5 yd green
- Finished size
- about 6 in across and 5 in tall (approximate)
- Check before seaming
- about 19 in, measured along the center (dc) band
Large — about 8 in across and 7 in tall
- Yarn
- Super bulky weight (#6)
- Hook
- US M/N-13 (9.0 mm)
- Stitches per row
- 24 (sc 5 · hdc 4 · dc 6 · hdc 4 · sc 5)
- Rows
- 30
- Yarn needed
- about 90 yd main color, 5 yd brown, 5 yd green
- Finished size
- about 8 in across and 7 in tall (approximate)
- Check before seaming
- about 25 in, measured along the center (dc) band
✓ CookZya original design · Stitch counts checked row by row — shape and size not tested. All 104 rows and foundation chains of the three sizes, the stem and the leaf were replayed by our stitch simulator; because every row of the rectangle is the same, this checks the stitch counts, not the 3D shape. This pattern has not been crochet-tested: tension, gauge and final size are up to your hands.
Materials
- Color A — main color, any shade (Small / Medium / Large), about 45 / 75 / 90 yd
- Color B — brown, for the stem, about 5 / 5 / 5 yd
- Color C — green, for the leaf (optional), about 5 / 5 / 5 yd
- Yardage is estimated from the stitch counts with a 20 % margin, for one pumpkin.
- Acrylic or a wool blend is best: soft, light and it holds the ribs.
- Fiberfill stuffing, a yarn needle and scissors.
Notes
- Small and Large use the same stitch counts; only the yarn and hook change, which changes the size.
- US crochet terms. ch = chain, sc = single crochet, hdc = half double crochet, dc = double crochet, BLO = back loop only, st(s) = stitch(es).
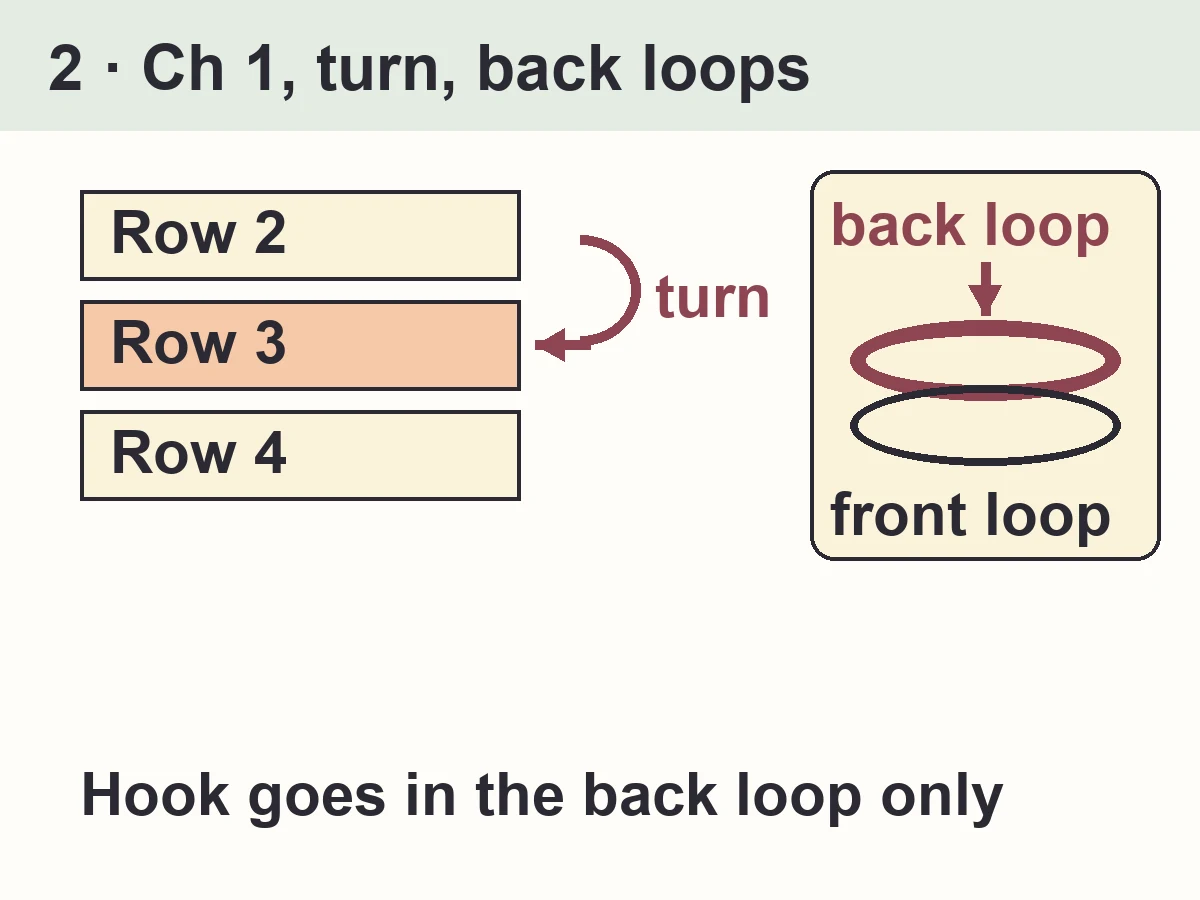
- Row 1 is worked into the chain. From Row 2 on, every stitch goes in the back loop only.
- The ch 1 at the start of a row does not count as a stitch. Every row ends on a sc.
- Each row goes from the bottom of the pumpkin to the top; the number of rows makes it go around.
How a row is built
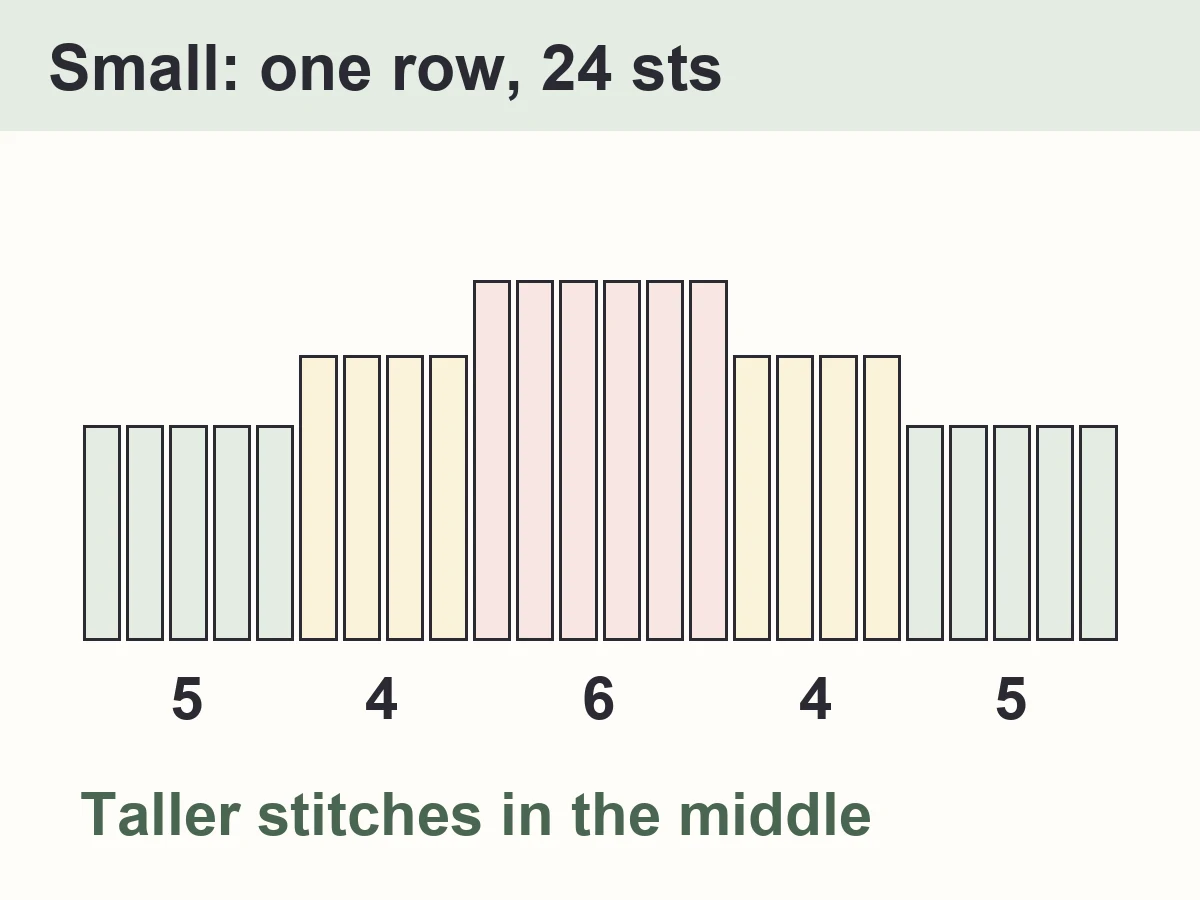
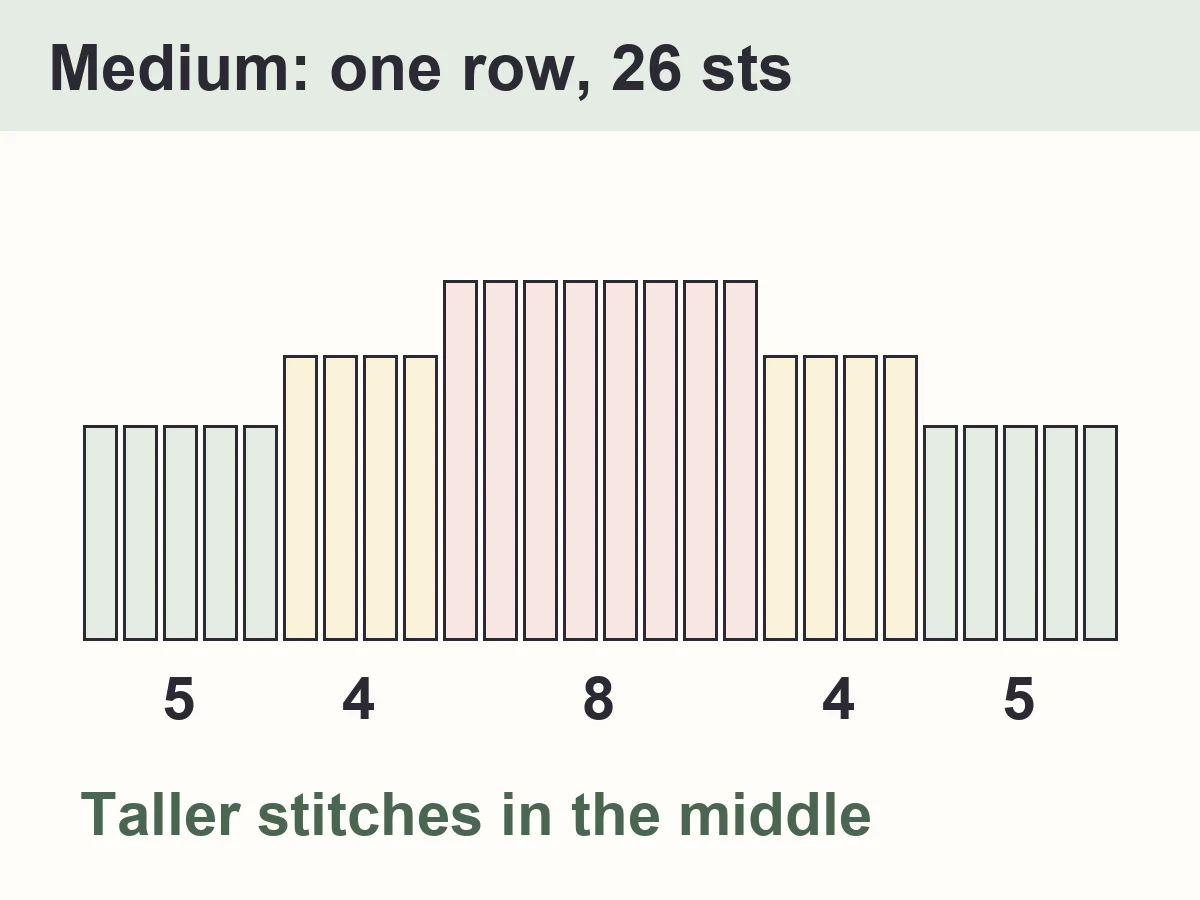
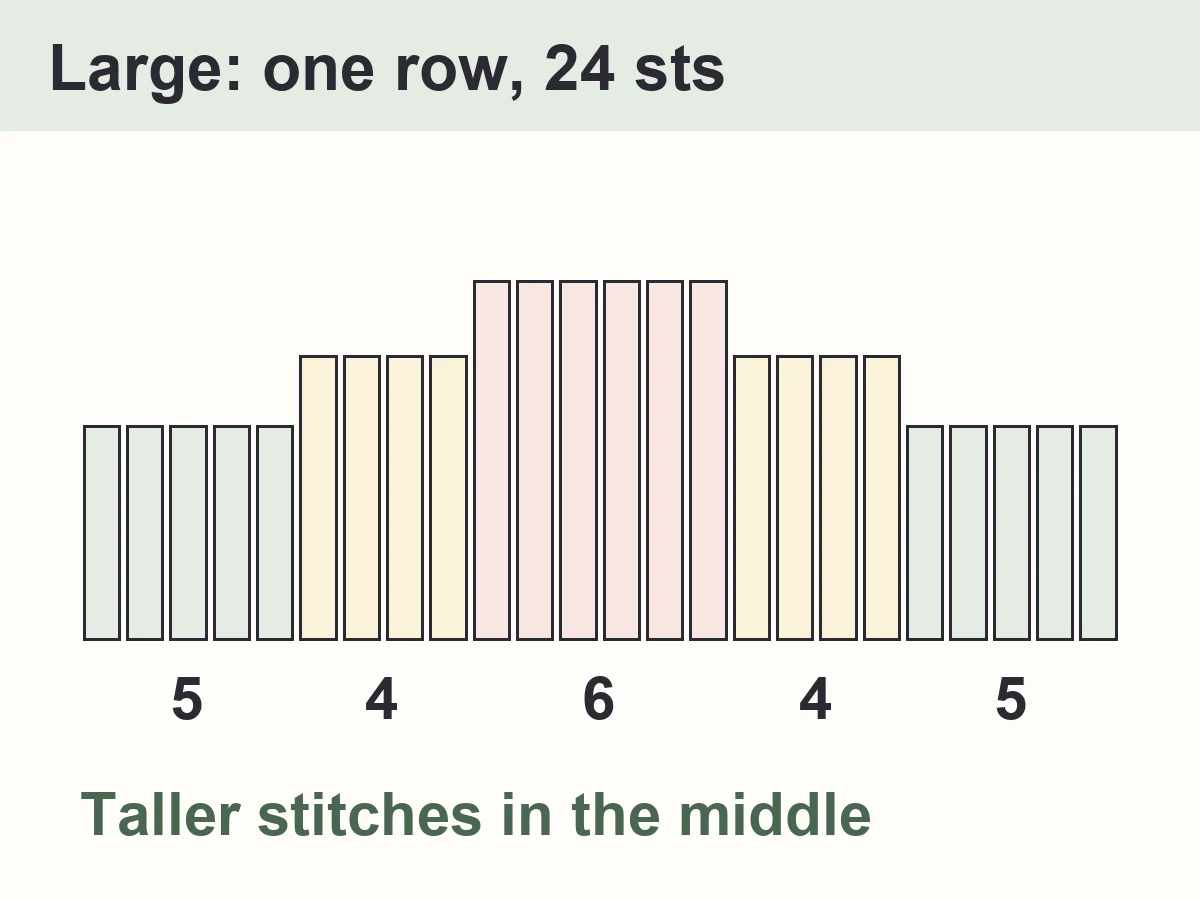
Small pumpkin rows
Worsted weight (#4), US H-8 (5.0 mm) hook. Work 30 rows, then check the length (about 12.5 in, measured along the center (dc) band) before you seam. Too short? Add rows. Too long? Stop sooner. Every row is the same, so any number of rows works; end with the fasten-off.
- With A, ch 25. 25 ch
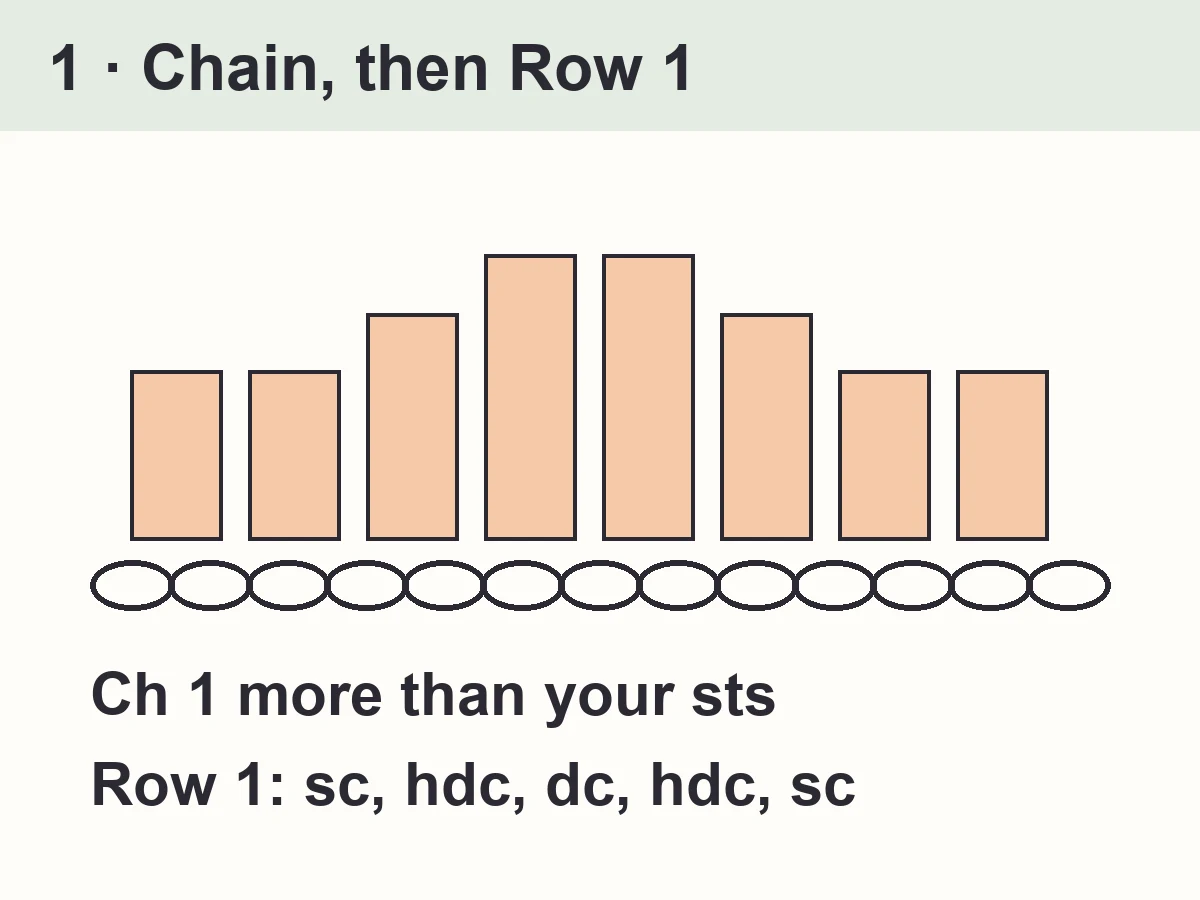
- Sc in 2nd ch from hook and in each of next 4 ch, hdc in each of next 4 ch, dc in each of next 6 ch, hdc in each of next 4 ch, sc in each of last 5 ch (24 sts; last st = sc). 10 sc, 8 hdc, 6 dc
- Ch 1 (does not count as a stitch), turn. Working in back loops only: sc in each of next 5 sts, hdc in each of next 4 sts, dc in each of next 6 sts, hdc in each of next 4 sts, sc in each of last 5 sts (24 sts; last st = sc). 10 sc, 8 hdc, 6 dc
- Ch 1, turn. Repeat Row 2 in back loops only (24 sts; last st = sc). 10 sc, 8 hdc, 6 dc
- Ch 1, turn. Repeat Row 2 in back loops only (24 sts; last st = sc). 10 sc, 8 hdc, 6 dc
- Ch 1, turn. Repeat Row 2 in back loops only (24 sts; last st = sc). 10 sc, 8 hdc, 6 dc
- Ch 1, turn. Repeat Row 2 in back loops only (24 sts; last st = sc). 10 sc, 8 hdc, 6 dc
- Ch 1, turn. Repeat Row 2 in back loops only (24 sts; last st = sc). 10 sc, 8 hdc, 6 dc
- Ch 1, turn. Repeat Row 2 in back loops only (24 sts; last st = sc). 10 sc, 8 hdc, 6 dc
- Ch 1, turn. Repeat Row 2 in back loops only (24 sts; last st = sc). 10 sc, 8 hdc, 6 dc
- Ch 1, turn. Repeat Row 2 in back loops only (24 sts; last st = sc). 10 sc, 8 hdc, 6 dc
- Ch 1, turn. Repeat Row 2 in back loops only (24 sts; last st = sc). 10 sc, 8 hdc, 6 dc
- Ch 1, turn. Repeat Row 2 in back loops only (24 sts; last st = sc). 10 sc, 8 hdc, 6 dc
- Ch 1, turn. Repeat Row 2 in back loops only (24 sts; last st = sc). 10 sc, 8 hdc, 6 dc
- Ch 1, turn. Repeat Row 2 in back loops only (24 sts; last st = sc). 10 sc, 8 hdc, 6 dc
- Ch 1, turn. Repeat Row 2 in back loops only (24 sts; last st = sc). 10 sc, 8 hdc, 6 dc
- Ch 1, turn. Repeat Row 2 in back loops only (24 sts; last st = sc). 10 sc, 8 hdc, 6 dc
- Ch 1, turn. Repeat Row 2 in back loops only (24 sts; last st = sc). 10 sc, 8 hdc, 6 dc
- Ch 1, turn. Repeat Row 2 in back loops only (24 sts; last st = sc). 10 sc, 8 hdc, 6 dc
- Ch 1, turn. Repeat Row 2 in back loops only (24 sts; last st = sc). 10 sc, 8 hdc, 6 dc
- Ch 1, turn. Repeat Row 2 in back loops only (24 sts; last st = sc). 10 sc, 8 hdc, 6 dc
- Ch 1, turn. Repeat Row 2 in back loops only (24 sts; last st = sc). 10 sc, 8 hdc, 6 dc
- Ch 1, turn. Repeat Row 2 in back loops only (24 sts; last st = sc). 10 sc, 8 hdc, 6 dc
- Ch 1, turn. Repeat Row 2 in back loops only (24 sts; last st = sc). 10 sc, 8 hdc, 6 dc
- Ch 1, turn. Repeat Row 2 in back loops only (24 sts; last st = sc). 10 sc, 8 hdc, 6 dc
- Ch 1, turn. Repeat Row 2 in back loops only (24 sts; last st = sc). 10 sc, 8 hdc, 6 dc
- Ch 1, turn. Repeat Row 2 in back loops only (24 sts; last st = sc). 10 sc, 8 hdc, 6 dc
- Ch 1, turn. Repeat Row 2 in back loops only (24 sts; last st = sc). 10 sc, 8 hdc, 6 dc
- Ch 1, turn. Repeat Row 2 in back loops only (24 sts; last st = sc). 10 sc, 8 hdc, 6 dc
- Ch 1, turn. Repeat Row 2 in back loops only (24 sts; last st = sc). 10 sc, 8 hdc, 6 dc
- Ch 1, turn. Repeat Row 2 in back loops only (24 sts; last st = sc). Fasten off, leaving a 24 in tail for the seam. 10 sc, 8 hdc, 6 dc
Medium pumpkin rows
Bulky weight (#5), US J-10 (6.0 mm) hook. Work 34 rows, then check the length (about 19 in, measured along the center (dc) band) before you seam. Too short? Add rows. Too long? Stop sooner. Every row is the same, so any number of rows works; end with the fasten-off.
- With A, ch 27. 27 ch
- Sc in 2nd ch from hook and in each of next 4 ch, hdc in each of next 4 ch, dc in each of next 8 ch, hdc in each of next 4 ch, sc in each of last 5 ch (26 sts; last st = sc). 10 sc, 8 hdc, 8 dc
- Ch 1 (does not count as a stitch), turn. Working in back loops only: sc in each of next 5 sts, hdc in each of next 4 sts, dc in each of next 8 sts, hdc in each of next 4 sts, sc in each of last 5 sts (26 sts; last st = sc). 10 sc, 8 hdc, 8 dc
- Ch 1, turn. Repeat Row 2 in back loops only (26 sts; last st = sc). 10 sc, 8 hdc, 8 dc
- Ch 1, turn. Repeat Row 2 in back loops only (26 sts; last st = sc). 10 sc, 8 hdc, 8 dc
- Ch 1, turn. Repeat Row 2 in back loops only (26 sts; last st = sc). 10 sc, 8 hdc, 8 dc
- Ch 1, turn. Repeat Row 2 in back loops only (26 sts; last st = sc). 10 sc, 8 hdc, 8 dc
- Ch 1, turn. Repeat Row 2 in back loops only (26 sts; last st = sc). 10 sc, 8 hdc, 8 dc
- Ch 1, turn. Repeat Row 2 in back loops only (26 sts; last st = sc). 10 sc, 8 hdc, 8 dc
- Ch 1, turn. Repeat Row 2 in back loops only (26 sts; last st = sc). 10 sc, 8 hdc, 8 dc
- Ch 1, turn. Repeat Row 2 in back loops only (26 sts; last st = sc). 10 sc, 8 hdc, 8 dc
- Ch 1, turn. Repeat Row 2 in back loops only (26 sts; last st = sc). 10 sc, 8 hdc, 8 dc
- Ch 1, turn. Repeat Row 2 in back loops only (26 sts; last st = sc). 10 sc, 8 hdc, 8 dc
- Ch 1, turn. Repeat Row 2 in back loops only (26 sts; last st = sc). 10 sc, 8 hdc, 8 dc
- Ch 1, turn. Repeat Row 2 in back loops only (26 sts; last st = sc). 10 sc, 8 hdc, 8 dc
- Ch 1, turn. Repeat Row 2 in back loops only (26 sts; last st = sc). 10 sc, 8 hdc, 8 dc
- Ch 1, turn. Repeat Row 2 in back loops only (26 sts; last st = sc). 10 sc, 8 hdc, 8 dc
- Ch 1, turn. Repeat Row 2 in back loops only (26 sts; last st = sc). 10 sc, 8 hdc, 8 dc
- Ch 1, turn. Repeat Row 2 in back loops only (26 sts; last st = sc). 10 sc, 8 hdc, 8 dc
- Ch 1, turn. Repeat Row 2 in back loops only (26 sts; last st = sc). 10 sc, 8 hdc, 8 dc
- Ch 1, turn. Repeat Row 2 in back loops only (26 sts; last st = sc). 10 sc, 8 hdc, 8 dc
- Ch 1, turn. Repeat Row 2 in back loops only (26 sts; last st = sc). 10 sc, 8 hdc, 8 dc
- Ch 1, turn. Repeat Row 2 in back loops only (26 sts; last st = sc). 10 sc, 8 hdc, 8 dc
- Ch 1, turn. Repeat Row 2 in back loops only (26 sts; last st = sc). 10 sc, 8 hdc, 8 dc
- Ch 1, turn. Repeat Row 2 in back loops only (26 sts; last st = sc). 10 sc, 8 hdc, 8 dc
- Ch 1, turn. Repeat Row 2 in back loops only (26 sts; last st = sc). 10 sc, 8 hdc, 8 dc
- Ch 1, turn. Repeat Row 2 in back loops only (26 sts; last st = sc). 10 sc, 8 hdc, 8 dc
- Ch 1, turn. Repeat Row 2 in back loops only (26 sts; last st = sc). 10 sc, 8 hdc, 8 dc
- Ch 1, turn. Repeat Row 2 in back loops only (26 sts; last st = sc). 10 sc, 8 hdc, 8 dc
- Ch 1, turn. Repeat Row 2 in back loops only (26 sts; last st = sc). 10 sc, 8 hdc, 8 dc
- Ch 1, turn. Repeat Row 2 in back loops only (26 sts; last st = sc). 10 sc, 8 hdc, 8 dc
- Ch 1, turn. Repeat Row 2 in back loops only (26 sts; last st = sc). 10 sc, 8 hdc, 8 dc
- Ch 1, turn. Repeat Row 2 in back loops only (26 sts; last st = sc). 10 sc, 8 hdc, 8 dc
- Ch 1, turn. Repeat Row 2 in back loops only (26 sts; last st = sc). 10 sc, 8 hdc, 8 dc
- Ch 1, turn. Repeat Row 2 in back loops only (26 sts; last st = sc). Fasten off, leaving a 36 in tail for the seam. 10 sc, 8 hdc, 8 dc
Large pumpkin rows
Super bulky weight (#6), US M/N-13 (9.0 mm) hook. Work 30 rows, then check the length (about 25 in, measured along the center (dc) band) before you seam. Too short? Add rows. Too long? Stop sooner. Every row is the same, so any number of rows works; end with the fasten-off.
- With A, ch 25. 25 ch
- Sc in 2nd ch from hook and in each of next 4 ch, hdc in each of next 4 ch, dc in each of next 6 ch, hdc in each of next 4 ch, sc in each of last 5 ch (24 sts; last st = sc). 10 sc, 8 hdc, 6 dc
- Ch 1 (does not count as a stitch), turn. Working in back loops only: sc in each of next 5 sts, hdc in each of next 4 sts, dc in each of next 6 sts, hdc in each of next 4 sts, sc in each of last 5 sts (24 sts; last st = sc). 10 sc, 8 hdc, 6 dc
- Ch 1, turn. Repeat Row 2 in back loops only (24 sts; last st = sc). 10 sc, 8 hdc, 6 dc
- Ch 1, turn. Repeat Row 2 in back loops only (24 sts; last st = sc). 10 sc, 8 hdc, 6 dc
- Ch 1, turn. Repeat Row 2 in back loops only (24 sts; last st = sc). 10 sc, 8 hdc, 6 dc
- Ch 1, turn. Repeat Row 2 in back loops only (24 sts; last st = sc). 10 sc, 8 hdc, 6 dc
- Ch 1, turn. Repeat Row 2 in back loops only (24 sts; last st = sc). 10 sc, 8 hdc, 6 dc
- Ch 1, turn. Repeat Row 2 in back loops only (24 sts; last st = sc). 10 sc, 8 hdc, 6 dc
- Ch 1, turn. Repeat Row 2 in back loops only (24 sts; last st = sc). 10 sc, 8 hdc, 6 dc
- Ch 1, turn. Repeat Row 2 in back loops only (24 sts; last st = sc). 10 sc, 8 hdc, 6 dc
- Ch 1, turn. Repeat Row 2 in back loops only (24 sts; last st = sc). 10 sc, 8 hdc, 6 dc
- Ch 1, turn. Repeat Row 2 in back loops only (24 sts; last st = sc). 10 sc, 8 hdc, 6 dc
- Ch 1, turn. Repeat Row 2 in back loops only (24 sts; last st = sc). 10 sc, 8 hdc, 6 dc
- Ch 1, turn. Repeat Row 2 in back loops only (24 sts; last st = sc). 10 sc, 8 hdc, 6 dc
- Ch 1, turn. Repeat Row 2 in back loops only (24 sts; last st = sc). 10 sc, 8 hdc, 6 dc
- Ch 1, turn. Repeat Row 2 in back loops only (24 sts; last st = sc). 10 sc, 8 hdc, 6 dc
- Ch 1, turn. Repeat Row 2 in back loops only (24 sts; last st = sc). 10 sc, 8 hdc, 6 dc
- Ch 1, turn. Repeat Row 2 in back loops only (24 sts; last st = sc). 10 sc, 8 hdc, 6 dc
- Ch 1, turn. Repeat Row 2 in back loops only (24 sts; last st = sc). 10 sc, 8 hdc, 6 dc
- Ch 1, turn. Repeat Row 2 in back loops only (24 sts; last st = sc). 10 sc, 8 hdc, 6 dc
- Ch 1, turn. Repeat Row 2 in back loops only (24 sts; last st = sc). 10 sc, 8 hdc, 6 dc
- Ch 1, turn. Repeat Row 2 in back loops only (24 sts; last st = sc). 10 sc, 8 hdc, 6 dc
- Ch 1, turn. Repeat Row 2 in back loops only (24 sts; last st = sc). 10 sc, 8 hdc, 6 dc
- Ch 1, turn. Repeat Row 2 in back loops only (24 sts; last st = sc). 10 sc, 8 hdc, 6 dc
- Ch 1, turn. Repeat Row 2 in back loops only (24 sts; last st = sc). 10 sc, 8 hdc, 6 dc
- Ch 1, turn. Repeat Row 2 in back loops only (24 sts; last st = sc). 10 sc, 8 hdc, 6 dc
- Ch 1, turn. Repeat Row 2 in back loops only (24 sts; last st = sc). 10 sc, 8 hdc, 6 dc
- Ch 1, turn. Repeat Row 2 in back loops only (24 sts; last st = sc). 10 sc, 8 hdc, 6 dc
- Ch 1, turn. Repeat Row 2 in back loops only (24 sts; last st = sc). 10 sc, 8 hdc, 6 dc
- Ch 1, turn. Repeat Row 2 in back loops only (24 sts; last st = sc). Fasten off, leaving a 42 in tail for the seam. 10 sc, 8 hdc, 6 dc
Stem
Same yarn weight as your pumpkin, in brown. Worked flat, then rolled.
- With B, ch 8. 8 ch
- Sc in 2nd ch from hook and in each ch across (7 sc). 7 sc
- Ch 1, turn. Sc in each st across (7 sc). 7 sc
- Ch 1, turn. Sc in each st across (7 sc). 7 sc
- Ch 1, turn. Sc in each st across (7 sc). Fasten off, leaving a 10 in tail. 7 sc
Leaf
Optional. Same yarn weight, in green.
- With C, ch 9. 9 ch
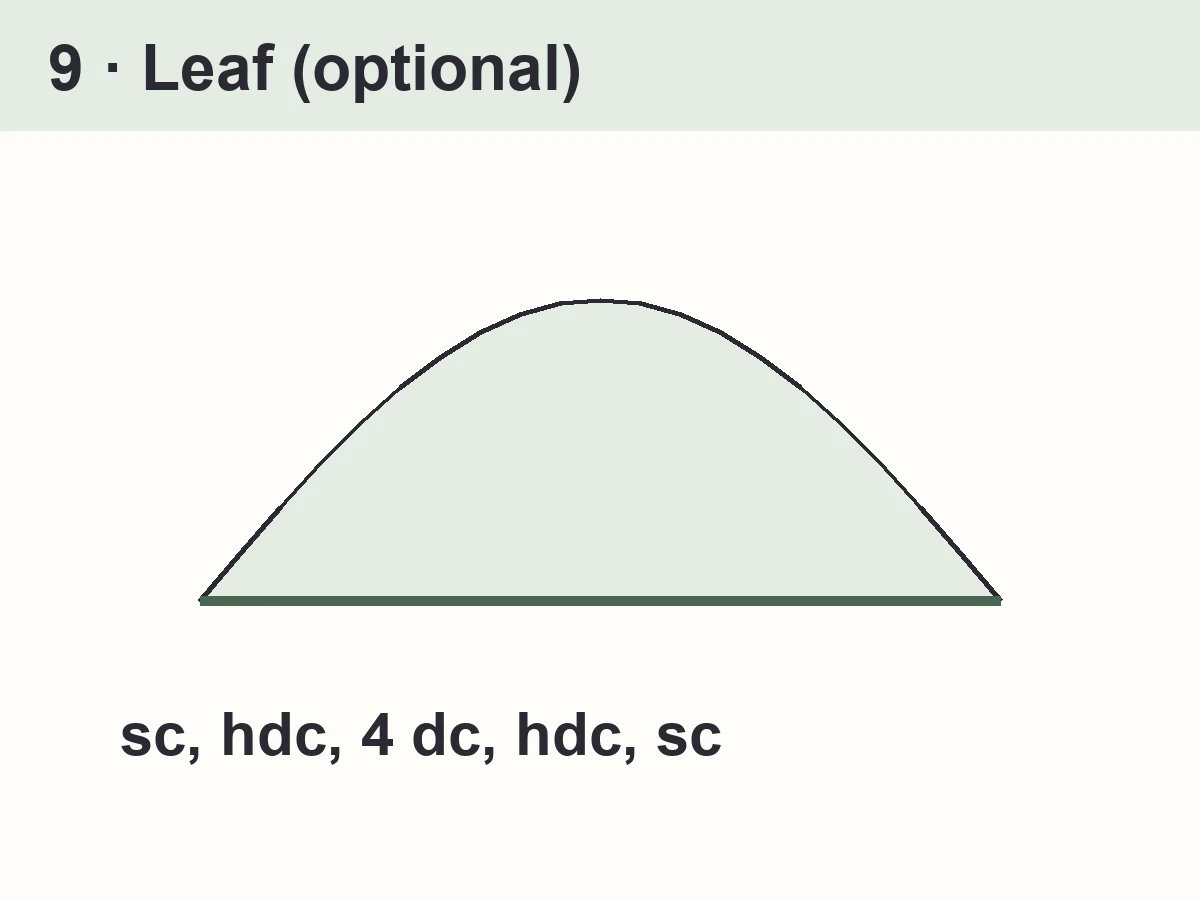
- Sc in 2nd ch from hook, hdc in next ch, dc in each of next 4 ch, hdc in next ch, sc in last ch (8 sts). Fasten off, leaving a 6 in tail. 2 sc, 2 hdc, 4 dc
Assembly, step by step
1 Chain and Row 1
2 Rows 2 to the end
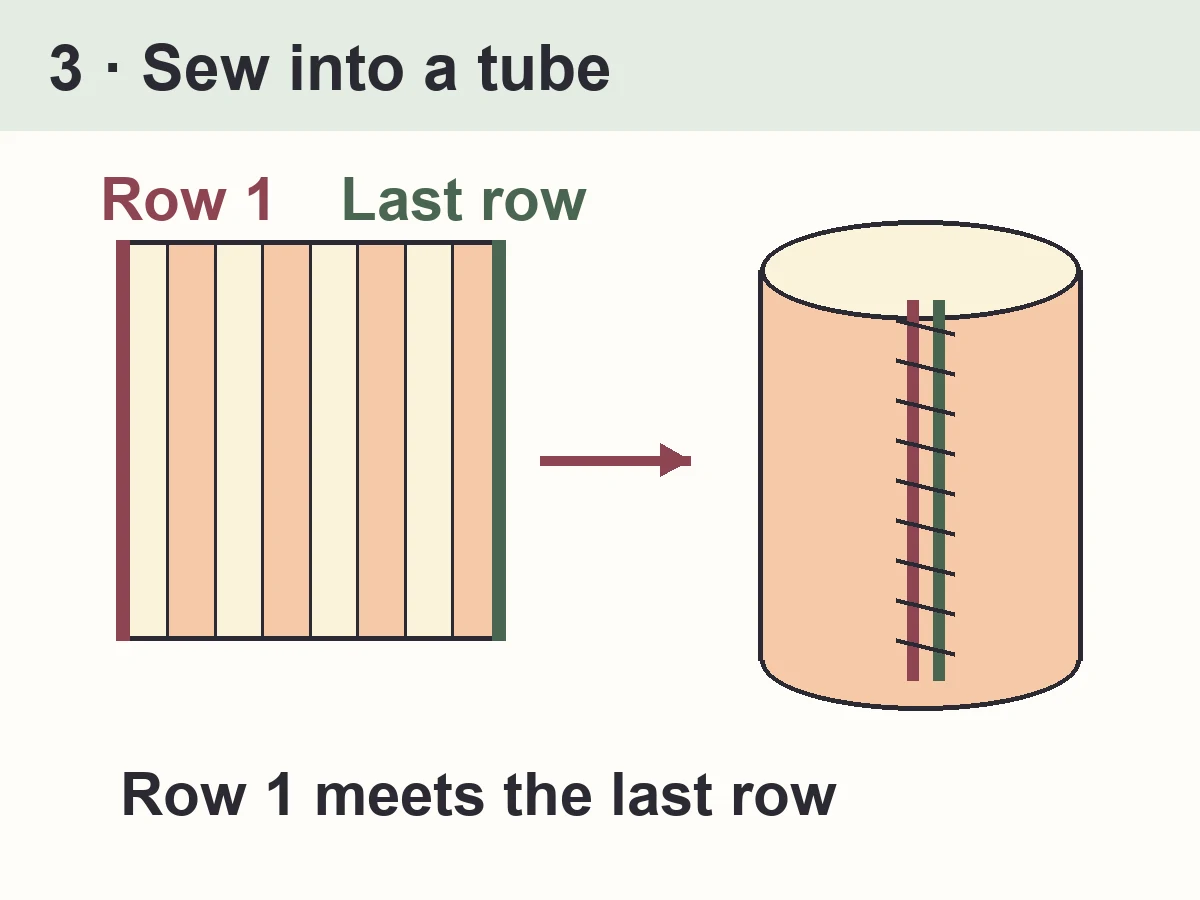
3 Sew the tube
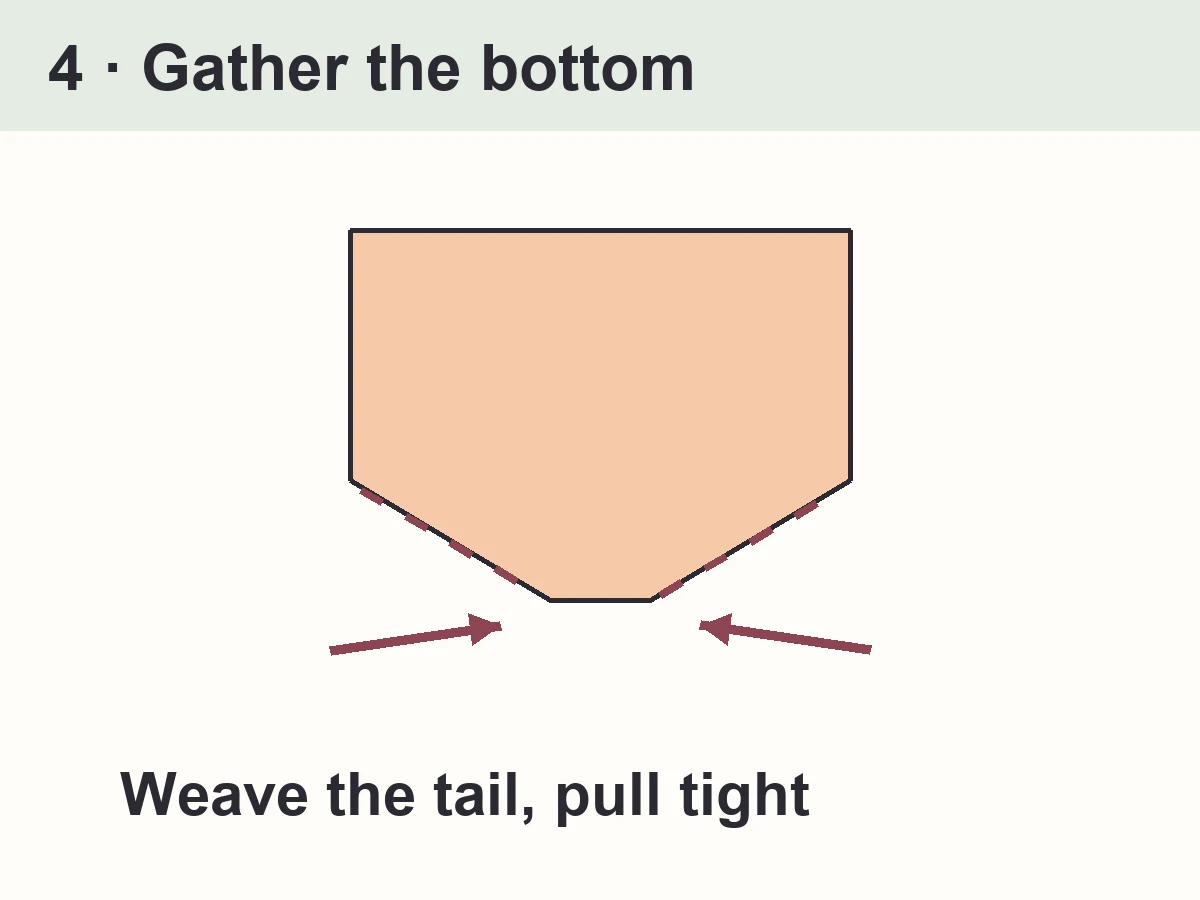
4 Gather the bottom
5 Stuff
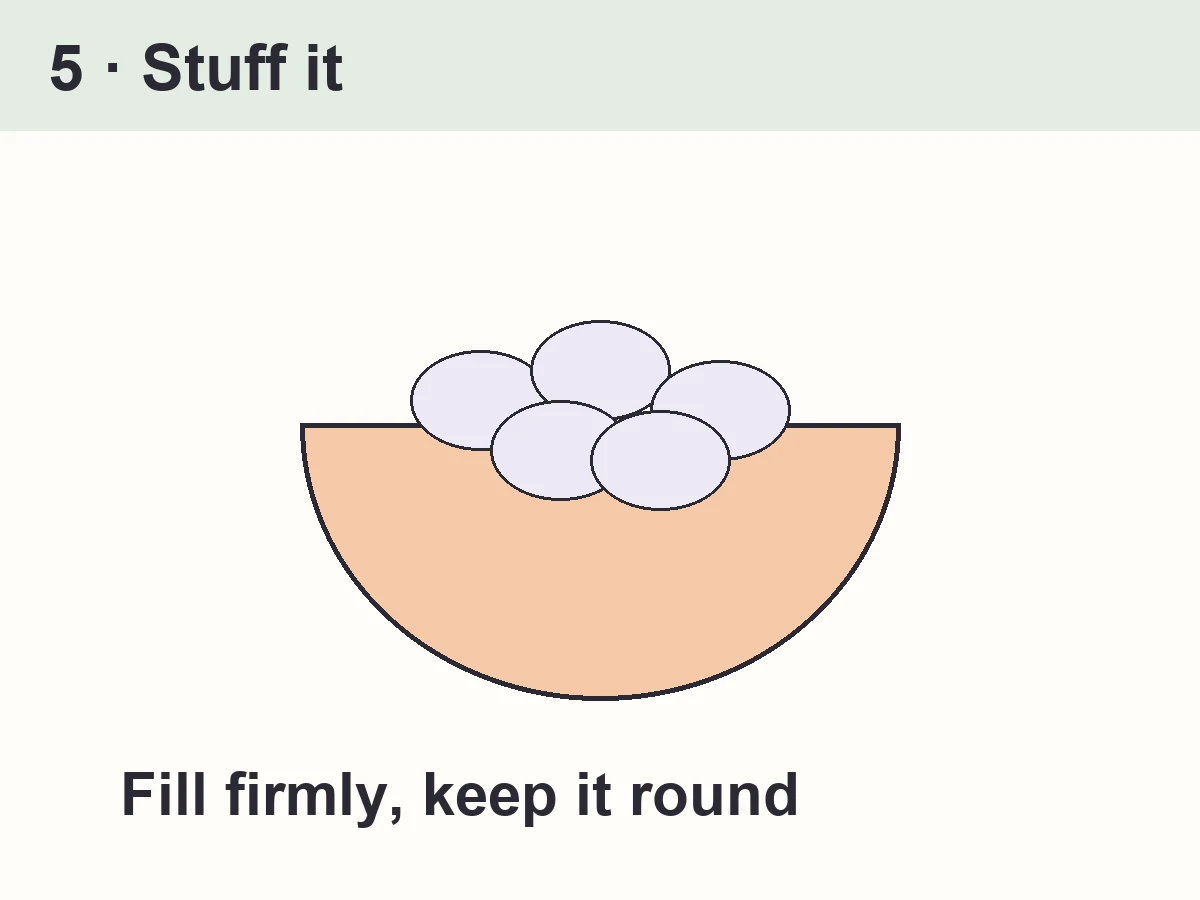
6 Gather the top
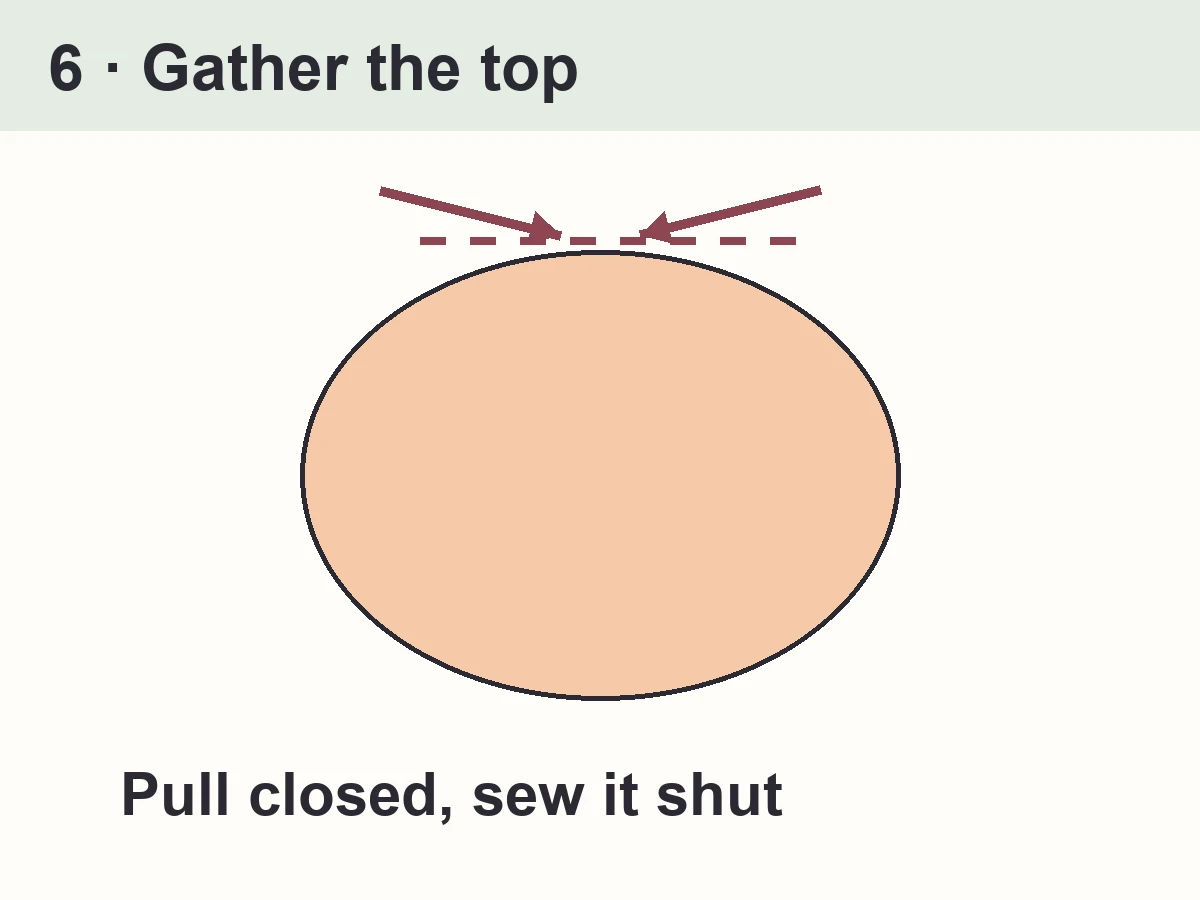
7 Shape the sections (optional)
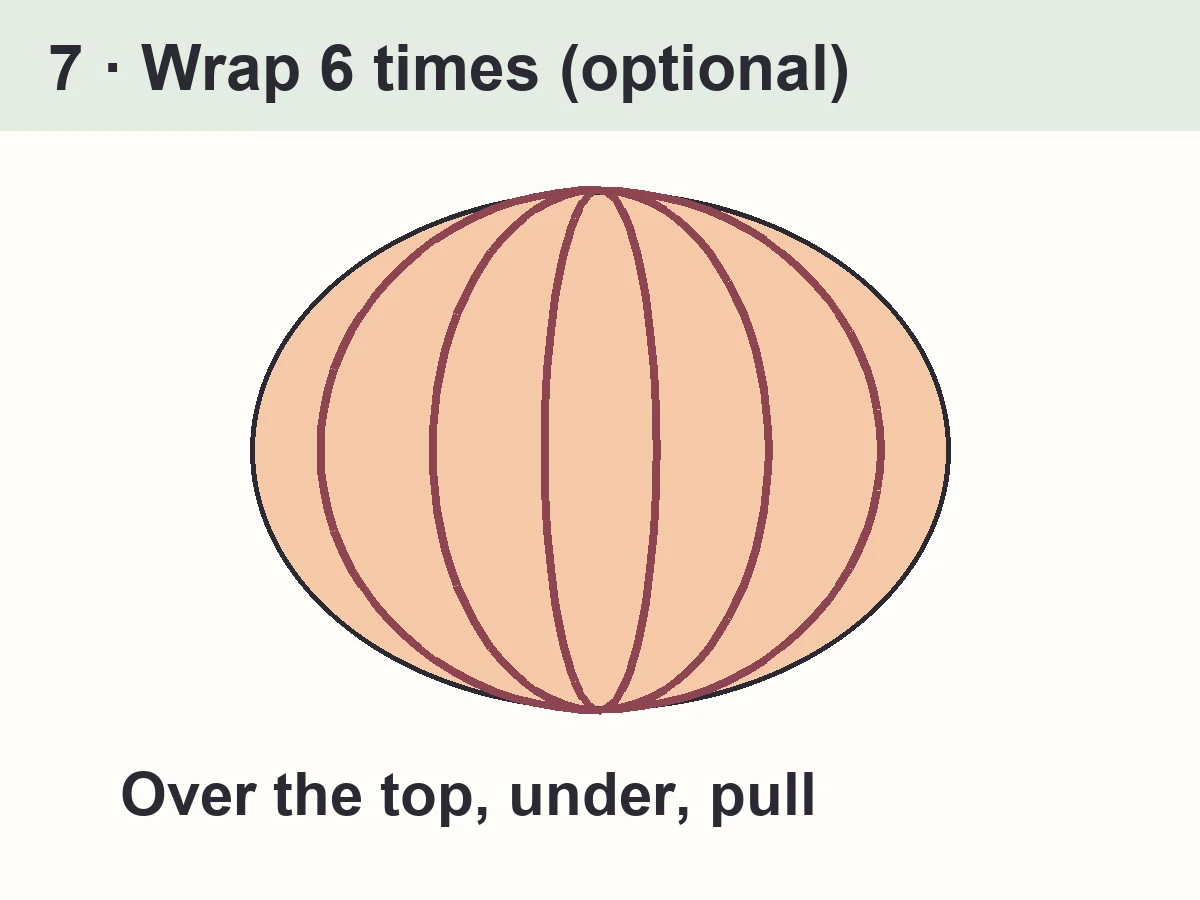
8 Stem
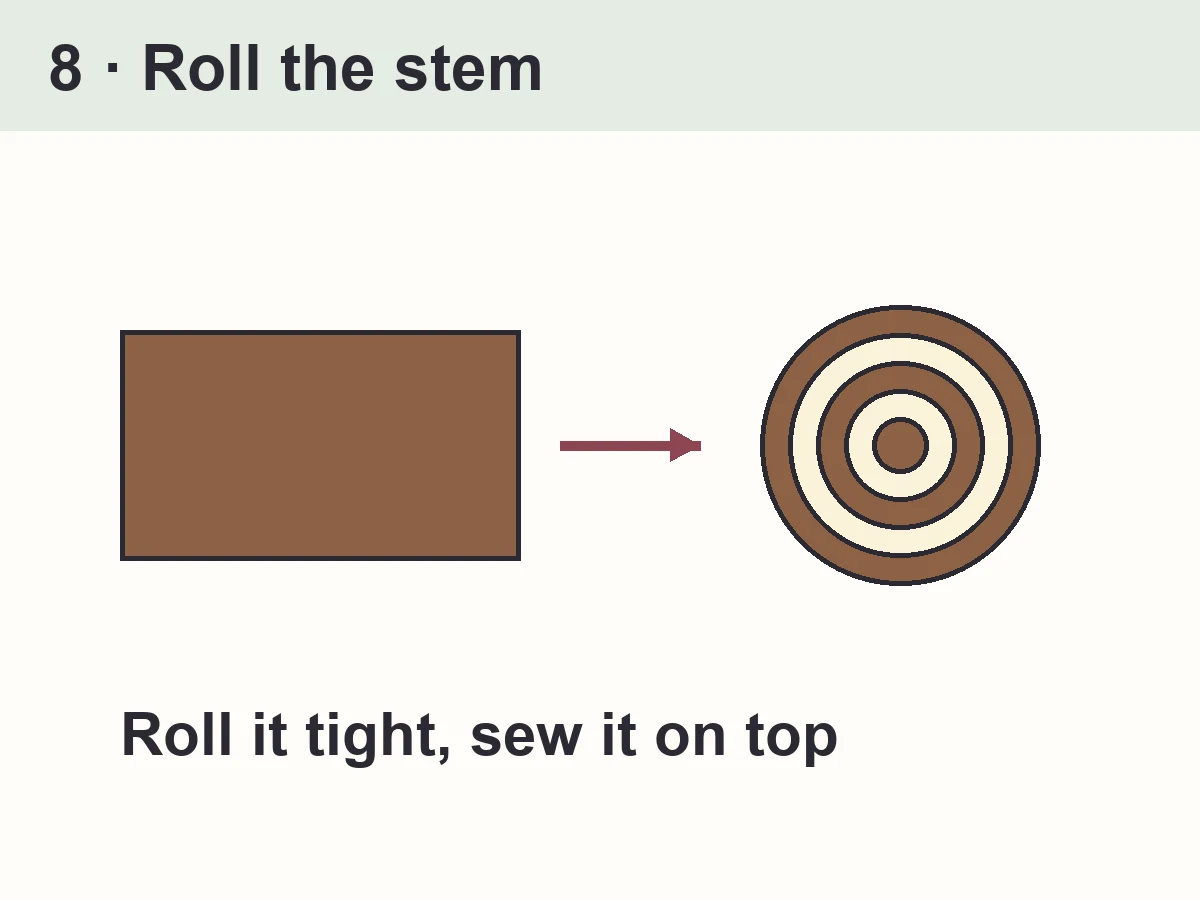
9 Leaf (optional)
Finishing
Weave in all the ends inside the pumpkin. If one side looks flat, squeeze and roll the pumpkin between your hands to spread the stuffing.
Design notes
- The bands — sc, hdc, dc, hdc, sc — make the middle of the rectangle longer than its edges, so the pumpkin is round instead of looking like a can.
- Every row is the same, so once Row 2 is done you only count rows.
- The three sizes come from a suggested gauge, not from a swatch: measure your rectangle before seaming.
Tips for a round pumpkin
- Mark the last stitch of each row with a stitch marker until the pattern feels natural.
- Measure along the middle (dc) band before seaming: that is the length that becomes the belly. Too short? Add rows. Too long? Stop sooner.
- Stuff more than you think: firm stuffing shows the ribs.
- Make the three sizes in one weekend for a matching set.
Common mistakes
- Counting the ch 1 at the start of a row as a stitch.
- Working in both loops: the ribs disappear.
- Ending a row on a hdc instead of a sc: the row is one stitch short. Count the last band: it is always sc.
- Closing the top before the stuffing is firm: you can't add more afterwards.
Make it your own
- Farmhouse look: cream, sage or dusty blue pumpkins with brown stems.
- Classic fall: burnt orange body, brown stem, green leaf.
- Halloween: black body with an orange stem.
- Skip the wraps for a soft, smooth pumpkin.
Care
- Spot clean, or hand wash cold and dry flat away from heat.
- Squeeze back into shape after washing.
- Store in a box so the stems are not crushed.
More crochet patterns for your table
- Crochet Pumpkin Coaster — a flat pumpkin for your mugs, in the same fall colors
- Halloween Ghost and Pumpkin Table Runner — pumpkins and ghosts worked into a table runner
FAQ
Is this crochet pumpkin pattern good for beginners?
Yes, if you can chain and work sc, hdc and dc in rows. Every row is the same, the only new skill is the back loop, and the shaping is done by sewing and gathering.
How big is the pumpkin?
With the suggested gauge: Small about 4 in across and 3.5 in tall, Medium about 6 in across and 5 in tall, Large about 8 in across and 7 in tall. These are estimates — your yarn and hook change the size, so measure the rectangle first.
Why are the stitches taller in the middle?
Tall double crochets make the middle of the rectangle longer than its edges. Once it is sewn and gathered, that extra length pushes out into a round belly.
Can I use a different yarn weight?
Yes. Each size is written for one weight; another weight works with any size, the pumpkin just comes out bigger or smaller.
Can I sell the pumpkins I make?
Yes, you may sell the pumpkins you crochet yourself. Please don't sell or repost the pattern; link to this page instead.
Copyright
© 2026 CookZya — original design. Free for personal use: you may make and sell the pumpkins you crochet. Please don't sell, copy or repost this pattern; link to this page instead.