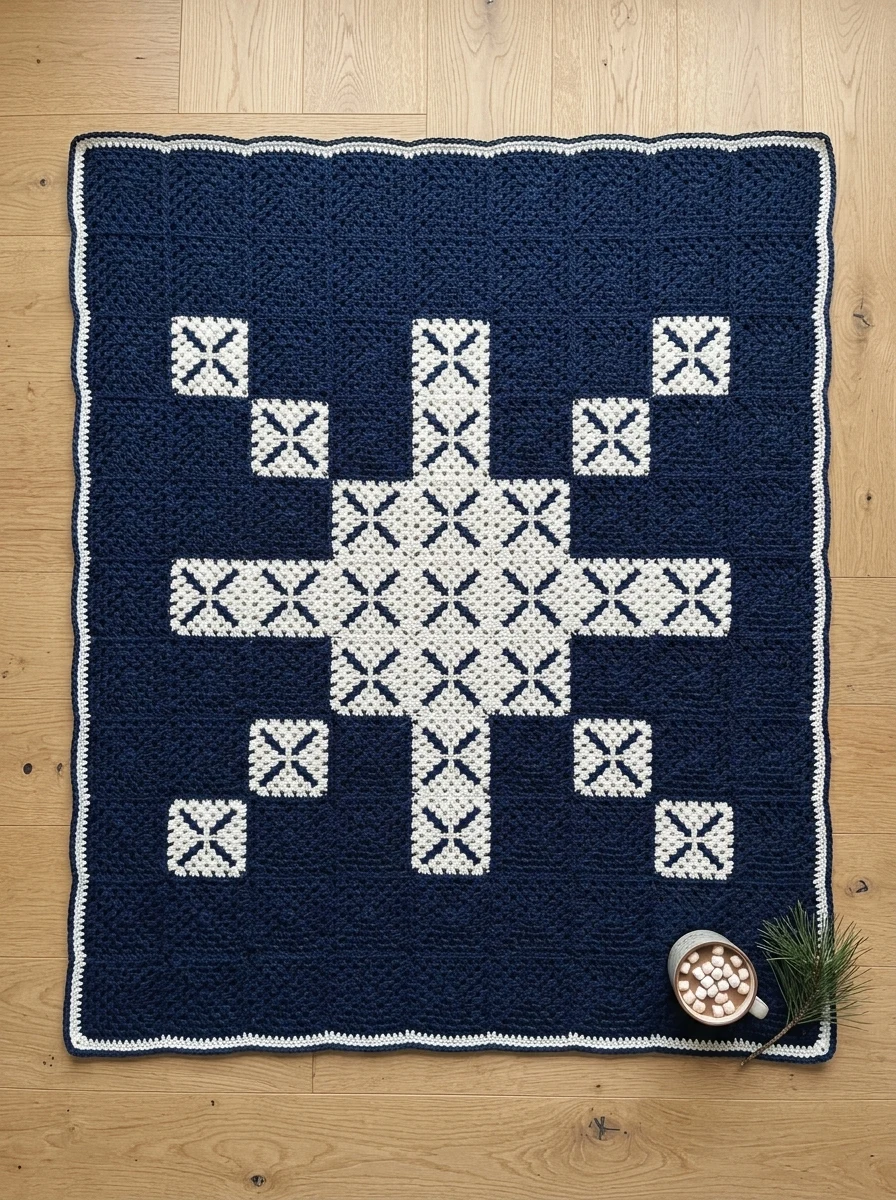
Free pattern · Easy · lap about 43 in square or throw about 55 x 67 in · worsted yarn in navy and snow white, US H-8 hook.
This winter snowflake granny square blanket is made of one simple square, worked in 2 solid colors. Laid out on the floor, the snow white squares draw one big Nordic-style snowflake on navy: 8 points, like the stars on a ski sweater. It is not a snowflake motif square: plain granny squares make one big snowflake.
Each square is the classic 5-round granny square, in one color, so there are no color changes inside a square. You join them with a navy slip-stitch seam and finish with a navy and white border.
Every round and both borders were checked by our stitch simulator. Sizes, yarn and time are estimates from a suggested gauge.
- Finished size
- Lap about 43 x 43 in, throw about 55 x 67 in (approximate)
- Level
- Easy: ch, sl st, sc and dc
- Time
- About 19 hours (lap) or 38 hours (throw), estimated, not timed
- Yarn
- Worsted weight (#4), 2 colors: about 1350 yd (lap) or 2690 yd (throw) in all
- Hook
- US H-8 (5.0 mm)
- Gauge
- Suggested only, not swatched: one square (5 rounds) = 6 in (15 cm) from side to side
- Squares
- 49 (lap) or 99 (throw)
Sizes
Lap blanket — 7 x 7 squares, about 43 x 43 in
- Yarn
- Worsted weight (#4), 2 colors
- Hook
- US H-8 (5.0 mm)
- Yarn needed
- navy 890 yd · snow white 460 yd — about 1350 yd in all (estimated, with a 20 % margin)
- Finished size
- about 43 x 43 in (109 x 109 cm), approximate
- Check before seaming
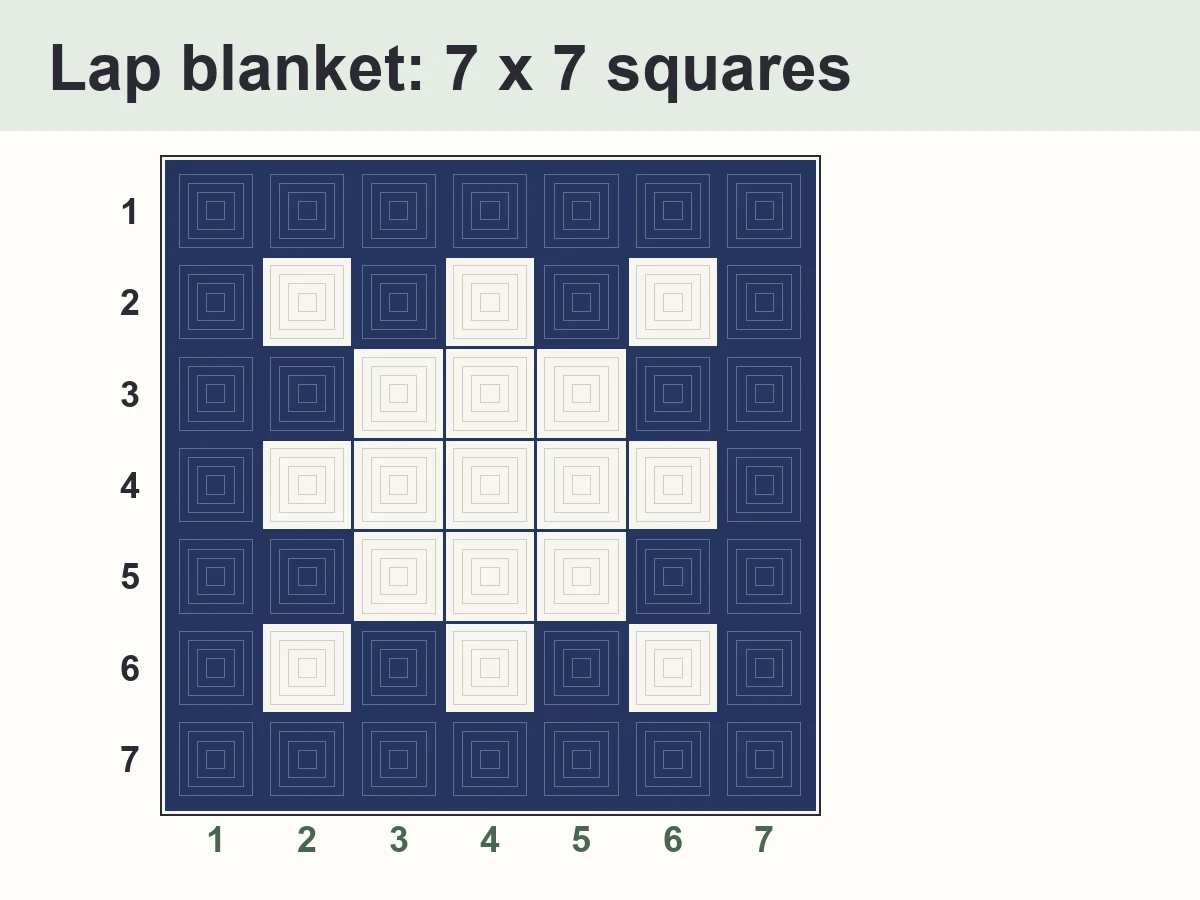
- 49 squares: 17 snow white and 32 navy. Border Rnd 1: 145 sc on the top and bottom edges, 145 sc on each side edge, 3 sc in each corner (592 sc in all); Rnd 2: 600 sc. About 19 hours in all, estimated.
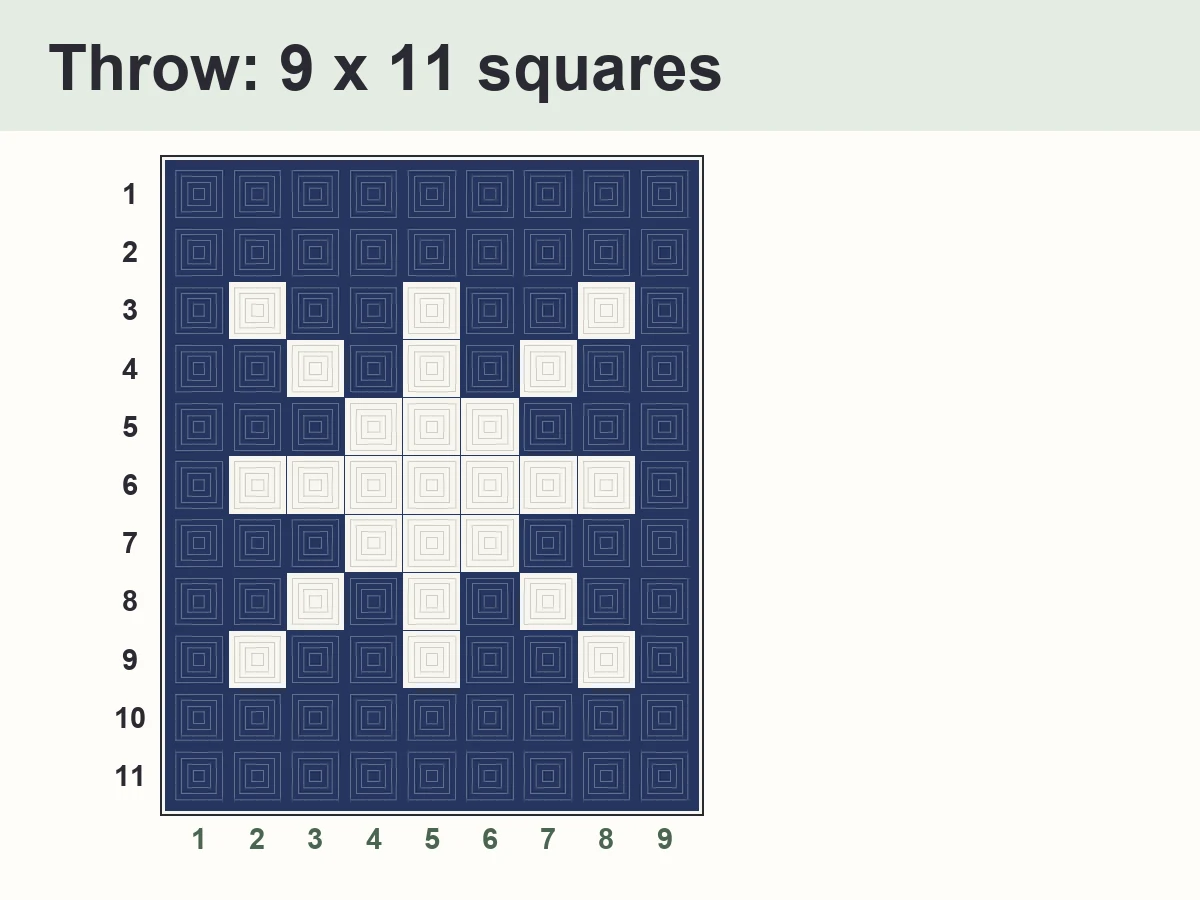
Throw — 9 x 11 squares, about 55 x 67 in
- Yarn
- Worsted weight (#4), 2 colors
- Hook
- US H-8 (5.0 mm)
- Yarn needed
- navy 2010 yd · snow white 680 yd — about 2690 yd in all (estimated, with a 20 % margin)
- Finished size
- about 55 x 67 in (140 x 170 cm), approximate
- Check before seaming
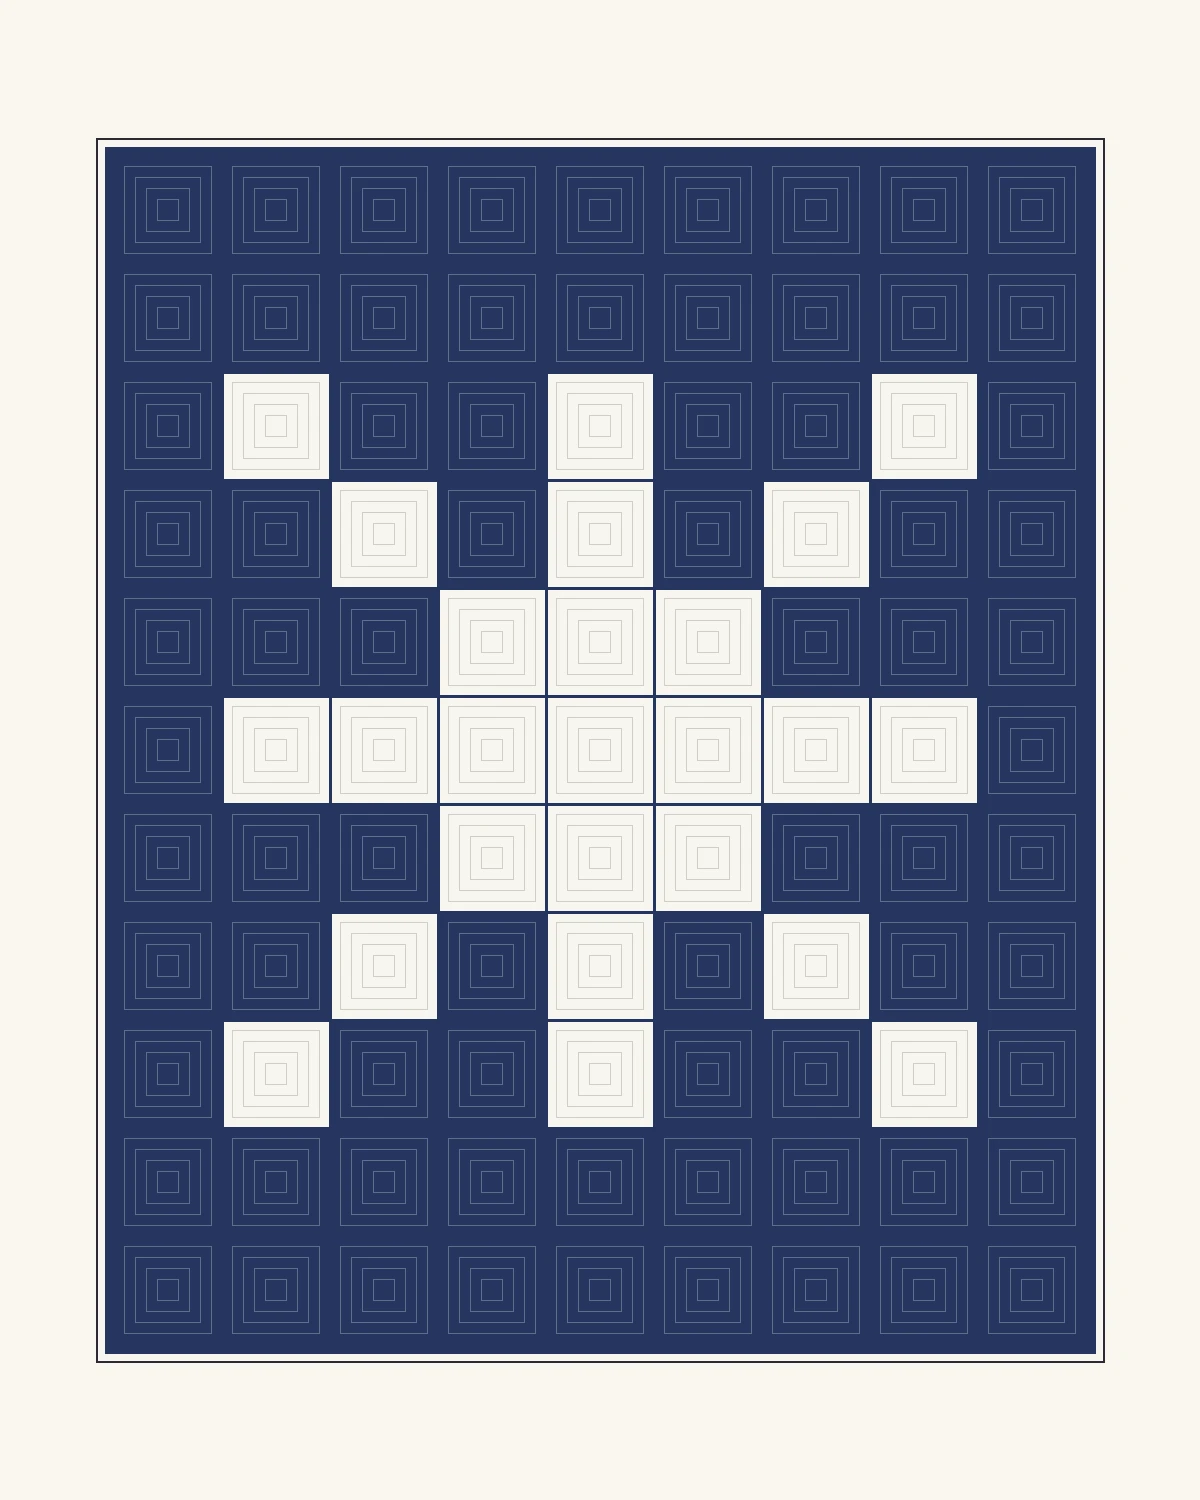
- 99 squares: 25 snow white and 74 navy. Border Rnd 1: 187 sc on the top and bottom edges, 229 sc on each side edge, 3 sc in each corner (844 sc in all); Rnd 2: 852 sc. About 38 hours in all, estimated.
Layout, row by row
Lap blanket layout, top row first
- Row 1
- 7 navy (N N N N N N N)
- Row 2
- 1 navy, 1 snow white, 1 navy, 1 snow white, 1 navy, 1 snow white, 1 navy (N S N S N S N)
- Row 3
- 2 navy, 3 snow white, 2 navy (N N S S S N N)
- Row 4
- 1 navy, 5 snow white, 1 navy (N S S S S S N)
- Row 5
- 2 navy, 3 snow white, 2 navy (N N S S S N N)
- Row 6
- 1 navy, 1 snow white, 1 navy, 1 snow white, 1 navy, 1 snow white, 1 navy (N S N S N S N)
- Row 7
- 7 navy (N N N N N N N)
Throw layout, top row first
- Row 1
- 9 navy (N N N N N N N N N)
- Row 2
- 9 navy (N N N N N N N N N)
- Row 3
- 1 navy, 1 snow white, 2 navy, 1 snow white, 2 navy, 1 snow white, 1 navy (N S N N S N N S N)
- Row 4
- 2 navy, 1 snow white, 1 navy, 1 snow white, 1 navy, 1 snow white, 2 navy (N N S N S N S N N)
- Row 5
- 3 navy, 3 snow white, 3 navy (N N N S S S N N N)
- Row 6
- 1 navy, 7 snow white, 1 navy (N S S S S S S S N)
- Row 7
- 3 navy, 3 snow white, 3 navy (N N N S S S N N N)
- Row 8
- 2 navy, 1 snow white, 1 navy, 1 snow white, 1 navy, 1 snow white, 2 navy (N N S N S N S N N)
- Row 9
- 1 navy, 1 snow white, 2 navy, 1 snow white, 2 navy, 1 snow white, 1 navy (N S N N S N N S N)
- Row 10
- 9 navy (N N N N N N N N N)
- Row 11
- 9 navy (N N N N N N N N N)
✓ CookZya original design · Stitch counts checked round by round — All 5 rounds of the square and both border rounds of each size were replayed by our stitch simulator; your tension decides the final size.
Materials
- Color N — navy (squares, seams, border Rnd 1), about 2010 yd
- Color S — snow white (squares, border Rnd 2), about 680 yd
- Yardage above is for the throw; the lap is in the Sizes cards.
- Yarn needle, scissors, stitch markers.
Notes
- US crochet terms. ch = chain, sl st = slip stitch, sc = single crochet, dc = double crochet, sp = space, st(s) = stitch(es), rep = repeat, Rnd = round.
- Magic ring: wrap the yarn twice around two fingers, insert the hook under the strands, pull up a loop and ch 1 to lock it. Prefer a chain ring? Ch 4, sl st in the first ch.
- Ch 3 (counts as a dc): the 3 chains at the start of a round stand in for the first dc; you join in the top (3rd chain) of it.
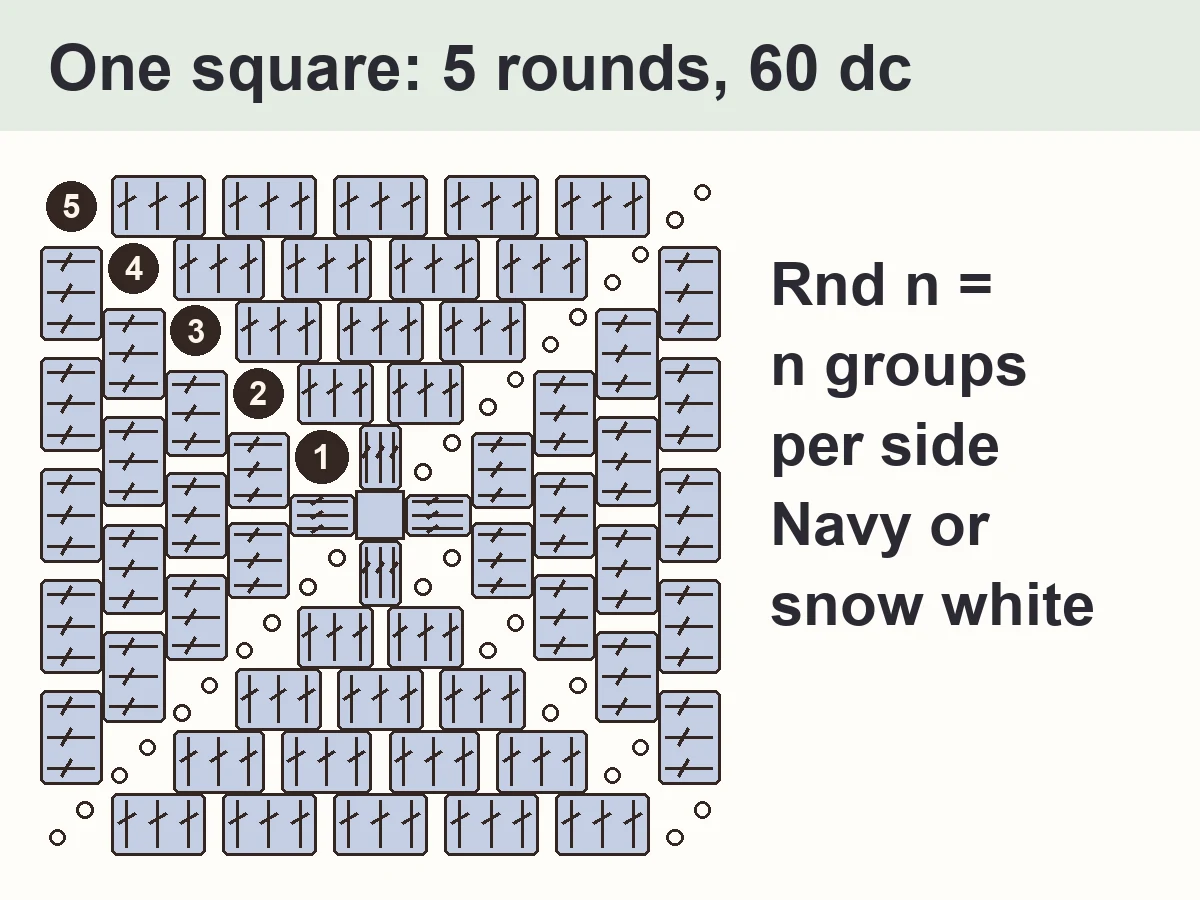
- A group = 3 dc in the same space. A corner = (3 dc, ch 2, 3 dc) in a ch-2 corner space.
- Make all the squares first: count them against your size card before you join.
- Layout code: N = navy square, S = snow white square, read from left to right, top row first.
Charts and layouts
Granny square
Make the number of navy and snow white squares in your size card. Right side facing you; you never turn.
- With the color of your square (navy or snow white), make a magic ring. Ch 3 (counts as the first dc), 2 dc in the ring, ch 2. *3 dc in the ring, ch 2; rep from * 2 more times. Pull the tail to close the ring. Join with sl st in the top of the beginning ch-3 (12 dc in 4 groups, 4 ch-2 corner sps). 12 dc, 4 ch-2 sps
- Sl st in each of next 2 dc and in the next ch-2 sp. Ch 3 (counts as a dc), (2 dc, ch 2, 3 dc) in the same sp, ch 1 (it goes over the 3 dc of Rnd 1), *(3 dc, ch 2, 3 dc) in the next ch-2 sp, ch 1; rep from * 2 more times. Join with sl st in the top of the beginning ch-3 (24 dc in 8 groups, 4 ch-2 corner sps, 4 ch-1 sps). 24 dc, 4 ch-2 sps, 4 ch-1 sps
- Sl st in each of next 2 dc and in the next ch-2 sp. Ch 3 (counts as a dc), (2 dc, ch 2, 3 dc) in the same sp, ch 1, *3 dc in the next ch-1 sp, ch 1, (3 dc, ch 2, 3 dc) in the next ch-2 sp, ch 1; rep from * 2 more times. Last side: 3 dc in the next ch-1 sp, ch 1. Join with sl st in the top of the beginning ch-3 (36 dc in 12 groups, 4 ch-2 corner sps, 8 ch-1 sps). 36 dc, 4 ch-2 sps, 8 ch-1 sps
- Sl st in each of next 2 dc and in the next ch-2 sp. Ch 3 (counts as a dc), (2 dc, ch 2, 3 dc) in the same sp, ch 1, *[3 dc in the next ch-1 sp, ch 1] 2 times, (3 dc, ch 2, 3 dc) in the next ch-2 sp, ch 1; rep from * 2 more times. Last side: [3 dc in the next ch-1 sp, ch 1] 2 times. Join with sl st in the top of the beginning ch-3 (48 dc in 16 groups, 4 ch-2 corner sps, 12 ch-1 sps). 48 dc, 4 ch-2 sps, 12 ch-1 sps
- Sl st in each of next 2 dc and in the next ch-2 sp. Ch 3 (counts as a dc), (2 dc, ch 2, 3 dc) in the same sp, ch 1, *[3 dc in the next ch-1 sp, ch 1] 3 times, (3 dc, ch 2, 3 dc) in the next ch-2 sp, ch 1; rep from * 2 more times. Last side: [3 dc in the next ch-1 sp, ch 1] 3 times. Join with sl st in the top of the beginning ch-3 (60 dc in 20 groups, 4 ch-2 corner sps, 16 ch-1 sps). Fasten off, leaving a 6-inch tail. 60 dc, 4 ch-2 sps, 16 ch-1 sps
Lap blanket border
After joining, for the lap blanket.
- With the right side facing you, join navy with sl st in the ch-2 corner sp at the top right corner of the blanket; you will work first along the top edge. Ch 1 (does not count as a stitch), 3 sc in the same corner sp. *Work along the edge to the next corner of the blanket: sc in each dc and in each ch-1 sp; at a seam, 1 sc in each of the 2 ch-2 corner sps (one on each side) and nothing in the seam itself; then 3 sc in the corner sp of the blanket; rep from * 2 more times (top edge, side edge, bottom edge, each followed by a corner). Work along the last side edge in the same way. Join with sl st in the first sc. The number of sc on each edge is in the Sizes cards. Fasten off navy. 592 sc
- Join snow white with sl st in the first sc of Rnd 1 (the sc where Rnd 1 was joined). Ch 1 (does not count as a stitch), sc in the same st, 3 sc in the next st (the center sc of the corner). *Sc in each st up to the center sc of the next corner, 3 sc in the center sc; rep from * 2 more times. Sc in each st to the end. Join with sl st in the first sc: 8 sc more than Rnd 1. Fasten off. 600 sc
Throw border
After joining, for the throw.
- With the right side facing you, join navy with sl st in the ch-2 corner sp at the top right corner of the blanket; you will work first along the top edge. Ch 1 (does not count as a stitch), 3 sc in the same corner sp. *Work along the edge to the next corner of the blanket: sc in each dc and in each ch-1 sp; at a seam, 1 sc in each of the 2 ch-2 corner sps (one on each side) and nothing in the seam itself; then 3 sc in the corner sp of the blanket; rep from * 2 more times (top edge, side edge, bottom edge, each followed by a corner). Work along the last side edge in the same way. Join with sl st in the first sc. The number of sc on each edge is in the Sizes cards. Fasten off navy. 844 sc
- Join snow white with sl st in the first sc of Rnd 1 (the sc where Rnd 1 was joined). Ch 1 (does not count as a stitch), sc in the same st, 3 sc in the next st (the center sc of the corner). *Sc in each st up to the center sc of the next corner, 3 sc in the center sc; rep from * 2 more times. Sc in each st to the end. Join with sl st in the first sc: 8 sc more than Rnd 1. Fasten off. 852 sc
How to join the squares
1 Lay out your squares
2 Join the columns
3 Join the rows
4 Add the border
5 Weave in and block
Finishing
Check that every end is woven in and every seam is closed. Wash and dry the blanket as the yarn label says before you gift it.
Design notes
- The snowflake is symmetric both ways, so the layout reads the same from the top or the bottom: you can't turn it the wrong way.
- Solid squares mean only 2 ends per square and no color changes inside the square.
- A navy margin of at least 1 square all around keeps the snowflake clear of the white last border round.
Tips
- Keep a tally of the navy squares as you make them: 74 for the throw is a lot to count in your head.
- Block a test square: if it is bigger or smaller than 6 in, the blanket will be too; the layout stays the same.
- Weave in the ends of each square as you go.
Common mistakes
- Joining a white square in a navy spot: lay out and photograph the whole blanket before the first seam.
- Pulling the sl st seam tight: the blanket puckers along the seams.
- Working a group into the top of a stitch instead of into a space: the square grows crooked.
Make it your own
- Ice colors: pale blue instead of navy for a softer snowflake.
- Christmas: red instead of navy, white snowflake.
- Bigger: see our Granny Square Blanket Size Chart for other sizes; keep the snowflake centered.
Care
- Follow the yarn label; most acrylic blankets can be machine washed on a gentle cycle.
More granny square patterns
- Granny Square Blanket Size Chart — want another size? How many squares for every blanket
- How to Crochet a Granny Square — the square step by step, one picture per round
- Easy Granny Square Blanket — the same square in 4 colors, with photos of the joining steps
- Crochet Snowflake Coaster — a matching snowflake for the coffee table
- Christmas Granny Square Blanket — the same square in red, green and gold
FAQ
How many squares do I need for the snowflake granny square blanket?
49 for the lap (17 snow white, 32 navy) and 99 for the throw (25 snow white, 74 navy).
Is this blanket good for a beginner?
Yes: one square, one color per square, and a slip-stitch seam. If the square is new to you, start with our How to Crochet a Granny Square guide.
How much yarn do I need?
About 2690 yd of worsted weight yarn for the throw (2010 yd navy, 680 yd snow white) and about 1350 yd for the lap (890 navy, 460 snow white), estimates with a 20 % margin.
Can I sell the blankets I make?
Yes, you may sell what you crochet. Please don't sell or repost the pattern; link to this page.
Copyright
© 2026 CookZya. Free for personal use: you may make and sell what you crochet. Please don't sell, copy or repost this pattern; link to it instead.