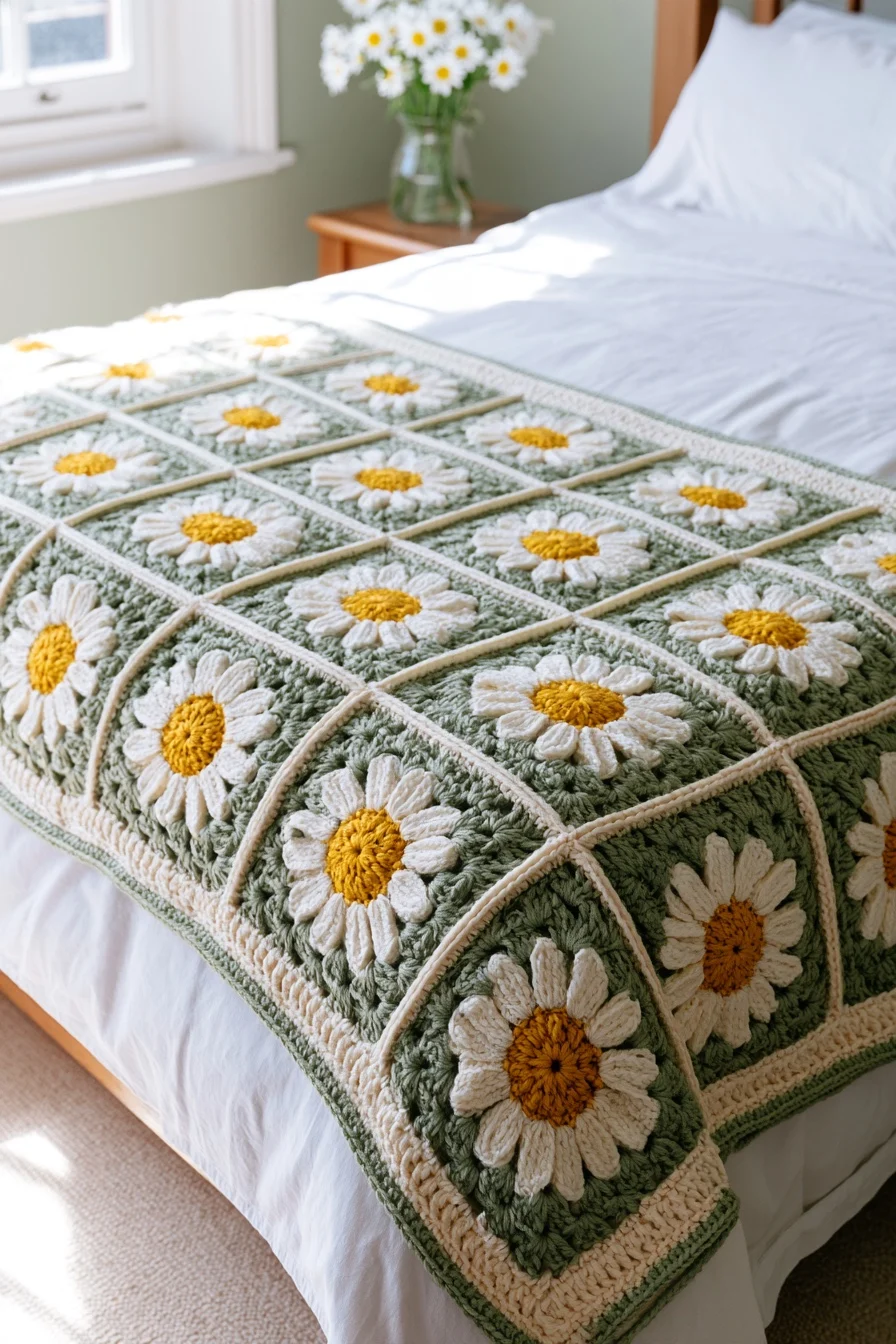
This free daisy granny square blanket pattern makes a soft, sunny blanket out of one easy square: a daisy granny square with a butter yellow centre, eight white petals and a sage green and cream frame. It is an original CookZya design, and it comes in baby, throw and twin sizes.
Each square takes 7 short rounds. Rounds 1 and 2 make the yellow centre. Round 3 adds the petals. Round 4 is the magic one: it turns the round flower into a square. Rounds 5 to 7 are classic granny rounds of 3 double crochet, green then cream. Then you sew the squares together flat and add a two-round border.
With worsted weight yarn and a US H-8 (5.0 mm) hook, one square is about 6½ in across. The baby blanket needs 20 squares, the throw 72 and the twin 140. Every round below was checked by our stitch simulator; the pattern has not been crochet-tested yet. Tick each round as you go — your progress stays saved in this browser.
- Finished size
- One square about 6½ x 6½ in. Blankets: Baby 27 x 33½ in (20 squares) · Throw 53 x 59½ in (72 squares) · Twin 66 x 92 in (140 squares), approximate
- Level
- Easy — a confident beginner who knows ch, sc and dc can make it
- Time
- About 35 minutes per square, estimated (not timed). Baby blanket about 17 hours in all
- Yarn
- Worsted weight (#4) in 4 colors. Baby size: about 50 yd yellow, 130 yd white, 460 yd green and 270 yd cream
- Hook
- US H-8 (5.0 mm), plus a yarn needle
- Gauge
- Suggested only, not swatched: the daisy (Rnds 1-3) is about 3 in across and the finished square about 6½ in after blocking
Sizes
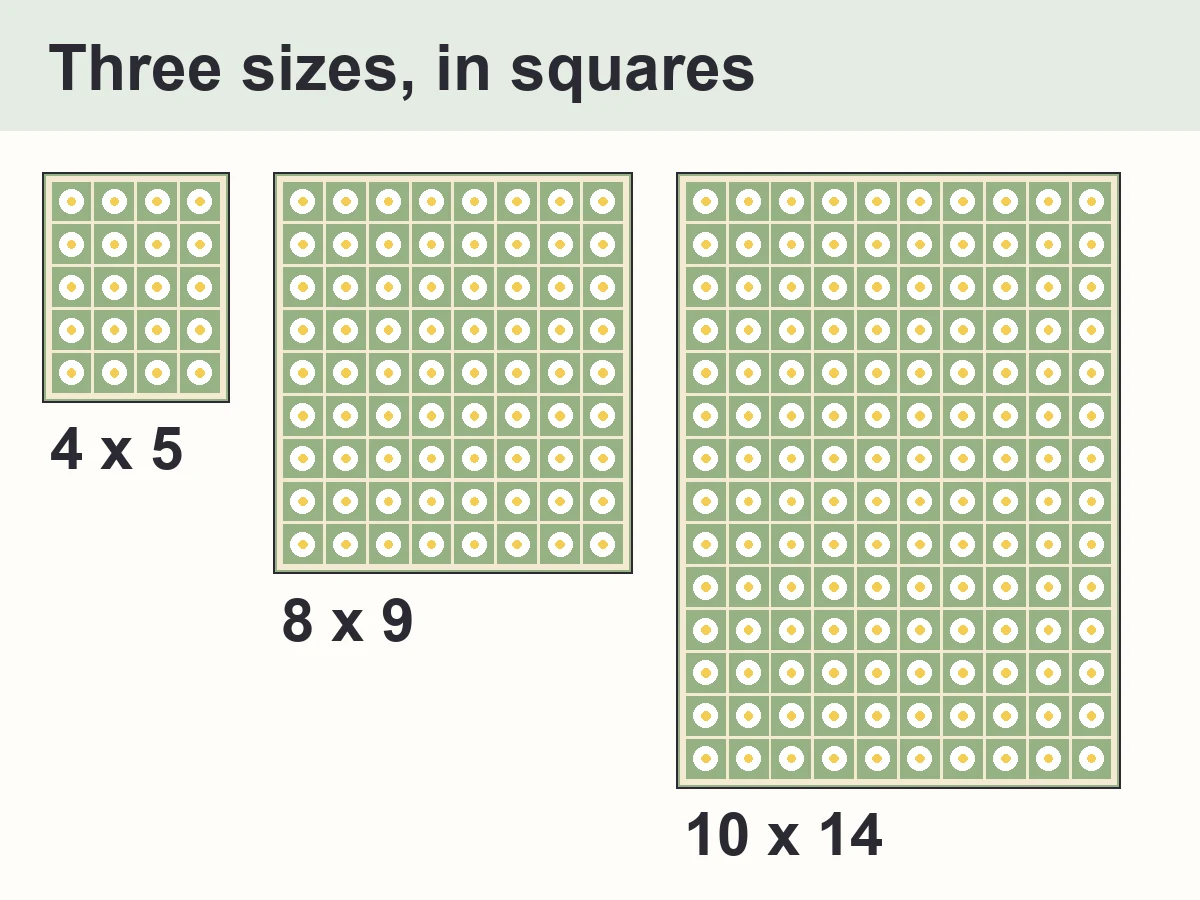
Baby blanket — about 27 x 33½ in
- Rows
- 5 rows of 4 squares = 20 squares
- Yarn needed
- butter yellow 50 yd · white 130 yd · sage green 460 yd · cream 270 yd (about 910 yd in all)
- Finished size
- about 27 x 33½ in (69 x 86 cm) with the border, approximate
- Check before seaming
- each square about 6½ in; about 17 hours in all, estimated (not timed)
Throw blanket — about 53 x 59½ in
- Rows
- 9 rows of 8 squares = 72 squares
- Yarn needed
- butter yellow 180 yd · white 440 yd · sage green 1570 yd · cream 940 yd (about 3130 yd in all)
- Finished size
- about 53 x 59½ in (135 x 152 cm) with the border, approximate
- Check before seaming
- each square about 6½ in; about 62 hours in all, estimated (not timed)
Twin bed blanket — about 66 x 92 in
- Rows
- 14 rows of 10 squares = 140 squares
- Yarn needed
- butter yellow 340 yd · white 860 yd · sage green 3000 yd · cream 1800 yd (about 6000 yd in all)
- Finished size
- about 66 x 92 in (168 x 234 cm) with the border, approximate
- Check before seaming
- each square about 6½ in; about 120 hours in all, estimated (not timed)
✓ CookZya original design · Stitch counts checked row by row — shape and size not tested. All 13 rounds — the 7 rounds of the square and the 2 border rounds for each of the 3 sizes — were replayed by our stitch simulator, the 4 sides of every square round were counted, and a second reading made from the written text alone matched it stitch by stitch. This pattern has not been crochet-tested: tension, gauge and final size are up to your hands.
Materials
- Color A — butter yellow, for the daisy centres (Rnds 1-2); baby size, about 50 yd
- Color B — white, for the petals (Rnd 3); baby size, about 130 yd
- Color C — sage green, for Rnds 4-6 and the last border round; baby size, about 460 yd
- Color D — cream, for Rnd 7, the joining and the first border round; baby size, about 270 yd
- The yards for the throw and twin sizes are in the size cards above. All yardage is estimated from the stitch counts, with a 20 % margin, and includes the joining yarn and the border.
- A soft, washable worsted weight yarn is best for a blanket: acrylic, a cotton blend or a superwash wool. Buy each color from the same dye lot.
- US H-8 (5.0 mm) hook, yarn needle, stitch markers, scissors, rust-proof pins for blocking.
Notes
- US crochet terms. ch = chain, sl st = slip stitch, sc = single crochet, hdc = half double crochet, dc = double crochet, tr = treble crochet, sp = space, st(s) = stitch(es), rep = repeat, Rnd = round.
- Sl st (slip stitch): insert the hook, yarn over and pull the loop through the stitch and the loop on your hook in one go. It closes a round, and it moves the hook to where the next round starts.
- Sc: insert the hook, yarn over, pull up a loop, yarn over and pull through both loops. Hdc: yarn over, insert, pull up a loop, yarn over and pull through all 3 loops. Dc: yarn over, insert, pull up a loop, then (yarn over, pull through 2 loops) twice. Tr: yarn over twice, insert, pull up a loop, then (yarn over, pull through 2 loops) three times.
- Magic ring: wrap the yarn around two fingers, insert the hook under the strands, pull up a loop and ch 1. Work Rnd 1 over the ring, then pull the tail to close the hole.
- The ch 1, 3 or 4 at the start of a round does not count as a stitch. "In next sp" means in the space under a chain: work the stitches around the chain, not into it.
- "[ch 1, 3 dc in next ch-1 sp] 3 times" means: work what is inside the brackets 3 times in a row.
- Petal = (dc, tr, ch 2, tr, dc) all in the same st. The ch 2 makes a little space at the tip of the petal: the next round is worked into these 8 petal tips.
- A granny group is 3 dc worked in the same space. The corner is (3 dc, ch 2, 3 dc) in the corner space: the ch 2 is what makes the corner sharp.
How the daisy granny square is built
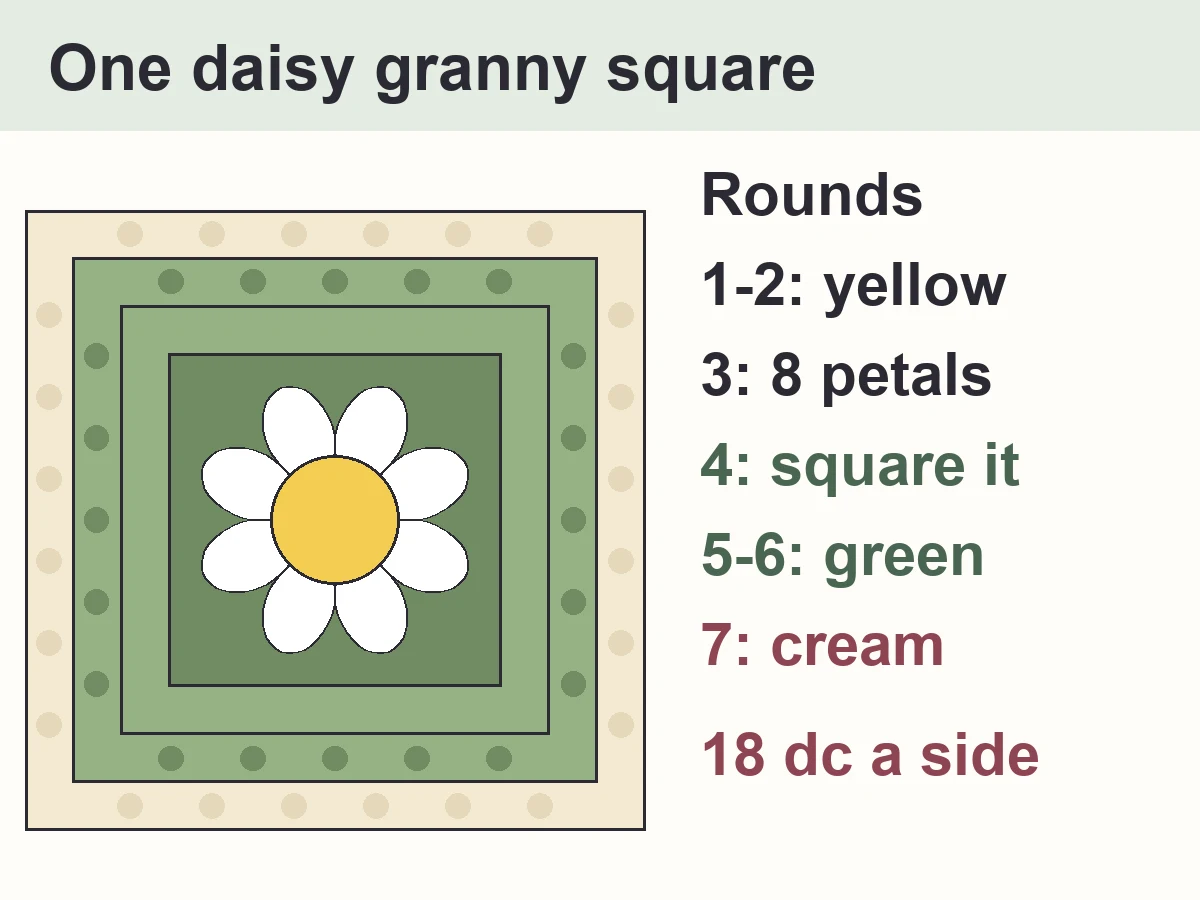
Daisy granny square
Make as many squares as your size needs. A (yellow) for Rnds 1-2, B (white) for Rnd 3, C (green) for Rnds 4-6, D (cream) for Rnd 7. Work every round with the right side facing you. Petal = (dc, tr, ch 2, tr, dc) all in the same st. The ch 2 makes a little space at the tip of the petal: the next round is worked into these 8 petal tips.
- With A, make a magic ring. Ch 1 (does not count as a stitch), 8 sc in the ring. Pull the tail to close the hole. Join with sl st in first sc (8 sc). 8 sc
- Ch 1 (does not count as a stitch), 2 hdc in each st around, starting in the same st as the join. Join with sl st in first hdc (16 hdc). Fasten off A. 16 hdc
- Join B with sl st in any hdc. Ch 1 (does not count as a stitch), sc in same st as join, petal in next st, *sc in next st, petal in next st; rep from * 6 more times. Join with sl st in first sc (8 petals). Fasten off B. 8 sc, 16 dc, 16 tr, 8 ch-2 sps
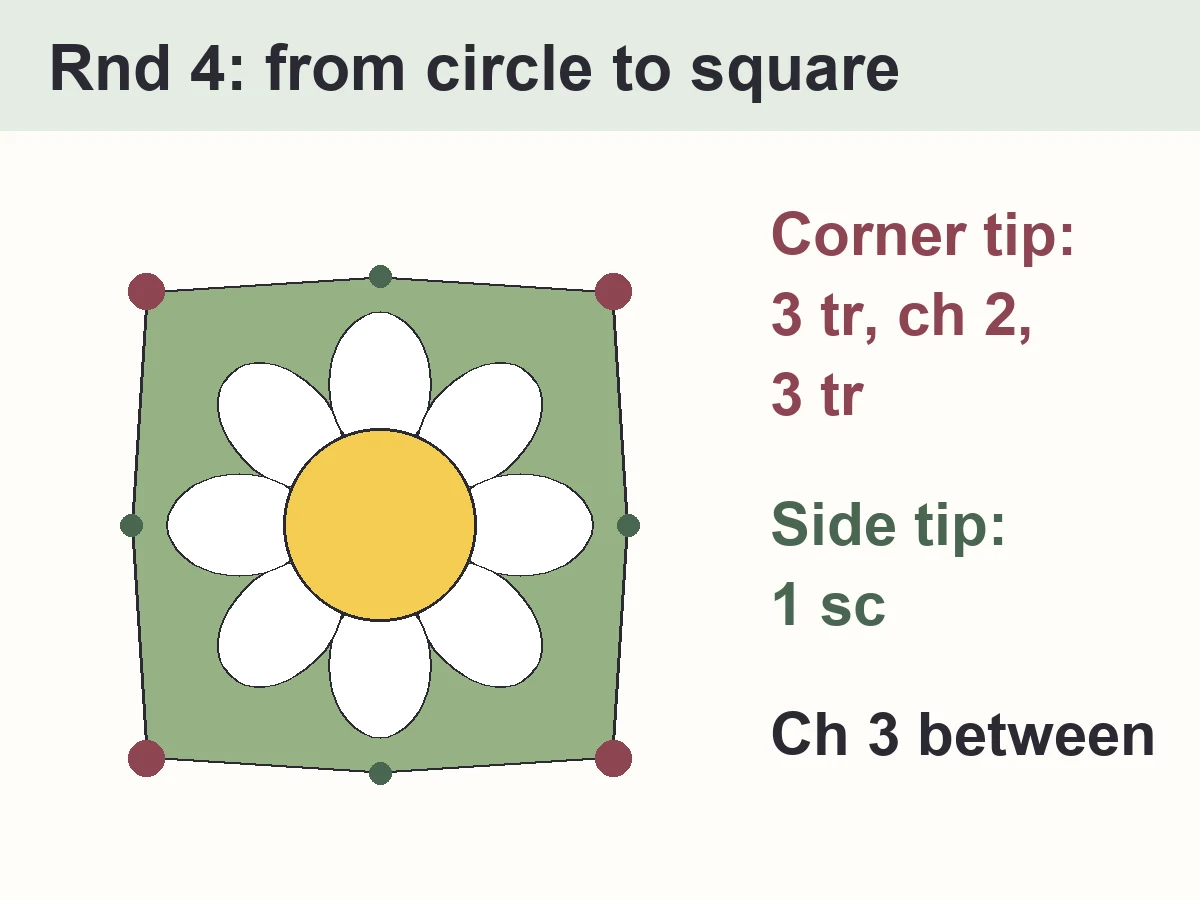
- Join C with sl st in any petal-tip ch-2 sp. Ch 4 (does not count as a stitch), (3 tr, ch 2, 3 tr) in the same sp: this is the first corner. Ch 3, sc in the next petal-tip sp, ch 3, *(3 tr, ch 2, 3 tr) in the next petal-tip sp, ch 3, sc in the next petal-tip sp, ch 3; rep from * 2 more times. Join with sl st in first tr (24 tr, 4 sc, 8 ch-3 sps, 4 corner ch-2 sps). Do not fasten off. 4 sc, 24 tr, 8 ch-3 sps, 4 ch-2 sps — each side: 3 tr, ch-3 sp, sc, ch-3 sp, 3 tr
- Sl st in each of the next 2 tr and into the corner ch-2 sp. Ch 3 (does not count as a stitch), (3 dc, ch 2, 3 dc) in the same corner sp, ch 1, 3 dc in next ch-3 sp, ch 1, 3 dc in next ch-3 sp, ch 1, *(3 dc, ch 2, 3 dc) in next corner sp, ch 1, 3 dc in next ch-3 sp, ch 1, 3 dc in next ch-3 sp, ch 1; rep from * 2 more times. Join with sl st in first dc (48 dc: 12 on each side, 12 ch-1 sps, 4 corner ch-2 sps). Do not fasten off. 48 dc, 4 ch-2 sps, 12 ch-1 sps — 12 dc on each side
- Sl st in each of the next 2 dc and into the corner ch-2 sp. Ch 3 (does not count as a stitch), (3 dc, ch 2, 3 dc) in the same corner sp, [ch 1, 3 dc in next ch-1 sp] 3 times, ch 1, *(3 dc, ch 2, 3 dc) in next corner sp, [ch 1, 3 dc in next ch-1 sp] 3 times, ch 1; rep from * 2 more times. Join with sl st in first dc (60 dc: 15 on each side, 16 ch-1 sps, 4 corner ch-2 sps). Fasten off C. 60 dc, 4 ch-2 sps, 16 ch-1 sps — 15 dc on each side
- Join D with sl st in any corner ch-2 sp. Ch 3 (does not count as a stitch), (3 dc, ch 2, 3 dc) in the same sp, [ch 1, 3 dc in next ch-1 sp] 4 times, ch 1, *(3 dc, ch 2, 3 dc) in next corner sp, [ch 1, 3 dc in next ch-1 sp] 4 times, ch 1; rep from * 2 more times. Join with sl st in first dc (72 dc: 18 on each side, 20 ch-1 sps, 4 corner ch-2 sps). Fasten off D. 72 dc, 4 ch-2 sps, 20 ch-1 sps — 18 dc on each side
Joining the squares
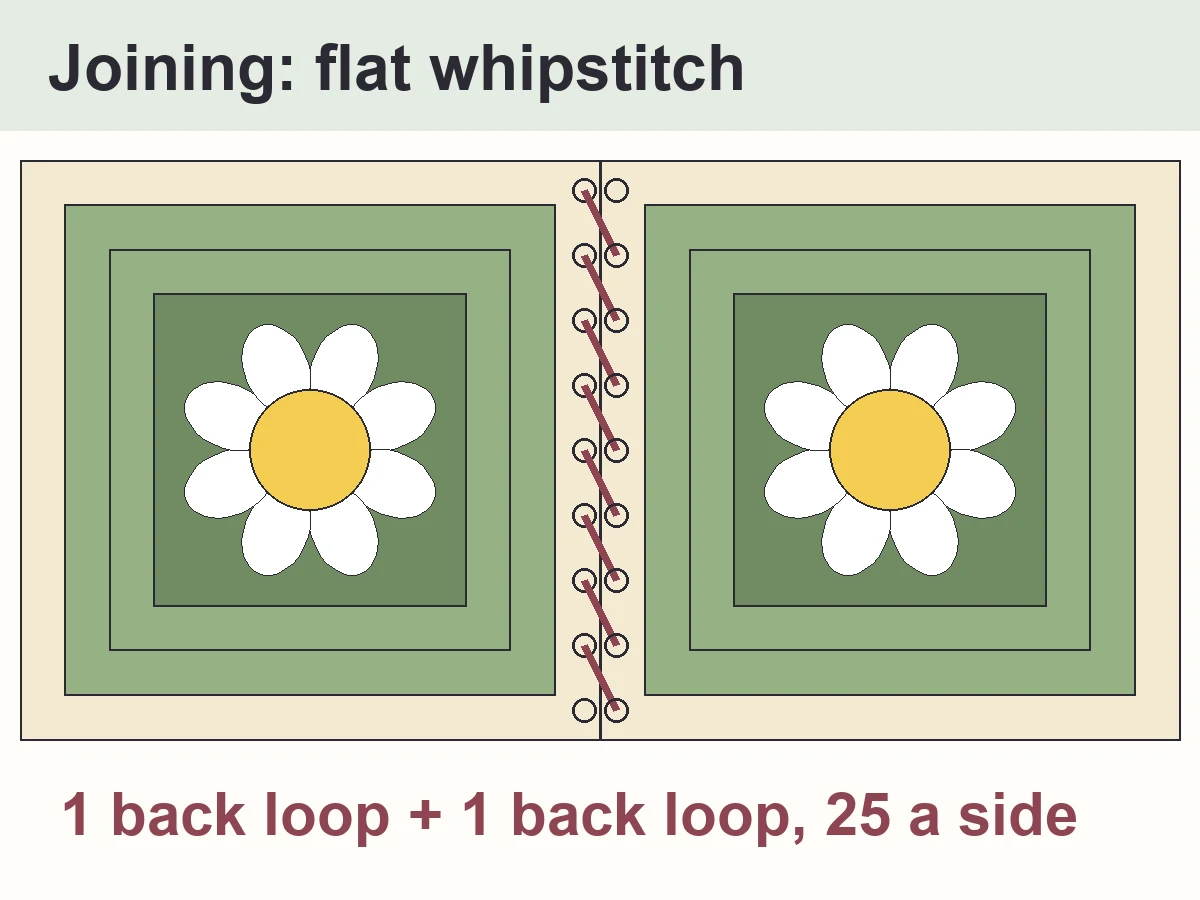
A flat whipstitch through the back loops: it is easy, it lies flat and it shows a neat little line between the squares on the right side. Each side of a square has 25 stitches to match.
- Lay all the squares out on a bed or the floor, right side up, in the rows and columns of your size. Turn them so the yarn tails all sit in the same corner: the seams then line up. Layout
- Thread a yarn needle with D (cream). Allow about 1½ in of yarn for every stitch you sew: one square side has 25 stitches, so about 38 in (just over 1 yd) for each square side of the seam. Leave a 6 in tail at the start. Cream yarn
- Take the first two squares of a row and lay them side by side, right side up, edges touching. On each square, the back loop is the outer loop of the edge stitch, the one right next to the other square. Start at the corner chains: bring the needle down through the back loop of the left square's corner ch (front to back), then up through the back loop of the right square's corner ch (back to front), and pull the yarn through. 1st stitch
- Keep going stitch for stitch along the edge: down through the next back loop of the left square, up through the next back loop of the right square, always in the same direction, so the yarn crosses over the seam on the front. Each side has 25 stitches to match: 1 corner ch, 18 dc and 5 ch (one for each ch-1 sp), 1 corner ch. Pull each stitch snug but not tight, so the seam lies flat. 25 sts a side
- At the end of the side, do not cut the yarn: lay the next two squares of the same seam line in place and keep sewing, corner ch to corner ch. Sew all the long seams in one direction first (between the rows), then all the long seams in the other direction (between the columns). Long seams
- Where four squares meet, sew one extra stitch through the corner chains to close the little hole. Weave each tail back along the seam, through the same color, for about 2 in. Corners
Border
D (cream) for Rnd 1, C (green) for Rnd 2, all around the joined blanket. The counts are for baby (4 x 5), throw (8 x 9) and twin (10 x 14).
- With the right side facing you, join D with sl st in the corner ch-2 sp at one corner of the blanket, so that you will work along a short side (the width) first. Ch 1 (does not count as a stitch), 3 sc in the same sp. Work along the side: sc in each dc and in each ch-1 sp; where two squares meet, sc in the corner sp of this square and sc in the corner sp of the next square (2 sc at each seam). At each corner of the blanket, 3 sc in the corner sp. Join with sl st in first sc. Fasten off D. baby 454 sc · throw 854 sc · twin 1204 sc
- Join C with sl st in the center sc of the corner where Rnd 1 began (the middle one of its 3 sc). Ch 1 (does not count as a stitch), 3 hdc in the same st, *hdc in each st to the center sc of the next corner, 3 hdc in that center sc; rep from * 2 more times, hdc in each st to the end. Join with sl st in first hdc. Fasten off C. baby 462 hdc · throw 862 hdc · twin 1212 hdc
Weave in, block and check the blanket
1 Weave in the ends
2 Block it
3 Check the border
Finishing
Wash and dry the blanket as the yarn label says, then lay it flat to dry the first time so the squares keep their shape.
Design notes
- A flower is round and a granny square is square. Rnd 4 fixes that: the 4 corner petal tips get tall treble stitches and a ch 2, the 4 side tips get a short single crochet, so the corners stick out farther than the sides.
- Our geometry check at the suggested gauge puts the Rnd 4 corners at about 94 % of a perfect square corner; each granny round brings it closer (97 % at Rnd 7), and blocking does the rest.
- Each granny round adds one group of 3 dc to every side: 12, 15 and 18 dc a side for Rnds 5, 6 and 7. All 4 sides always match, so any square fits next to any other.
- The daisy centre is 8 sc, then 16 hdc: the hdc is just tall enough for 16 stitches to lie flat.
- Where the 6½ in comes from: at the suggested gauge, the centre, the petals, the sc of Rnd 4 and the 3 granny rounds add up to about 3.25 in from the middle of the square to the middle of a side, so the square is about 6½ in across (6.50 in). The blanket sizes are counted with that number.
Tips for this daisy granny square blanket pattern
- Make one square first, block it and measure it. If it is bigger than 6½ in, go down a hook size; if it is smaller, go up one.
- Make the squares in batches: all the yellow centres, then all the petals, then the green rounds. You change color less often and it goes faster.
- Count the sides of Rnd 6 before you change to cream: 15 dc on each side, 4 corners.
- Pull the petal tips gently into place before Rnd 4, so each one points straight out.
- Weave in the ends of each square as you finish it: 8 ends per square (a start and an end tail for each of the 4 colors) add up fast on a big blanket.
- Prefer crochet to sewing? Join with sl st instead: hold two squares wrong sides together and sl st through both loops of both squares, stitch for stitch (25 a side). It makes a raised ridge on the front.
Common mistakes
- Working Rnd 4 into the sc between petals instead of the petal tips: the square comes out too small and wavy.
- Putting the corners on two tips side by side: corners and sides must alternate around the flower.
- Counting the starting ch 3 as a dc: every side then has one dc too many on one corner.
- Sewing too tightly: the seams pucker. The seam should stretch as much as the squares do.
Make it your own
- Classic meadow (as written): butter yellow centres, white petals, sage green squares and cream edges.
- Nursery: pale yellow, white, mint and white, with a mint border.
- Boho: mustard, oatmeal, olive and cream.
- Sweet spring: golden yellow, blush pink petals, soft green and cream.
- Scrappy: keep the cream rounds and the green border, and change the petal color on every square.
- Pillow: join 3 x 3 squares (about 19½ in) for the front of a pillow cover.
Care
- Machine wash cold on a gentle cycle in a large laundry bag, or as the yarn label says.
- Tumble dry low only if the yarn label allows it; otherwise lay flat to dry.
- Never hang a wet blanket: the weight of the water stretches it.
More crochet patterns for your table
- Autumn Leaves Table Runner — another CookZya original with small flat motifs and a simple border
- Tulip Table Runner — spring flowers again, this time worked in colorwork rows
- Easy Crochet Pumpkin — a quick, easy make in three sizes when you need a break from squares
- Crochet Pumpkin Coaster — a small one-evening project to practice sc and hdc
FAQ
Is this daisy granny square blanket pattern good for beginners?
Yes. If you can chain and work sc and dc, you can make it. You will also use two more stitches: hdc in Rnd 2 (the 16 hdc of the yellow centre) and in the last border round, and tr in the petals of Rnd 3 (16 tr) and in the 4 corners of Rnd 4 (24 tr). Both are explained step by step in the notes. The joining is a simple flat whipstitch with a yarn needle.
How many daisy granny squares do I need for a blanket?
With 6½ in squares: 20 squares (4 x 5) for a baby blanket of about 27 x 33½ in, 72 (8 x 9) for a throw of about 53 x 59½ in, and 140 (10 x 14) for a twin blanket of about 66 x 92 in.
How much yarn does a daisy granny square blanket take?
About 910 yd of worsted weight yarn for the baby size, 3130 yd for the throw and 6000 yd for the twin, all 4 colors together. Green is the biggest color, because it makes Rnds 4 to 6 of every square. These are estimates with a 20 % margin.
What size is one daisy granny square?
About 6½ x 6½ in after blocking, with worsted weight yarn and a US H-8 (5.0 mm) hook. The daisy alone (Rnds 1-3) is about 3 in across.
How do you turn a round daisy into a granny square?
Rnd 4 does it. Work (3 tr, ch 2, 3 tr) in 4 of the petal tips and 1 sc in the other 4, alternating, with ch 3 in between. The tall corners stick out farther than the short sides, so the round flower becomes a square, and the next granny rounds straighten it.
How long does it take to crochet a daisy granny square blanket?
About 35 minutes per square, estimated: roughly 17 hours for the baby size, 62 hours for the throw and 120 hours for the twin, joining and border included.
What is the best way to join daisy granny squares?
A flat whipstitch through the back loops: lay two squares side by side, right side up, and sew one back loop of each square together, 25 stitches per side. It lies flat and leaves a neat line on the front. A slip stitch join with the hook works too.
Can I sell the blankets I make from this pattern?
Yes, you may sell the blankets you crochet yourself. Please don't sell or repost the pattern; link to this page instead.
Copyright
© 2026 CookZya — original design. Free for personal use: you may make and sell the blankets you crochet. Please don't sell, copy or repost this pattern; link to this page instead.