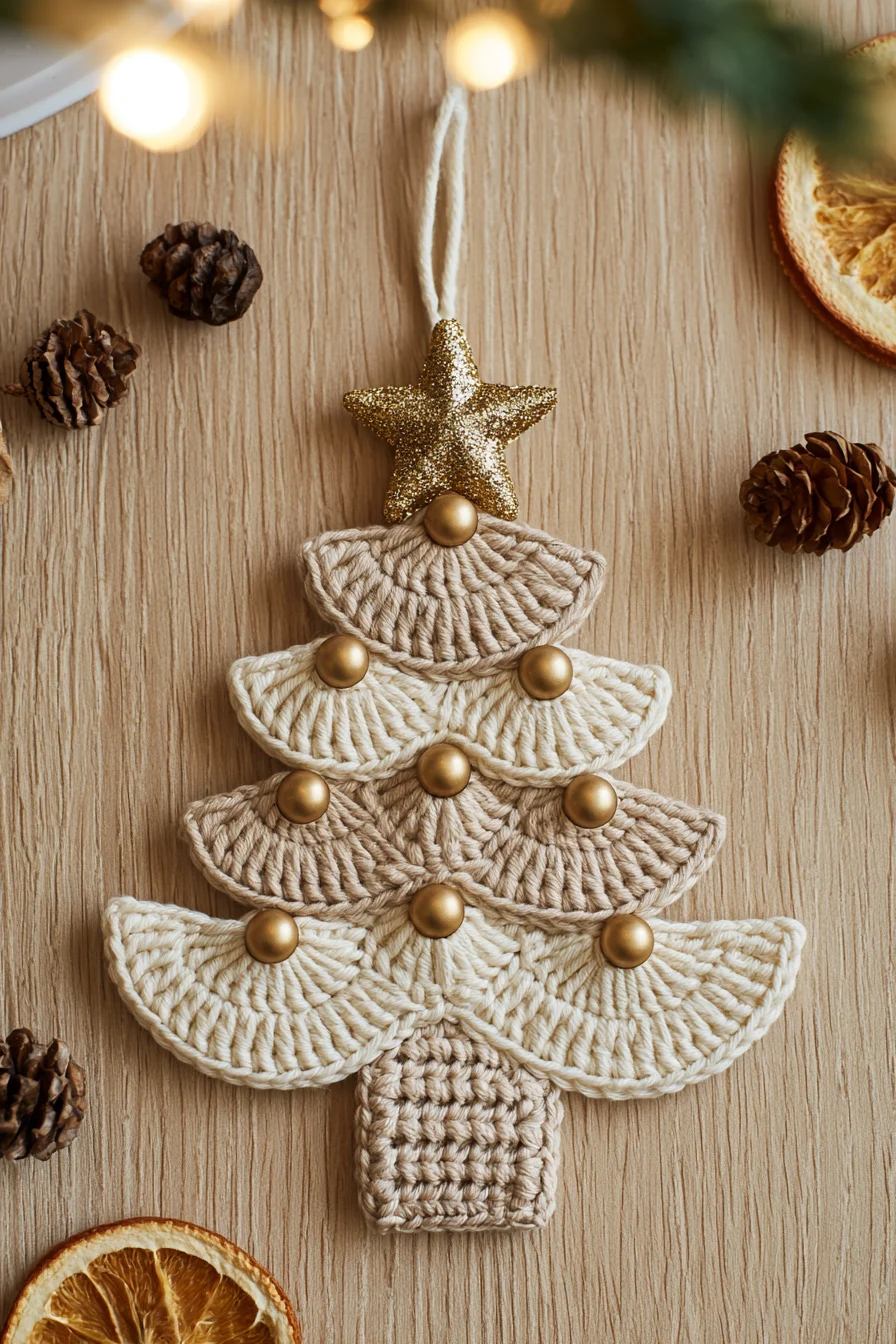
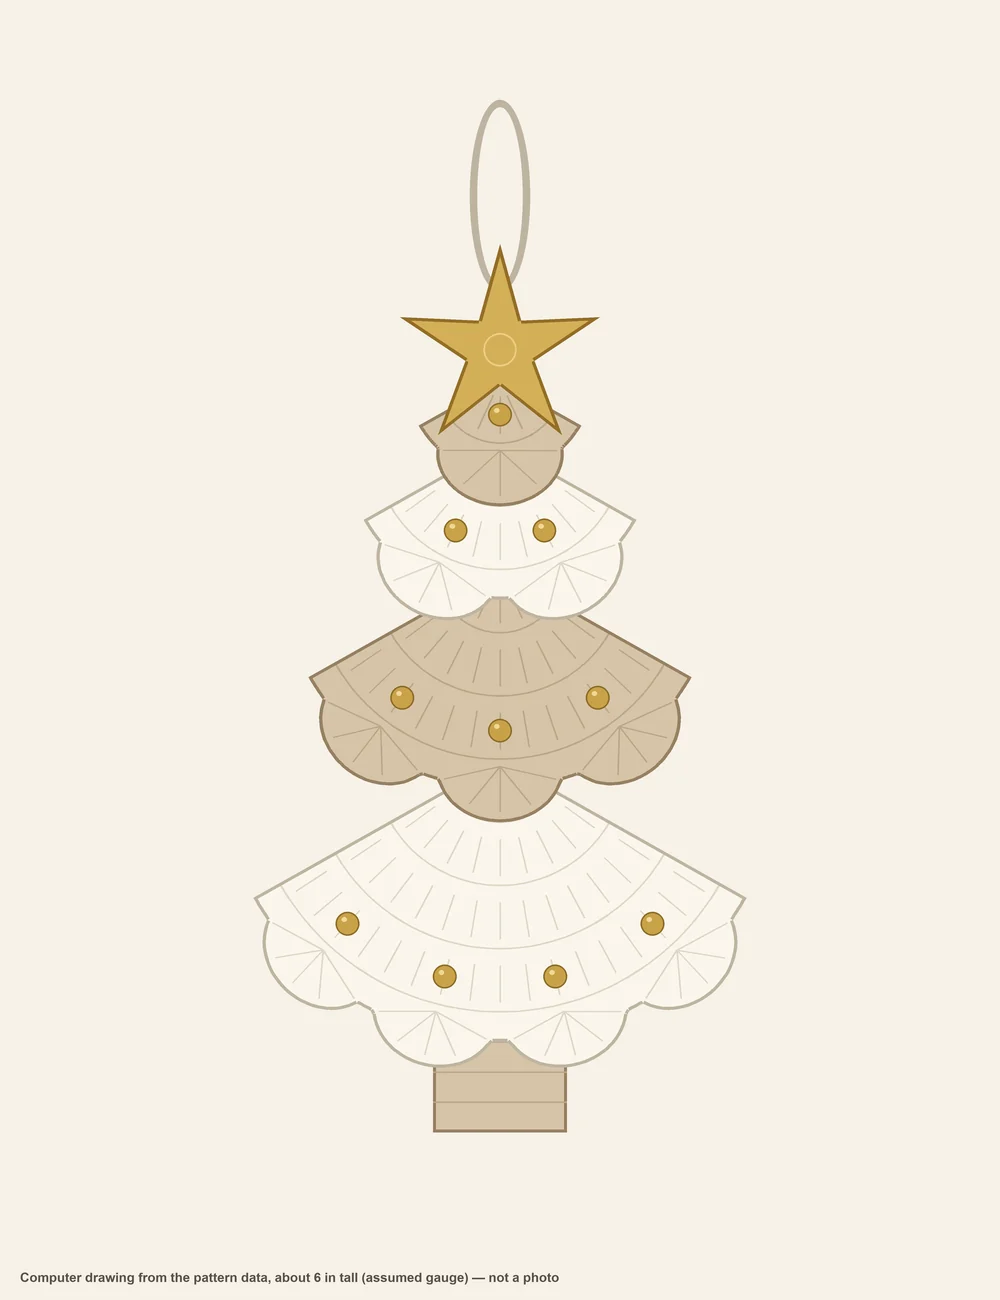
This free crochet Christmas tree ornament is a little flat tree made of four scalloped tiers, in ivory and oatmeal, with a garland of tiny gold beads and a gold star on top. It is an original CookZya design and the second ornament of our neutral Christmas series, after the layered poinsettia.
Every tier is the same easy fan, worked in rows from a magic ring: 5 dc, then 4 more dc on every row, then a row of shells for the scalloped edge. The top tier stops after 1 row, the bottom tier after 4, so once you have made the first tier you know the whole crochet Christmas tree pattern. A 5-point star, a short trunk and a chain loop finish it.
With worsted weight yarn and a US G-6 (4.0 mm) hook, the tree is about 6 in tall and 3¼ in wide. Every row below was checked by our stitch simulator; the pattern has not been crochet-tested yet. Tick each row as you go — your progress stays saved in this browser.
- Finished size
- About 6 in tall (trunk to star tip) and 3¼ in wide, without the loop — approximate, at the suggested gauge
- Level
- Easy — you need ch, sl st, sc, hdc and dc, and a magic ring
- Time
- About 2 hours with the assembly, estimated (not timed)
- Yarn
- Worsted weight (#4): about 15 yd ivory, 10 yd oatmeal and 5 yd gold metallic
- Hook
- US G-6 (4.0 mm), plus a yarn needle and a thin needle for the beads
- Gauge
- Suggested only, not swatched: 18 sc and 20 rows of sc = 4 in. Each dc row of a tier adds about 0.4 in
Sizes
Mini — about 4½ in tall
- Yarn
- sport weight (#2)
- Hook
- US C-2 (2.75 mm)
- Yarn needed
- ivory 15 yd · oatmeal 10 yd · gold 5 yd
- Finished size
- about 4½ x 2½ in, approximate (assumed gauge 24 sc = 4 in)
- Check before seaming
- same stitch counts for every size: only the yarn and the hook change
Standard (as written) — about 6 in tall
- Yarn
- worsted weight (#4)
- Hook
- US G-6 (4.0 mm)
- Yarn needed
- ivory 15 yd · oatmeal 10 yd · gold 5 yd
- Finished size
- about 6 x 3¼ in, approximate (assumed gauge 18 sc = 4 in)
- Check before seaming
- same stitch counts for every size: only the yarn and the hook change
Large (tree topper) — about 8¼ in tall
- Yarn
- bulky weight (#5)
- Hook
- US I-9 (5.5 mm)
- Yarn needed
- ivory 20 yd · oatmeal 15 yd · gold 5 yd
- Finished size
- about 8¼ x 4½ in, approximate (assumed gauge 13 sc = 4 in)
- Check before seaming
- same stitch counts for every size: only the yarn and the hook change
✓ CookZya original design · Stitch counts checked row by row — shape and size not tested. All 22 rows and rounds — 4 tiers, the star, the trunk and the loop — were replayed by our stitch simulator, the chart symbols were counted against the text, and a second reading made from the written text alone matched it stitch by stitch. This pattern has not been crochet-tested: tension, gauge and final size are up to your hands.
Materials
- Color A — ivory, for tiers 2 and 4 and the loop, about 15 yd
- Color B — oatmeal, for tiers 1 and 3 and the trunk, about 10 yd
- Color C — gold metallic, for the star, about 5 yd
- Yardage is estimated from the stitch counts, with a 20 % margin and the long sewing tails included.
- Worsted weight (#4) yarn: a smooth cotton or a cotton blend keeps the shells crisp; acrylic works too. For the star, any worsted weight metallic yarn (or a #4 yarn held together with a fine gold thread).
- US G-6 (4.0 mm) hook: one size smaller than most worsted labels ask for, on purpose — the tighter fabric keeps the tiers flat and firm and holds the beads.
- 10 gold beads, about 4 mm, with sewing thread and a thin needle that fits through them.
- Yarn needle, pins, a towel for blocking. Optional: spray starch.
Notes
- US crochet terms. ch = chain, sl st = slip stitch, sc = single crochet, hdc = half double crochet, dc = double crochet, st(s) = stitch(es), rep = repeat, Rnd = round.
- Magic ring: wrap the yarn around two fingers, insert the hook under the strands, pull up a loop and ch as the row says. Work the first row over the ring, then pull the tail to close it.
- The tiers are worked in rows, not rounds: do not join. At the end of each row, turn the work over and start back the other way. The ch 2 (or ch 1) at the start of a row does not count as a stitch.
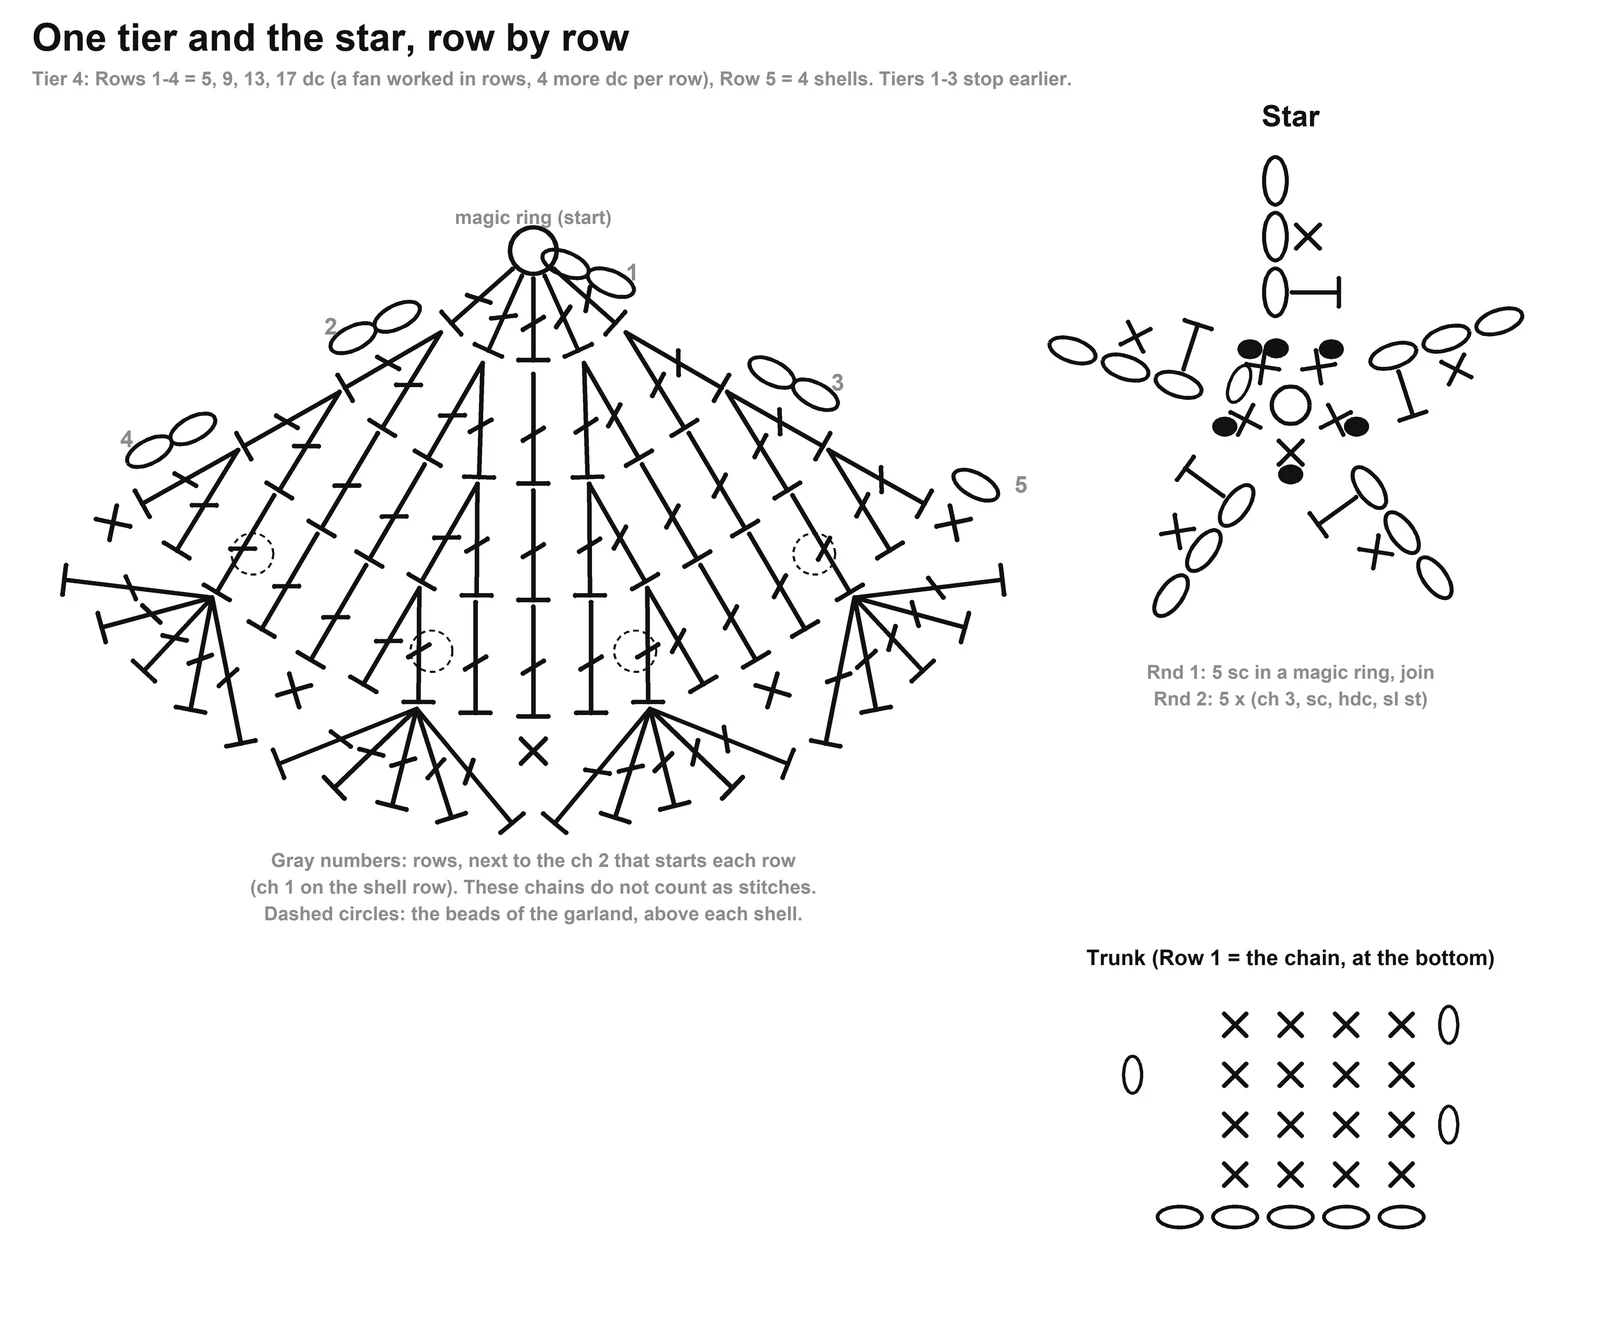
- "2 dc in next dc" = an increase: 2 dc in the same stitch. Row 1 is 5 dc in the ring; every dc row after it has 4 increases, so each row has 4 more dc than the one before: 5, 9, 13, 17.
- Shell = 5 dc in the same stitch. On the last row of a tier, the shells sit between sc: sc, skip 1, shell, skip 1, sc. Tier 1 has 1 shell, tier 2 has 2, tier 3 has 3, tier 4 has 4.
- Star point: ch 3, then work back down that chain: sc in the 2nd ch from the hook, hdc in the next ch. Then sl st in the next sc of the centre.
- "Leaving a 12 in tail": these long tails are used to sew the pieces together at the end.
Crochet Christmas tree chart
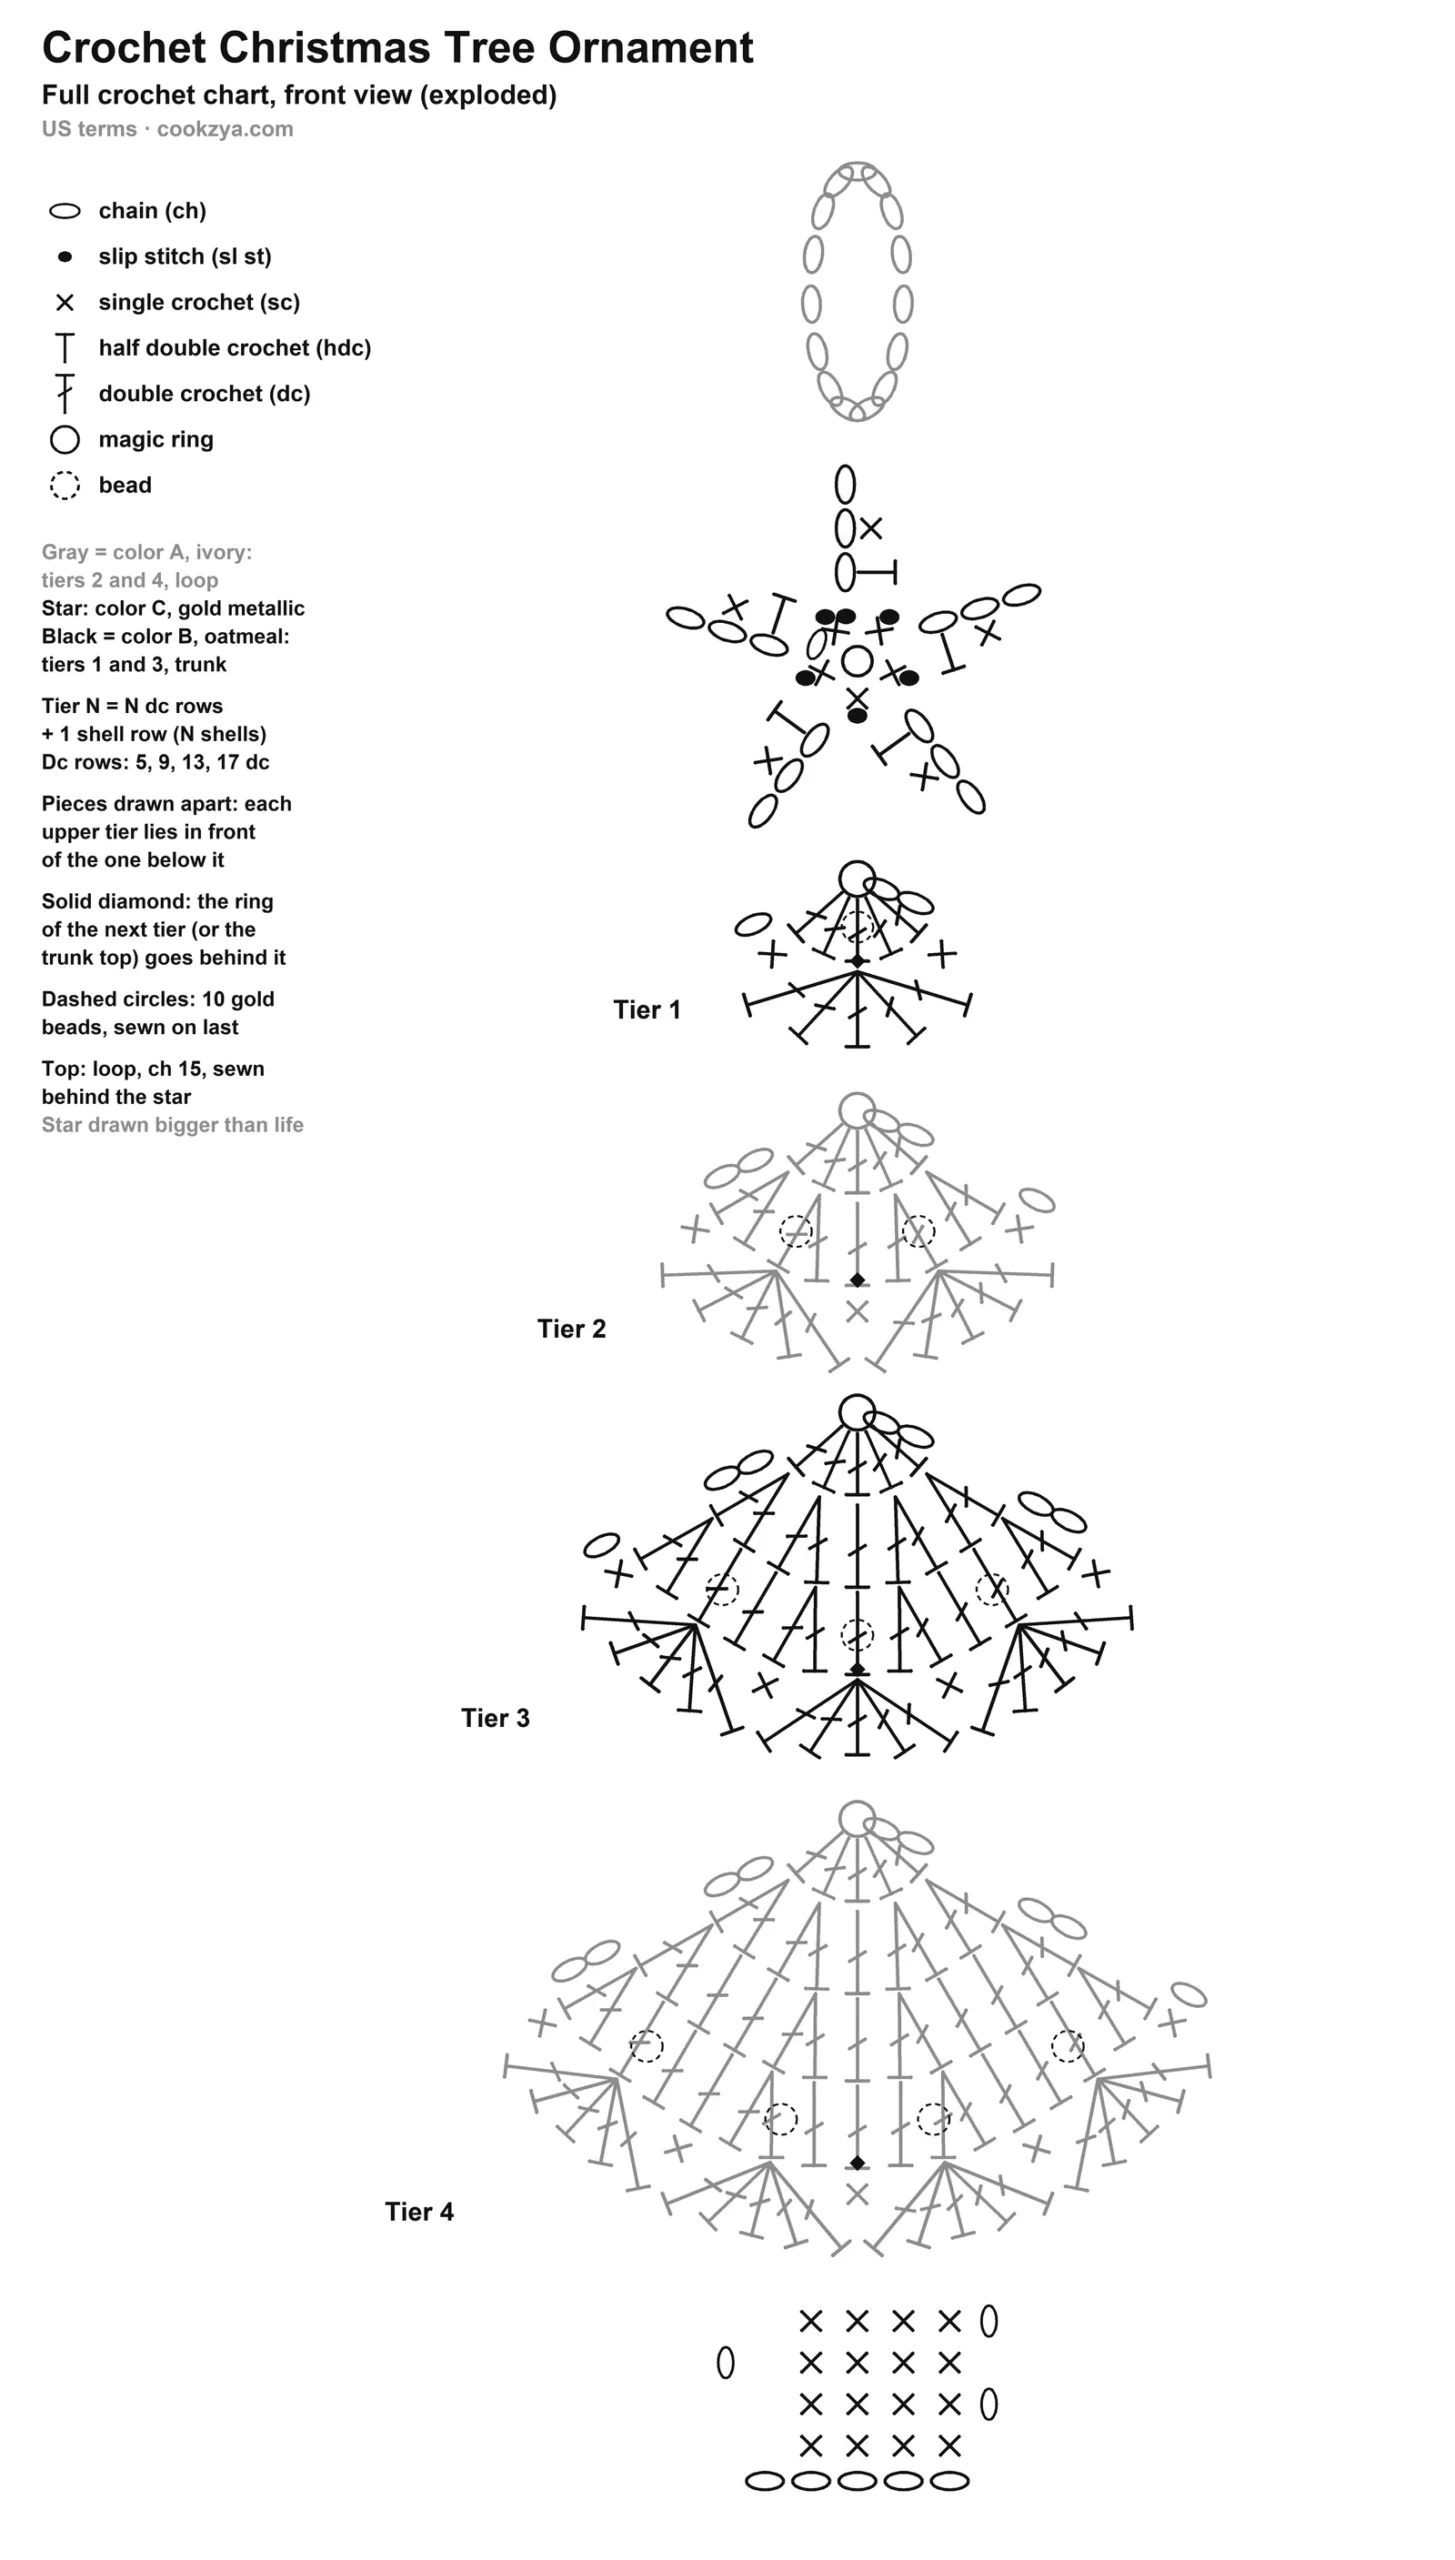
Tier 1 (top) — color B, oatmeal
The smallest tier: 1 row of dc and 1 shell. Every tier starts the same way, from a magic ring, and is worked in rows (turn at the end of every row). The ch at the start of a row never counts as a stitch.
- With B (oatmeal), leaving a 12 in tail, make a magic ring. Ch 2 (does not count as a stitch), 5 dc in the ring. Pull the tail to close the ring. Do not join: the tier is a fan worked in rows (5 dc). 5 dc
- Ch 1 (does not count as a stitch), turn. Sc in first dc, skip 1 dc, 5 dc in next dc, skip 1 dc, sc in last dc (1 shell: 5 dc, 2 sc). Fasten off, leaving a 6 in tail. 2 sc, 5 dc
Tier 2 — color A, ivory
2 rows of dc (5 and 9 dc), then 2 shells.
- With A (ivory), leaving a 12 in tail, make a magic ring. Ch 2 (does not count as a stitch), 5 dc in the ring. Pull the tail to close the ring. Do not join: the tier is a fan worked in rows (5 dc). 5 dc
- Ch 2 (does not count as a stitch), turn. 2 dc in each of first 2 dc, dc in next dc, 2 dc in each of last 2 dc (9 dc: 4 more than the row before). 9 dc
- Ch 1 (does not count as a stitch), turn. Sc in first dc, *skip 1 dc, 5 dc in next dc, skip 1 dc, sc in next dc; rep from * 1 more time (2 shells: 10 dc, 3 sc). Fasten off, leaving a 6 in tail. 3 sc, 10 dc
Tier 3 — color B, oatmeal
3 rows of dc (5, 9 and 13 dc), then 3 shells.
- With B (oatmeal), leaving a 12 in tail, make a magic ring. Ch 2 (does not count as a stitch), 5 dc in the ring. Pull the tail to close the ring. Do not join: the tier is a fan worked in rows (5 dc). 5 dc
- Ch 2 (does not count as a stitch), turn. 2 dc in each of first 2 dc, dc in next dc, 2 dc in each of last 2 dc (9 dc: 4 more than the row before). 9 dc
- Ch 2 (does not count as a stitch), turn. 2 dc in first dc, dc in next 2 dc, 2 dc in next dc, dc in next dc, 2 dc in next dc, dc in next 2 dc, 2 dc in last dc (13 dc: 4 more than the row before). 13 dc
- Ch 1 (does not count as a stitch), turn. Sc in first dc, *skip 1 dc, 5 dc in next dc, skip 1 dc, sc in next dc; rep from * 2 more times (3 shells: 15 dc, 4 sc). Fasten off, leaving a 6 in tail. 4 sc, 15 dc
Tier 4 (bottom) — color A, ivory
The biggest tier: 4 rows of dc (5, 9, 13 and 17 dc), then 4 shells.
- With A (ivory), leaving a 12 in tail, make a magic ring. Ch 2 (does not count as a stitch), 5 dc in the ring. Pull the tail to close the ring. Do not join: the tier is a fan worked in rows (5 dc). 5 dc
- Ch 2 (does not count as a stitch), turn. 2 dc in each of first 2 dc, dc in next dc, 2 dc in each of last 2 dc (9 dc: 4 more than the row before). 9 dc
- Ch 2 (does not count as a stitch), turn. 2 dc in first dc, dc in next 2 dc, 2 dc in next dc, dc in next dc, 2 dc in next dc, dc in next 2 dc, 2 dc in last dc (13 dc: 4 more than the row before). 13 dc
- Ch 2 (does not count as a stitch), turn. 2 dc in first dc, dc in next 3 dc, 2 dc in next dc, dc in next 3 dc, 2 dc in next dc, dc in next 3 dc, 2 dc in last dc (17 dc: 4 more than the row before). 17 dc
- Ch 1 (does not count as a stitch), turn. Sc in first dc, *skip 1 dc, 5 dc in next dc, skip 1 dc, sc in next dc; rep from * 3 more times (4 shells: 20 dc, 5 sc). Fasten off, leaving a 6 in tail. 5 sc, 20 dc
Gold star — color C, gold metallic
Worked in the round: 5 sc, then 5 points. One point = ch 3, sc in 2nd ch from hook, hdc in next ch: the sc and the hdc are worked into the chain you just made, back toward the centre.
- With C (gold metallic), leaving a 12 in tail, make a magic ring. Ch 1 (does not count as a stitch), 5 sc in the ring. Pull the tail to close the hole. Join with sl st in first sc (5 sc). 5 sc
- Do not turn. Start in the same sc as the join: *ch 3, sc in 2nd ch from hook, hdc in next ch (1 point made: the sc and the hdc sit on the ch 3, which stays in the point), sl st in next sc; rep from * 4 more times. The last sl st goes in the first sc, where Rnd 1 was joined (5 points, each one rising from 1 sc: the round holds 5 ch-3 chains, 5 sc and 5 hdc). Fasten off, leaving a 6 in tail. 5 sc, 5 hdc, 5 ch-3 sps
Trunk — color B, oatmeal
A little rectangle of 4 sc, worked in rows.
- With B (oatmeal), leaving a 12 in tail, ch 5 (the foundation chain). 1 ch-5 sp
- Working back along the chain: sc in 2nd ch from hook and in each ch across (4 sc). 4 sc
- Ch 1 (does not count as a stitch), turn. Sc in each sc across (4 sc). 4 sc
- Ch 1 (does not count as a stitch), turn. Sc in each sc across (4 sc). 4 sc
- Ch 1 (does not count as a stitch), turn. Sc in each sc across (4 sc). Fasten off, leaving a 6 in tail. 4 sc
Hanging loop — color A, ivory
A plain chain, folded in half and sewn on at the end.
- With A (ivory), leaving a 6 in tail, ch 15. Fasten off, leaving a 6 in tail. Fold the chain in half: the two tails sew it behind the star. 1 ch-15 sp
Assemble the crochet Christmas tree
1 Weave in the short ends
2 Block the pieces
3 Sew on the bead garland
4 Stack the tiers
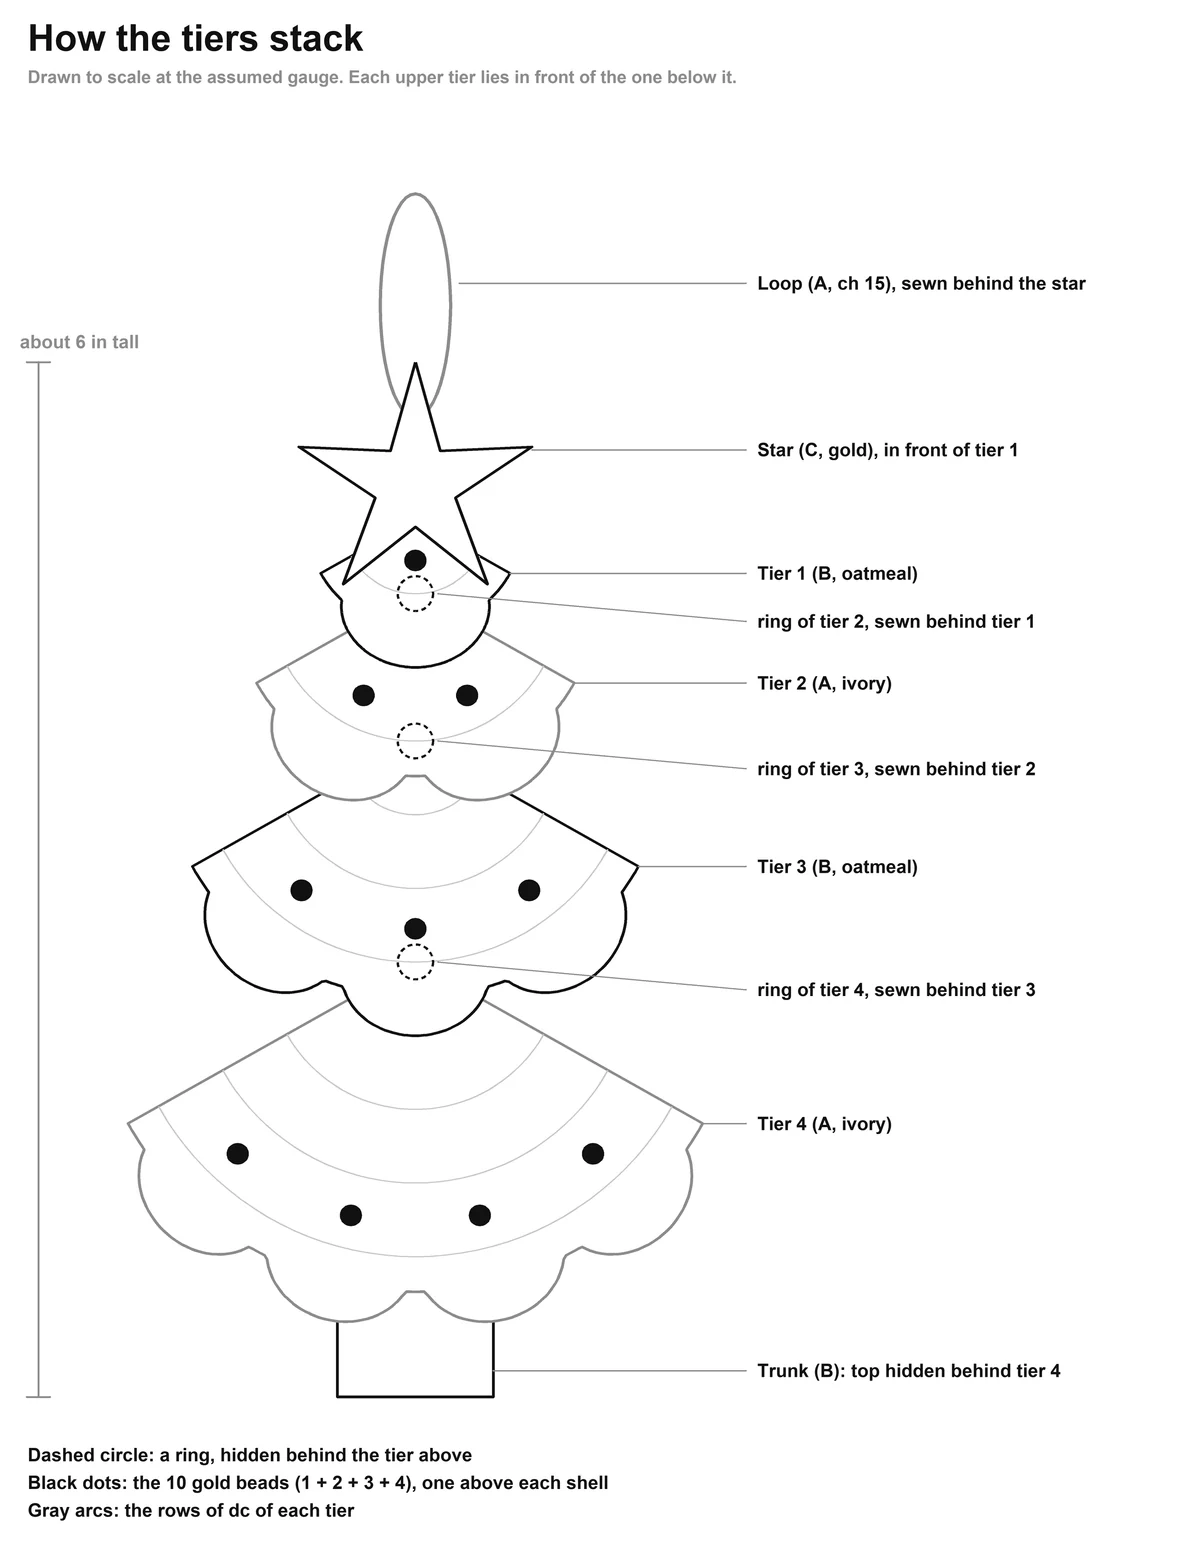
5 Sew the tiers together
6 Add the trunk
7 Sew on the gold star
8 Add the loop
Finishing
Hang the tree by its loop. To keep it flat from one Christmas to the next, store it flat in a box between two pieces of card.
Design notes
- Each tier is a fan that gains 4 dc per row. At the suggested gauge, that keeps the same angle (about 121 degrees) from row to row, so the fan lies flat instead of cupping or rippling.
- A shell row closes exactly on 1 + 4 x (number of shells) stitches: 5, 9, 13 and 17 dc give 1, 2, 3 and 4 shells. That is why tier N has N rows of dc and N shells.
- The shells add a few stitches more than a flat row would need: the edge of each tier ruffles very slightly, like a little skirt.
- Each ring sits behind the tier above it, so the stitched join never shows from the front, and the tiers alternate oatmeal and ivory from top to bottom.
- The size is computed from the stitch heights at the suggested gauge: about 6 in from the bottom of the trunk to the tip of the star.
Tips for this crochet Christmas tree
- Make tier 4 first: it has every row of the other tiers, so once it is done the others go fast.
- Count each dc row before you turn: 5, 9, 13, 17. If a row has 8 or 10, an increase is missing or doubled.
- Place a stitch marker in the first dc of each row: the ch 2 at the start is easy to mistake for a stitch.
- Metallic yarn can be slippery: work the star a little more slowly and pull the ring tight.
- Block the tiers before you stack them: flat tiers are much easier to line up.
- Make several at once in one evening: all the rings first, then all the rows.
Common mistakes
- Joining the rows like a round: the tiers are fans worked in rows, so turn instead of joining.
- Counting the starting ch 2 as a dc: every row then ends with one dc too many.
- Working the shells into the wrong stitches: skip 1 dc on each side of every shell, never 2.
- Sewing through to the front: catch only the back of the stitches when you sew the rings.
Make it your own
- Three sizes, same counts: Mini in sport weight (#2) with a US C-2 (2.75 mm) hook, about 4½ in; Large in bulky weight (#5) with a US I-9 (5.5 mm) hook, about 8¼ in, big enough for a small tree topper.
- Ivory star: work the star in A (ivory) instead of gold, for an all-neutral tree (about 5 yd more ivory).
- No beads (homes with babies and toddlers): skip the beads and embroider small French knots in gold yarn, or leave the garland out. Beads are a choking hazard: keep beaded ornaments away from children under 3.
- Garland of trees: make 5 or more Mini trees, crochet a long chain and slip it through the loops, or sew the trees to a ribbon, a hand's width apart.
- Gift tag: sew a tree onto a kraft tag or a wrapped present instead of adding the loop.
- Two-tone tiers: make all four tiers in one color and only the star in gold.
Care
- Spot clean with a damp cloth; do not machine wash the beaded ornament.
- Store flat between two pieces of card so the tiers keep their shape.
More views
More crochet patterns for your table
- Layered Poinsettia Christmas Ornament — the first ornament of this neutral Christmas series: an ivory and oatmeal flower with gold beads
- Easy Crochet Pumpkin — another quick, easy make in three sizes
- Crochet Pumpkin Coaster — a small one-evening project to practice sc and hdc
- Autumn Leaves Table Runner — a CookZya original with small flat motifs for the holiday table
FAQ
Is this crochet Christmas tree pattern good for beginners?
Yes. If you can chain and work sc and dc, you can make it. You will also use hdc (only in the star points) and a magic ring. Every tier is the same fan, so the pattern repeats itself and you can check each row with its stitch count.
How big is the crochet Christmas tree ornament?
About 6 in tall from the trunk to the tip of the star and 3¼ in wide, with worsted weight yarn and a US G-6 (4.0 mm) hook, at the suggested gauge. The Mini version is about 4½ in and the Large about 8¼ in.
How much yarn do I need?
About 15 yd of ivory, 10 yd of oatmeal and 5 yd of gold metallic worsted weight yarn — a great way to use up leftovers. These are estimates with a 20 % margin.
Which hook should I use?
A US G-6 (4.0 mm) hook with worsted weight yarn. It is a little small for the yarn on purpose: the firm fabric keeps the tiers flat and holds the beads.
Can I make it without beads?
Yes. Skip the beads or embroider small French knots in gold yarn instead. If the ornament may end up in a child's hands, leave the beads out: they are a choking hazard.
How do I keep the tiers flat and stiff?
Use the smaller hook, block every piece flat before you sew, and tack the centre of each shell row to the tier behind it. A light spray starch while blocking makes the ornament stiffer.
Can I make a garland of crochet Christmas trees?
Yes. Make 5 or more trees, in the Mini size if you like, and string them on a long crochet chain or a ribbon through their loops.
Can I sell the ornaments I make from this pattern?
Yes, you may sell the ornaments you crochet yourself. Please don't sell or repost the pattern; link to this page instead.
Copyright
© 2026 CookZya — original design. Free for personal use: you may make and sell the ornaments you crochet. Please don't sell, copy or repost this pattern; link to this page instead.