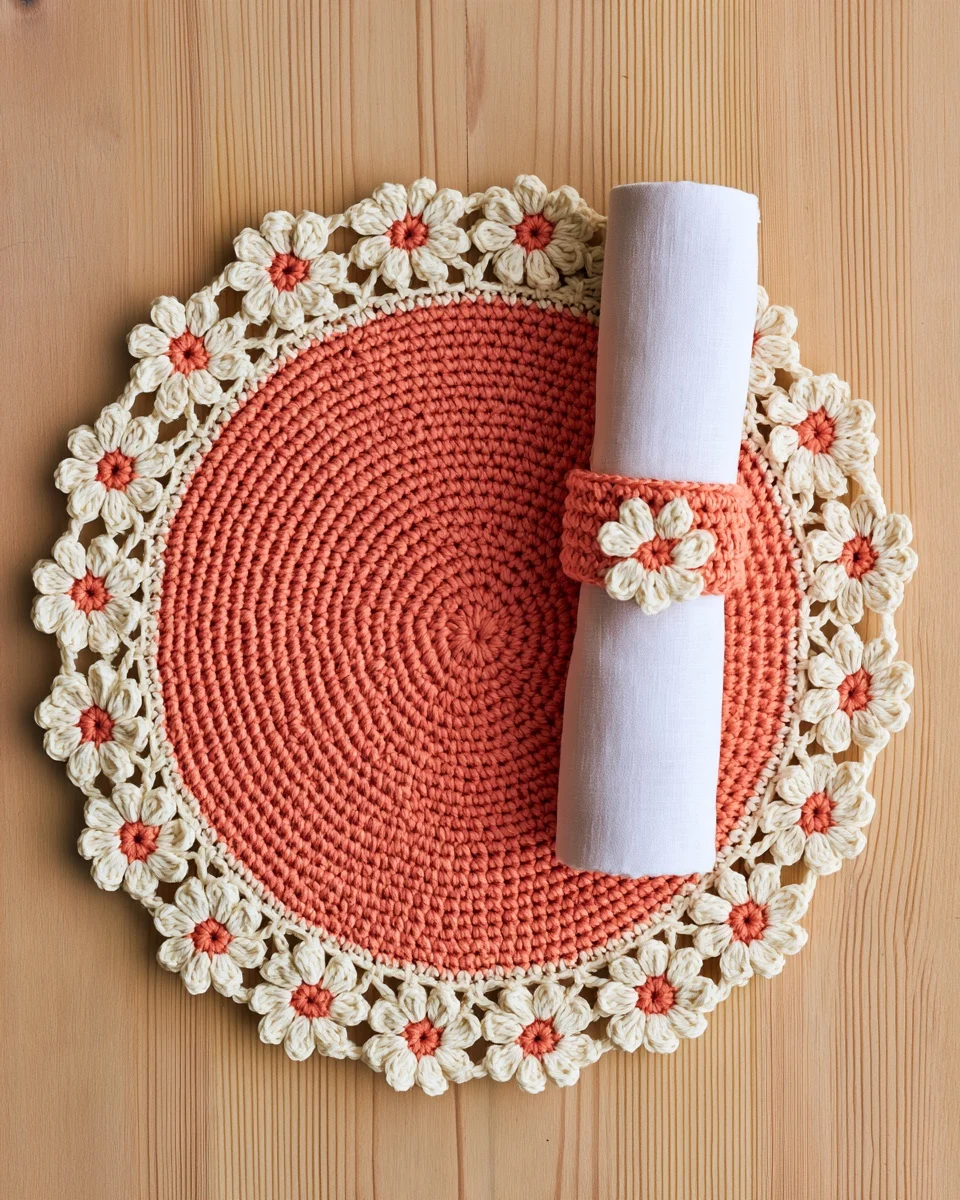
This crochet daisy placemat pattern makes a round coral placemat ringed with cream daisies, plus a matching daisy napkin ring. It is an original CookZya design, free on this page, and it brings a little spring garden to the table.
You make it in three easy parts. First you crochet the solid coral centre in rounds of double crochet. Then one thin cream round adds little chain loops. Last, you make 12 small daisies and join each one to those loops while you work its petals, so there is nothing to sew on the placemat.
The finished placemat is about 13 1/2 in (34 cm) across, approximate, in worsted weight cotton with a US G-6 (4.0 mm) hook. Every round below was checked by our stitch simulator; the pattern has not been crochet-tested yet. Tick each round as you go — your progress stays saved in this browser.
- Finished size
- Placemat about 13 1/2 in (34 cm) across, approximate. Napkin ring about 5 3/4 in around and 2 in wide (15 x 5 cm), approximate.
- Level
- Easy — for a confident beginner who knows ch, sc, hdc and dc
- Time
- About 5 hours for the placemat and 45 minutes for a napkin ring, estimated (not timed)
- Yarn
- Worsted weight (#4) cotton in 2 colors: about 60 yd coral and 60 yd cream for one placemat and one napkin ring
- Hook
- US G-6 (4.0 mm)
- Gauge
- Suggested only, not swatched: Rnds 1-4 of the centre = about 3 3/4 in across
- Daisies
- 12 on the placemat, 1 on the napkin ring, each about 2 3/4 in across
✓ CookZya original design · Stitch counts checked row by row — shape and size not tested. All 50 rounds and rows — the placemat centre and edge, the 3 versions of the daisy, the napkin ring band and its edging — were replayed by our stitch simulator, and a second reading made from the written text alone matched it stitch by stitch. This pattern has not been crochet-tested: tension, gauge and final size are up to your hands.
Materials
- Color A — coral (or terracotta), for the placemat centre, the daisy centres and the napkin ring band, about 60 yd
- Color B — cream, for the edge, the petals and the napkin ring edging, about 60 yd
- Yardage is estimated from the stitch counts with a 20 % margin. The placemat alone takes about 50 yd of A and 50 yd of B; each napkin ring about 10 yd of A and 10 yd of B.
- 100 % cotton is best for a placemat: it lies flat, takes the heat of a plate and washes well.
- US G-6 (4.0 mm) hook, yarn needle, rust-proof pins, scissors.
Notes
- US crochet terms. ch = chain, sl st = slip stitch, sc = single crochet, hdc = half double crochet, dc = double crochet, tr = treble crochet, sp = space, st(s) = stitch(es), rep = repeat, Rnd = round.
- Sl st (slip stitch): insert the hook, yarn over and pull the loop through the stitch and the loop on your hook in one go. It joins a round, and it joins a daisy petal to the placemat.
- Hdc: yarn over, insert the hook, pull up a loop, yarn over and pull through all 3 loops. Dc: yarn over, insert, pull up a loop, then (yarn over, pull through 2 loops) twice. Tr: yarn over twice, insert, pull up a loop, then (yarn over, pull through 2 loops) three times.
- Magic ring: wrap the yarn around two fingers, insert the hook under the strands, pull up a loop and ch 1. Work the first round over the ring, then pull the tail to close the hole.
- The ch 2 or ch 1 at the start of a round does not count as a stitch, and each round starts in the same stitch as the join.
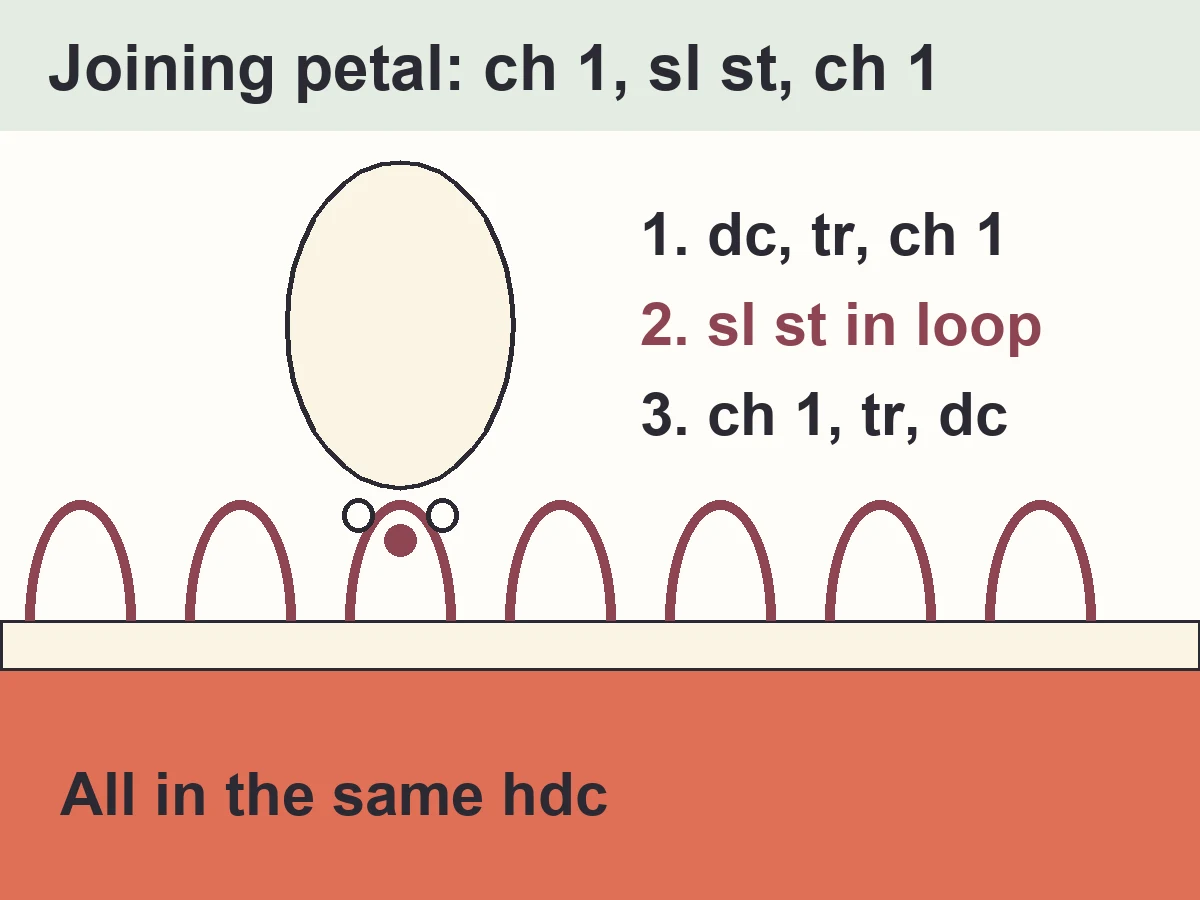
- Petal = (dc, tr, ch 2, tr, dc) all in the same st. Joining petal = (dc, tr, ch 1, sl st in the space you join to, ch 1, tr, dc) all in the same st: the sl st takes the place of the middle of the ch 2.
- Work the placemat and the daisies with the right side facing you. The daisies go around the placemat one after the other: after petal 1, the next petals you work face the edge of the placemat.
How the crochet daisy placemat is built
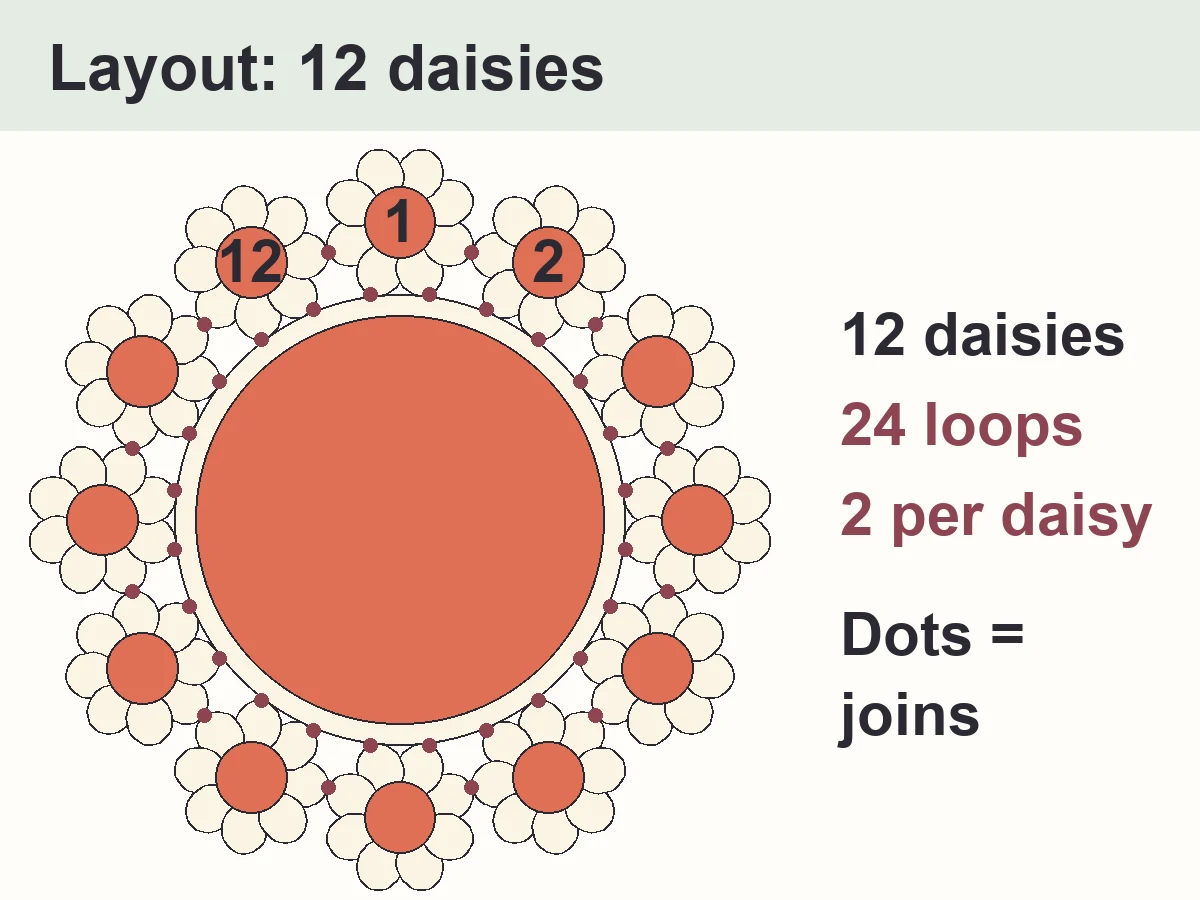
Placemat centre and edge
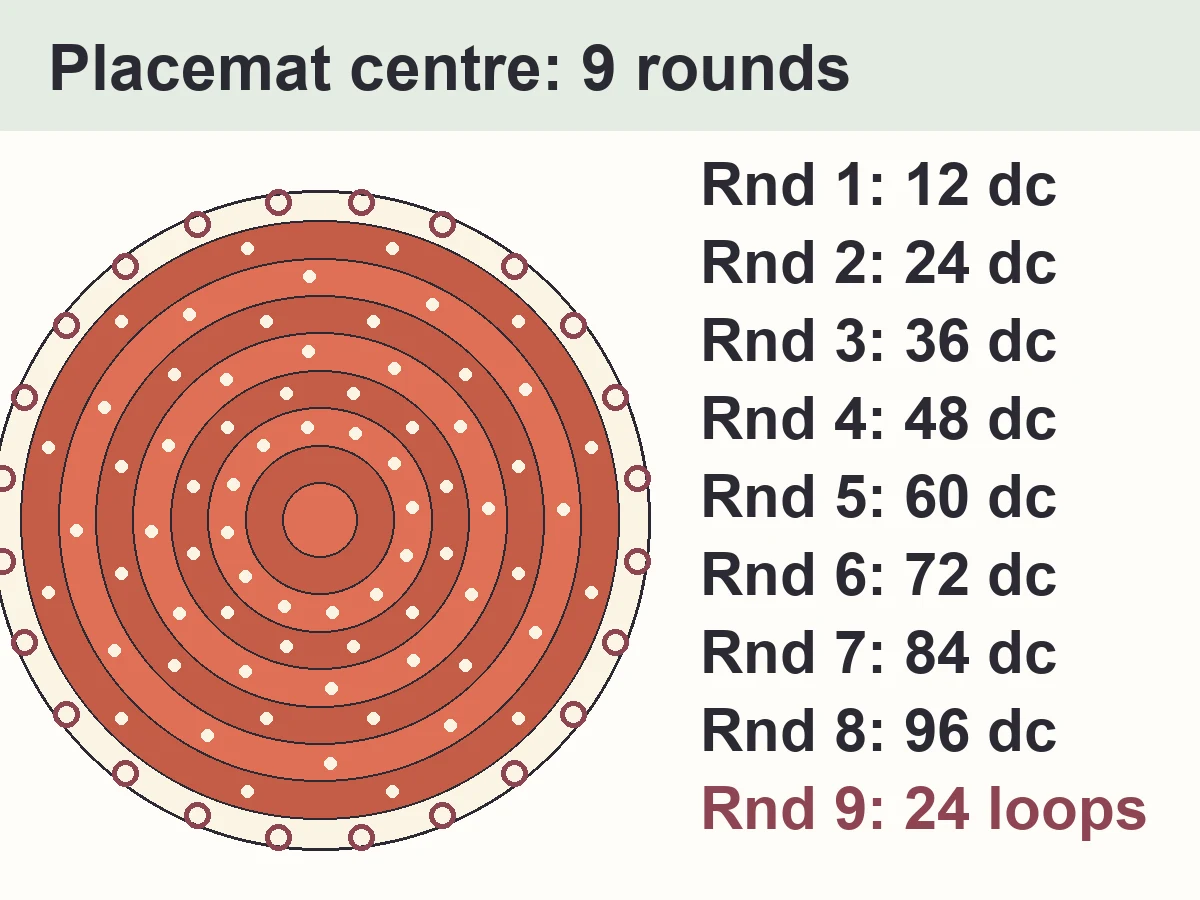
With A (coral) for Rnds 1-8, then B (cream) for Rnd 9. Each round of the centre adds 12 dc, so the circle lies flat; the increases move from round to round so it stays round, not six-sided. Rnd 9 makes the 24 little loops the daisies hold on to.
- With A, make a magic ring. Ch 2 (does not count as a stitch), 12 dc in the ring. Pull the tail to close the ring. Join with sl st in first dc (12 dc). 12 dc
- Ch 2 (does not count as a stitch), 2 dc in each st around, starting in the same st as the join. Join with sl st in first dc (24 dc). 24 dc
- Ch 2 (does not count as a stitch). The st with the join counts as the first st: *dc in next st, 2 dc in next st; rep from * 11 more times. Join with sl st in first dc (36 dc). 36 dc
- Ch 2 (does not count as a stitch). The st with the join counts as the first st: *dc in next st, 2 dc in next st, dc in next st; rep from * 11 more times. Join with sl st in first dc (48 dc). 48 dc
- Ch 2 (does not count as a stitch). The st with the join counts as the first st: *dc in each of next 3 sts, 2 dc in next st; rep from * 11 more times. Join with sl st in first dc (60 dc). 60 dc
- Ch 2 (does not count as a stitch). The st with the join counts as the first st: *dc in each of next 2 sts, 2 dc in next st, dc in each of next 2 sts; rep from * 11 more times. Join with sl st in first dc (72 dc). 72 dc
- Ch 2 (does not count as a stitch). The st with the join counts as the first st: *dc in each of next 5 sts, 2 dc in next st; rep from * 11 more times. Join with sl st in first dc (84 dc). 84 dc
- Ch 2 (does not count as a stitch). The st with the join counts as the first st: *dc in each of next 3 sts, 2 dc in next st, dc in each of next 3 sts; rep from * 11 more times. Join with sl st in first dc (96 dc). Fasten off A. 96 dc
- Join B with sl st in any dc. Ch 1 (does not count as a stitch), sc in same st as join, sc in each of next 2 sts, ch 3, skip next st, *sc in each of next 3 sts, ch 3, skip next st; rep from * 22 more times. Join with sl st in first sc (72 sc, 24 ch-3 sps). Fasten off B. 72 sc, 24 ch-3 sps
Daisies
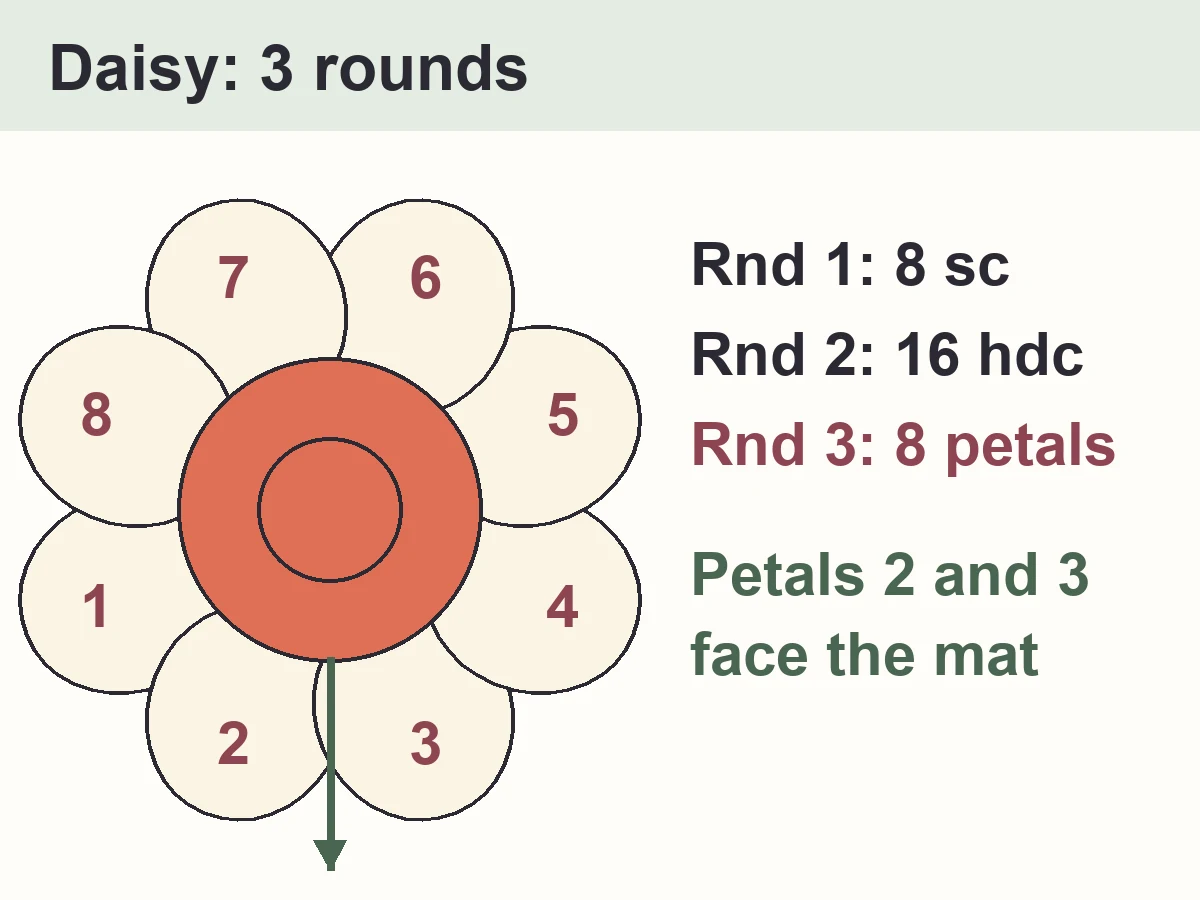
Make 12, one at a time: the centre in A, the petals in B. Rnds 1 and 2 are the same for every daisy. Rnd 3 comes in 3 versions: daisy 1 joins the edge only, daisies 2 to 11 also join the daisy before, and daisy 12 also joins daisy 1 to close the ring. Petal = (dc, tr, ch 2, tr, dc) all in the same st. Joining petal = (dc, tr, ch 1, sl st in the space you join to, ch 1, tr, dc) all in the same st: the sl st takes the place of the middle of the ch 2.
- With A, make a magic ring. Ch 1 (does not count as a stitch), 8 sc in the ring. Pull the tail to close the ring. Join with sl st in first sc (8 sc). 8 sc
- Ch 1 (does not count as a stitch), 2 hdc in each st around, starting in the same st as the join. Join with sl st in first hdc (16 hdc). Fasten off A. 16 hdc
- Join B with sl st in any hdc. Ch 1 (does not count as a stitch), sc in same st as join, petal in next st (petal 1). Sc in next st, joining petal in next st, joined to any ch-3 sp of the placemat edge (petal 2). Sc in next st, joining petal in next st, joined to the next ch-3 sp along the edge, on the side away from petal 1 (petal 3). *Sc in next st, petal in next st; rep from * 4 more times (petals 4 to 8). Join with sl st in first sc (8 petals). Fasten off B. 8 sc, 16 dc, 16 tr: 6 free petal tips, 2 joined
- Join B with sl st in any hdc. Ch 1 (does not count as a stitch), sc in same st as join, joining petal in next st, joined to the ch-2 sp at the tip of petal 4 of the daisy before (petal 1). Sc in next st, joining petal in next st, joined to the first free ch-3 sp of the placemat edge, the one right next to the ch-3 sp that holds petal 3 of the daisy before (petal 2). Sc in next st, joining petal in next st, joined to the next ch-3 sp along the edge, on the side away from petal 1 (petal 3). *Sc in next st, petal in next st; rep from * 4 more times (petals 4 to 8). Join with sl st in first sc (8 petals). Fasten off B. 8 sc, 16 dc, 16 tr: 5 free petal tips, 3 joined
- Join B with sl st in any hdc. Ch 1 (does not count as a stitch), sc in same st as join, joining petal in next st, joined to the ch-2 sp at the tip of petal 4 of the daisy before (petal 1). Sc in next st, joining petal in next st, joined to the first free ch-3 sp of the placemat edge, the one right next to the ch-3 sp that holds petal 3 of the daisy before (petal 2). Sc in next st, joining petal in next st, joined to the next ch-3 sp along the edge, on the side away from petal 1 (petal 3). Sc in next st, joining petal in next st, joined to the ch-2 sp at the tip of petal 1 of the first daisy (petal 4). *Sc in next st, petal in next st; rep from * 3 more times (petals 5 to 8). Join with sl st in first sc (8 petals). Fasten off B. 8 sc, 16 dc, 16 tr: 4 free petal tips, 4 joined
Napkin ring band
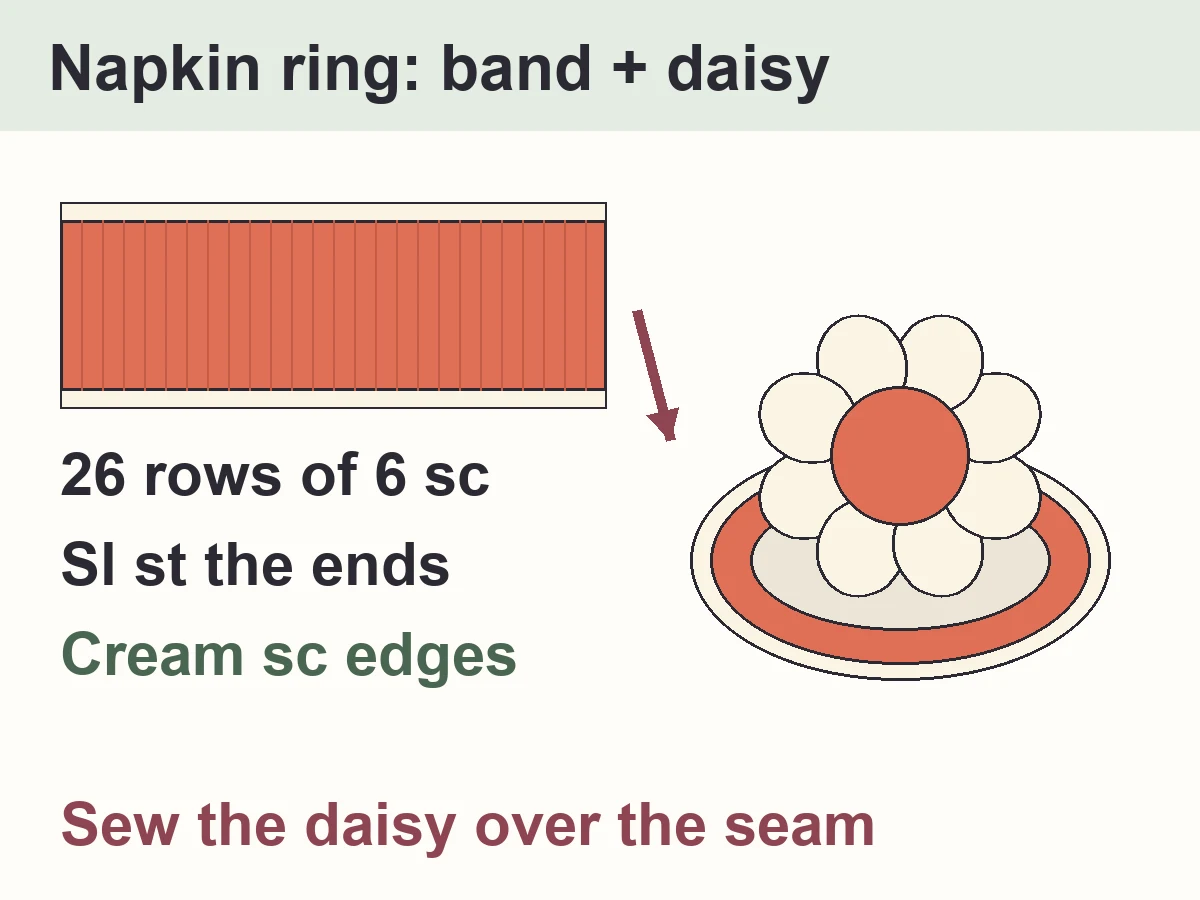
With A. Rows are worked back and forth. Every row after Row 1 is the same, so you only count rows: 26 in all. The band should wrap loosely around a rolled napkin; add or remove rows if you like.
- With A, ch 7. 7 ch
- Sc in 2nd ch from hook and in each ch across (6 sc). 6 sc
- Ch 1 (does not count as a stitch), turn. Sc in each st across (6 sc). 6 sc
- Ch 1 (does not count as a stitch), turn. Sc in each st across (6 sc). 6 sc
- Ch 1 (does not count as a stitch), turn. Sc in each st across (6 sc). 6 sc
- Ch 1 (does not count as a stitch), turn. Sc in each st across (6 sc). 6 sc
- Ch 1 (does not count as a stitch), turn. Sc in each st across (6 sc). 6 sc
- Ch 1 (does not count as a stitch), turn. Sc in each st across (6 sc). 6 sc
- Ch 1 (does not count as a stitch), turn. Sc in each st across (6 sc). 6 sc
- Ch 1 (does not count as a stitch), turn. Sc in each st across (6 sc). 6 sc
- Ch 1 (does not count as a stitch), turn. Sc in each st across (6 sc). 6 sc
- Ch 1 (does not count as a stitch), turn. Sc in each st across (6 sc). 6 sc
- Ch 1 (does not count as a stitch), turn. Sc in each st across (6 sc). 6 sc
- Ch 1 (does not count as a stitch), turn. Sc in each st across (6 sc). 6 sc
- Ch 1 (does not count as a stitch), turn. Sc in each st across (6 sc). 6 sc
- Ch 1 (does not count as a stitch), turn. Sc in each st across (6 sc). 6 sc
- Ch 1 (does not count as a stitch), turn. Sc in each st across (6 sc). 6 sc
- Ch 1 (does not count as a stitch), turn. Sc in each st across (6 sc). 6 sc
- Ch 1 (does not count as a stitch), turn. Sc in each st across (6 sc). 6 sc
- Ch 1 (does not count as a stitch), turn. Sc in each st across (6 sc). 6 sc
- Ch 1 (does not count as a stitch), turn. Sc in each st across (6 sc). 6 sc
- Ch 1 (does not count as a stitch), turn. Sc in each st across (6 sc). 6 sc
- Ch 1 (does not count as a stitch), turn. Sc in each st across (6 sc). 6 sc
- Ch 1 (does not count as a stitch), turn. Sc in each st across (6 sc). 6 sc
- Ch 1 (does not count as a stitch), turn. Sc in each st across (6 sc). 6 sc
- Ch 1 (does not count as a stitch), turn. Sc in each st across (6 sc). 6 sc
- Ch 1 (does not count as a stitch), turn. Sc in each st across (6 sc). Do not fasten off. 6 sc
Napkin ring edging
Close the ring: fold the band so the foundation chain lies against Row 26, without twisting it. Ch 1, then work 6 sl st across: each time, insert the hook through the next st of Row 26 (both loops) and the chain right below it, one of the 6 ch that Row 1 was worked into (6 sl st). Fasten off A.
- Join B with sl st in the end of any row on one edge of the ring. Ch 1 (does not count as a stitch), sc in the same row end and in the end of each row around: 1 sc per row, nothing in the seam itself (26 sc). Join with sl st in first sc. Fasten off B. 26 sc
- Join B with sl st in the end of any row on the other edge of the ring. Ch 1 (does not count as a stitch), sc in the same row end and in the end of each row around: 1 sc per row, nothing in the seam itself (26 sc). Join with sl st in first sc. Fasten off B. 26 sc
Napkin ring daisy
Make 1 daisy with 8 plain petals: no joins.
- With A, make a magic ring. Ch 1 (does not count as a stitch), 8 sc in the ring. Pull the tail to close the ring. Join with sl st in first sc (8 sc). 8 sc
- Ch 1 (does not count as a stitch), 2 hdc in each st around, starting in the same st as the join. Join with sl st in first hdc (16 hdc). Fasten off A. 16 hdc
- Join B with sl st in any hdc. Ch 1 (does not count as a stitch), sc in same st as join, petal in next st, *sc in next st, petal in next st; rep from * 6 more times (petals 1 to 8). Join with sl st in first sc (8 petals). Fasten off B, leaving a 12 in tail for sewing. 8 sc, 16 dc, 16 tr: 8 free petal tips
Putting it together
1 Check the daisy ring
2 Close the napkin ring
3 Sew the daisy on
4 Block both pieces
Finishing
Weave in all the ends on the back, through stitches of the same color so they do not show. Store the placemats flat, stacked, with the daisies facing up.
Design notes
- A flat circle of dc grows by 12 stitches a round. Moving the increases each round keeps the edge round instead of six-sided.
- Rnd 8 ends with 96 dc: that is 24 loops of 4 stitches, exactly 2 loops for each of the 12 daisies, with nothing left over.
- Each daisy holds the edge with 2 petals and its neighbor with 1, so the ring stays even without sewing.
- The daisy centre is 8 sc, then 16 hdc: hdc is just tall enough for 16 stitches to lie flat.
Tips for a neat crochet daisy placemat
- Put a stitch marker in the first dc of each round: it is the stitch most often missed at the join.
- Count every round of the centre: it should end with a multiple of 12.
- Lay each new daisy in place before Rnd 3, petals 2 and 3 toward the edge, to see where it joins.
- Keep the sl st of a joining petal loose: a tight join pulls the petal tip out of shape.
- Test each color before you start: soak a strand in warm water with a white tissue. If the coral runs, wash that yarn first so the cream stays clean.
Common mistakes
- Counting the ch 2 at the start of a round as a stitch: the round grows by one.
- Stacking the increases in the same place every round: the circle turns into a hexagon.
- Skipping a loop between two daisies: the last daisy has no room to close the ring.
- Joining the daisies with the wrong side up: the petals twist.
Make it your own
- Keep the size as written: the 12 daisies are sized for this exact centre. With 2 rounds more or less, the daisies would no longer meet each other (our geometry check shows a gap or a crowding of about 10 %), so we do not give an untested bigger or smaller version.
- Coaster: make Rnds 1-3 of the centre and one cream round of sc, then sew one daisy on top.
- Spring colors: swap the coral for butter yellow or sage green and keep the cream daisies.
- Set of four: one placemat and one napkin ring per guest, about 5 to 6 hours each.
Care
- Hand wash cold with a mild soap, or machine wash cold in a mesh bag on a gentle cycle.
- Lay flat to dry and pin the petals open again.
- Iron on low from the back, with a towel under the daisies.
More crochet patterns for your table
- Tulip Table Runner — a flower runner in the same spring mood, to run down the middle of the table
- Crochet Pumpkin Coaster — a quick coaster to set beside each placemat
- Easy Crochet Pumpkin — more easy table decor, in three sizes
- Star Plate Doily — a round vintage doily if you love making circles
FAQ
Is this crochet daisy placemat pattern good for beginners?
Yes, for a confident beginner. If you can chain and work sc, hdc and dc, you can make it. The centre is plain rounds of dc, and each daisy is 3 short rounds. Treble crochet and the joining petal are explained step by step in the notes.
How big is the crochet daisy placemat?
With the suggested gauge, the placemat is about 13 1/2 in (34 cm) across, approximate, and each daisy is about 2 3/4 in across. Your yarn and hook change the size, so measure Rnds 1-4 of the centre before you go on.
What yarn and hook do I need for a crochet placemat?
Worsted weight (#4) 100 % cotton and a US G-6 (4.0 mm) hook. Cotton lies flat, takes the heat of a plate and washes well. A slightly small hook keeps the placemat firm.
How much yarn does one placemat take?
About 50 yd of coral and 50 yd of cream for one placemat, plus about 10 yd of coral and 10 yd of cream for each napkin ring. These are estimates with a 20 % margin.
How long does it take to crochet a daisy placemat?
About 5 hours, estimated: around 2 hours for the centre and 15 to 20 minutes for each daisy. A napkin ring takes about 45 minutes.
Do I have to sew the daisies on?
No. Each daisy is joined to the placemat while you crochet its petals, with a slip stitch into a chain loop of the edge. Only the daisy on the napkin ring is sewn on.
Can I sell the placemats I make?
Yes, you may sell the placemats and napkin rings you crochet yourself. Please don't sell or repost the pattern; link to this page instead.
Copyright
© 2026 CookZya — original design. Free for personal use: you may make and sell the placemats and napkin rings you crochet. Please don't sell, copy or repost this pattern; link to this page instead.