Free pattern · Intermediate beginner · about 15 in across · about 7 hours per placemat · worsted weight cotton · 2 colorways. Materials first, then the placemat, the flower and the assembly.
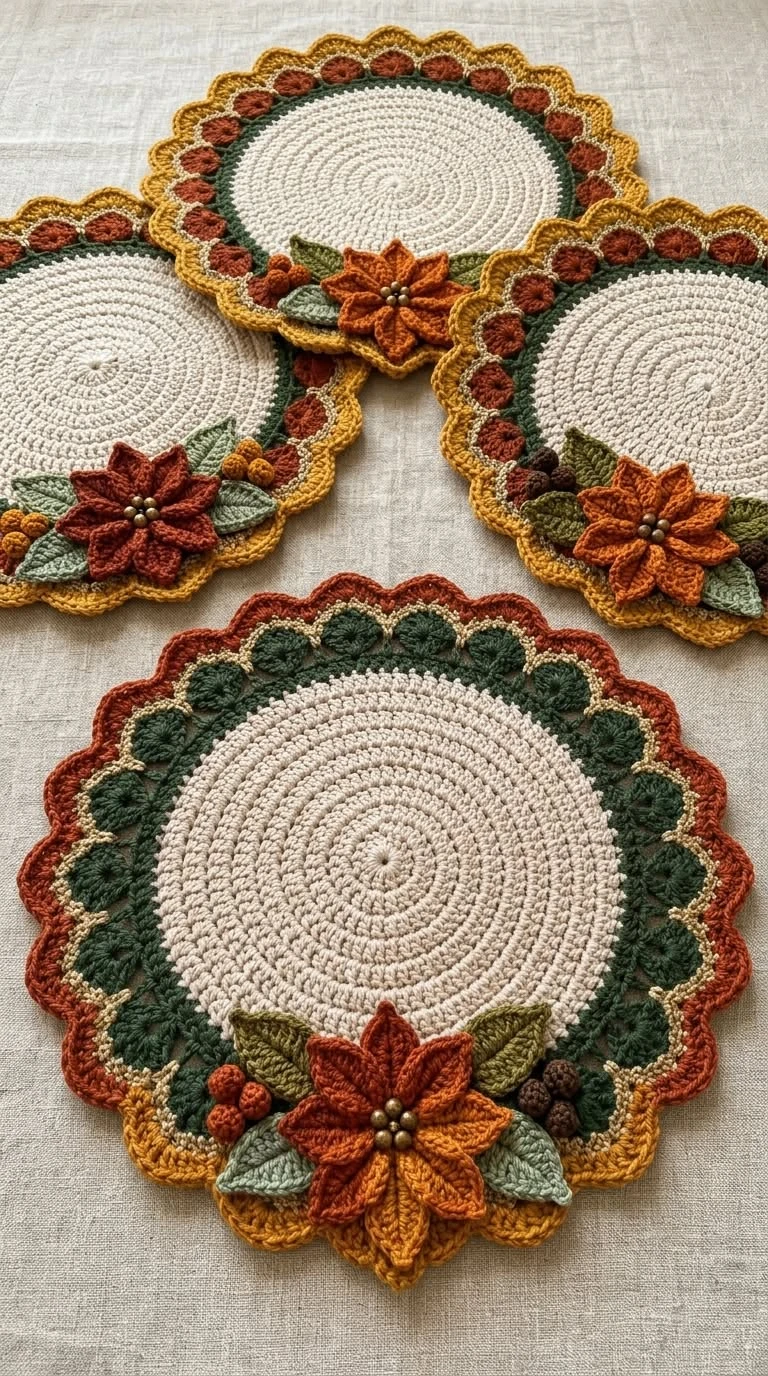
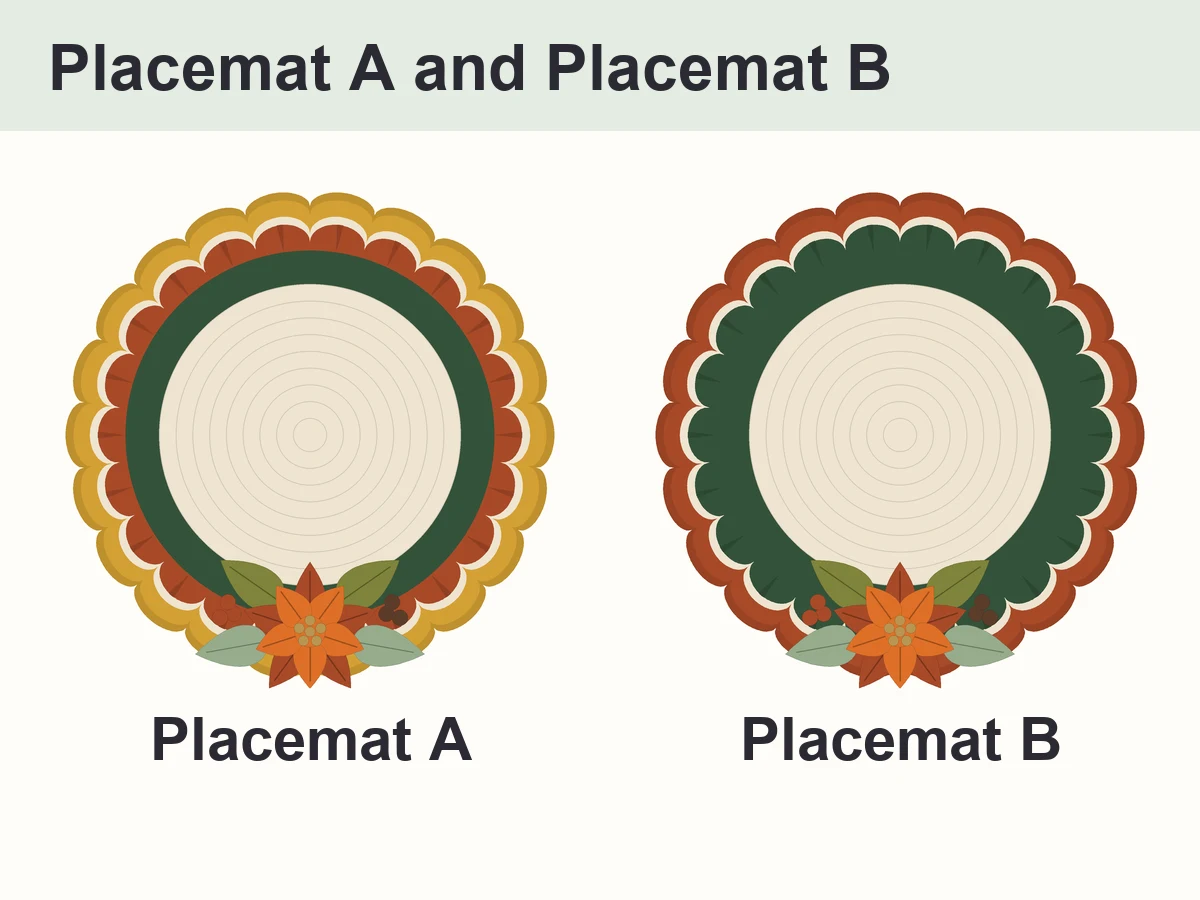
This crochet Christmas placemat pattern makes the round placemats from our Pinterest pin: a cream center, a hunter green ring, a ring of 22 little shells, a thin cream line, a scalloped edge and a layered poinsettia bouquet with leaves and berries at the bottom. It is a free, original CookZya design, written in US terms, in the two colorways of the photo: Placemat A with rust shells and a mustard edge, and Placemat B with green shells and a rust edge.
The placemat is worked in the round from the center out: 9 rounds of double crochet, two green rounds, then the border. You need chains, slip stitches, single, half double, double and treble crochet, all explained below; if you have made a granny square or a dc circle, you can make this. The flower, the leaves and the berries are small pieces made with a smaller hook, sewn on a felt circle that snaps on and off, so the bouquet never gets in the way of a plate. The rust, mustard and olive colors take your table from Thanksgiving to Christmas.
One placemat is about 15 in across and takes about 7 hours with its flower, estimated. Make 2 A and 2 B for a set of four, or all four alike. Every round was checked by our stitch simulator; these placemats have not been crochet-tested yet. Tick each round as you go — your progress stays saved in this browser.
- Finished size
- About 15 in (38 cm) across, approximate: between 14 1/2 and 15 1/2 in, depending on your tension
- Level
- Intermediate beginner: ch, sl st, sc, hdc, dc and tr, all explained below
- Time
- About 7 hours per placemat with its flower (estimated, not timed)
- Yarn
- Worsted weight (#4) cotton in 8 colors: about 255 yd for Placemat A, 255 yd for Placemat B
- Hooks
- US H-8 (5.0 mm) for the placemat, US G-6 (4.0 mm) for the flower, leaves and berries
- Gauge
- Suggested only, not swatched: Rnds 1-4 = about 4 1/4 in across with the H-8 hook
- Notions
- 6 gold glass beads (8 mm), a 3 in felt circle and 2 sew-on snaps per placemat, yarn needle, sewing needle and thread, stitch markers
Sizes
Placemat A — rust shells, mustard edge (the 3 placemats at the top of the photo)
- Yarn
- Worsted weight (#4) cotton. C (shells) = rust, D (edge) = mustard
- Hook
- US H-8 (5.0 mm) + US G-6 (4.0 mm)
- Yarn needed
- cream 80 yd · hunter green 30 yd · rust 55 yd · mustard 50 yd · pumpkin orange 10 yd · olive green 10 yd · sage green 10 yd · chocolate brown 10 yd — about 255 yd in all (estimated, with a 20 % margin)
- Finished size
- about 15 in (38 cm) across, approximate, with 22 shells and 22 scallops
Placemat B — hunter green shells, rust edge (the big placemat at the front of the photo)
- Yarn
- Worsted weight (#4) cotton. C (shells) = hunter green, D (edge) = rust
- Hook
- US H-8 (5.0 mm) + US G-6 (4.0 mm)
- Yarn needed
- cream 80 yd · hunter green 65 yd · rust 70 yd · pumpkin orange 10 yd · olive green 10 yd · sage green 10 yd · chocolate brown 10 yd — about 255 yd in all (estimated, with a 20 % margin)
- Finished size
- about 15 in (38 cm) across, approximate, with 22 shells and 22 scallops
✓ CookZya original design · Stitch counts checked round by round and row by row — size not tested. All 33 rounds and rows — the 15 placemat rounds, the 2 flower layers, the petals, the leaf and the berry — were replayed by our stitch simulator. These placemats have not been crochet-tested: your tension decides the final size.
Materials
- Color E — cream: Rnds 1-9 and 13, about 80 / 80 / 320 yd
- Color G — hunter green: Rnds 10-11, and C (the shells) of Placemat B, about 30 / 65 / 190 yd
- Color R — rust: C (the shells) of Placemat A, D (the edge) of Placemat B, the back petals, 3 berries, about 55 / 70 / 250 yd
- Color M — mustard: D (the edge) of Placemat A, about 50 / — / 100 yd
- Color O — pumpkin orange: the front petals, about 10 / 10 / 40 yd
- Color L — olive green: 2 leaves, about 10 / 10 / 40 yd
- Color S — sage green: 2 leaves, about 10 / 10 / 40 yd
- Color W — chocolate brown: 3 berries, about 10 / 10 / 40 yd
- Yardage is given as Placemat A / Placemat B / a set of 4 (2 A + 2 B), estimated from the stitch counts with a 20 % margin. C is always the shell color and D the edge color: rust and mustard on Placemat A, hunter green and rust on Placemat B. The appliques use only a few yards: scraps are perfect.
- Cotton or a cotton blend is best for a placemat: it lies flat, takes heat and washes well. Acrylic works too but feels softer and can slide on a polished table.
- 6 gold glass beads, about 8 mm, per flower (glass keeps its color in the wash; metallic plastic beads peel), or 6 French knots in gold yarn. A small felt circle and 2 sew-on snaps make the bouquet removable.
Notes
- US crochet terms. ch = chain, sl st = slip stitch, sc = single crochet, hdc = half double crochet, dc = double crochet, tr = treble crochet, st(s) = stitch(es), sp = space, rep = repeat, Rnd = round.
- Double crochet (dc): yarn over, insert the hook, yarn over and pull up a loop (3 loops on the hook), [yarn over and pull through 2 loops] 2 times.
- Treble crochet (tr): yarn over 2 times, insert the hook, yarn over and pull up a loop (4 loops on the hook), [yarn over and pull through 2 loops] 3 times. You use it only for the shells of Rnd 12.
- Half double crochet (hdc): yarn over, insert the hook, yarn over and pull up a loop (3 loops on the hook), yarn over and pull through all 3 loops.
- Magic ring: wrap the yarn twice around two fingers, insert the hook under the strands, pull up a loop and ch 1. Work the first round over the ring, then pull the tail to close the hole.
- Ch 2 (or ch 1) at the start of a round does not count as a stitch: the first stitch goes into the same st as the join, and you close the round with a sl st in that first stitch.
- The 12 increases (2 dc in one st) move a little every round, so they never stack and the circle stays round instead of turning into a hexagon.
- Joining a new color: make a slip knot on your hook, insert the hook in the stitch, yarn over and pull through the stitch and the slip knot.
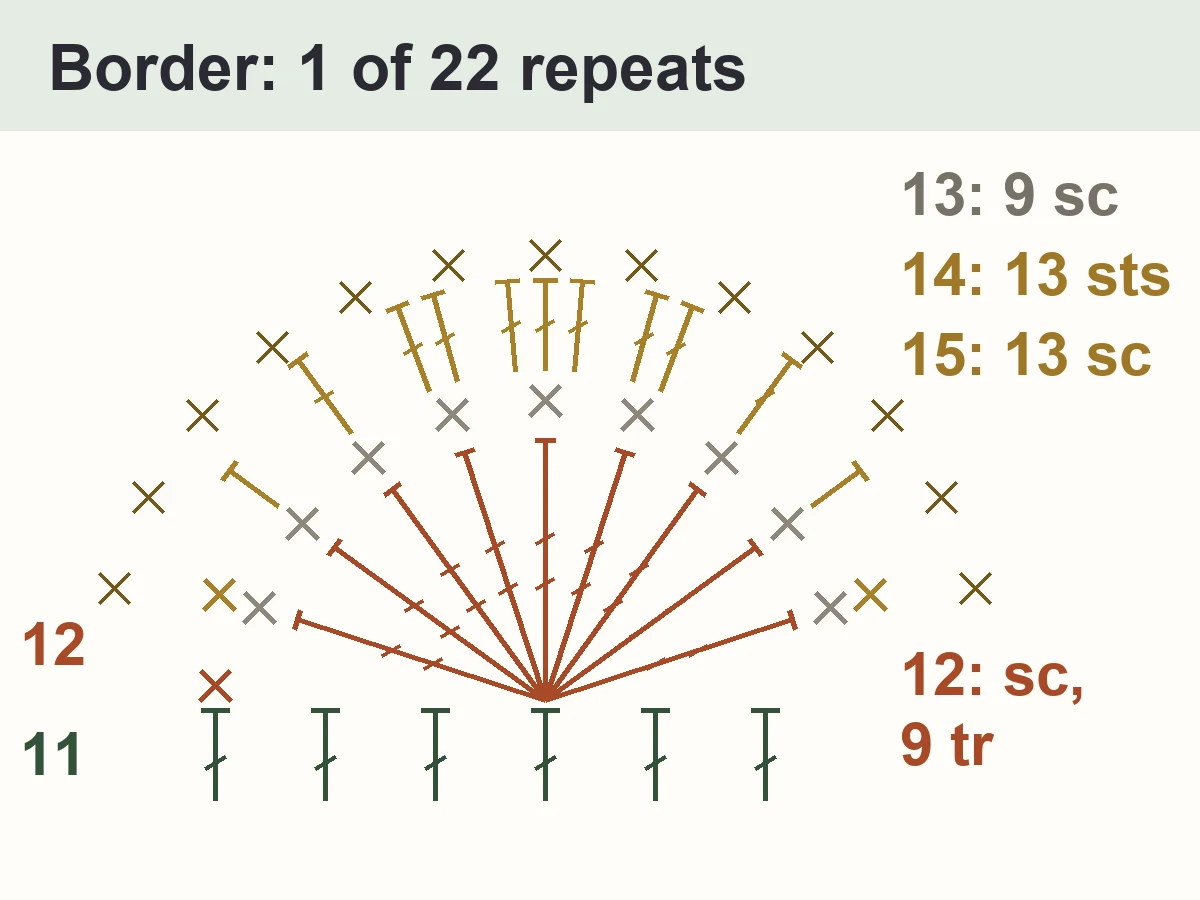
- A shell is 9 tr in one stitch: it fans out into a half circle. The cream line of Rnd 13 goes over the 9 tr of each shell and skips the sc between two shells, which outlines every shell.
- Sc2tog (single crochet 2 together): insert the hook in the next st and pull up a loop, insert it in the following st and pull up a loop (3 loops on the hook), yarn over and pull through all 3 loops. It turns 2 sts into 1.
- *…; rep from * 20 more times means: work the part after the * 21 times in all; with the first repeat written out before the *, that makes 22.
- All rounds are worked with the right side facing you: you never turn the placemat.
How the crochet Christmas placemat is built
Placemat
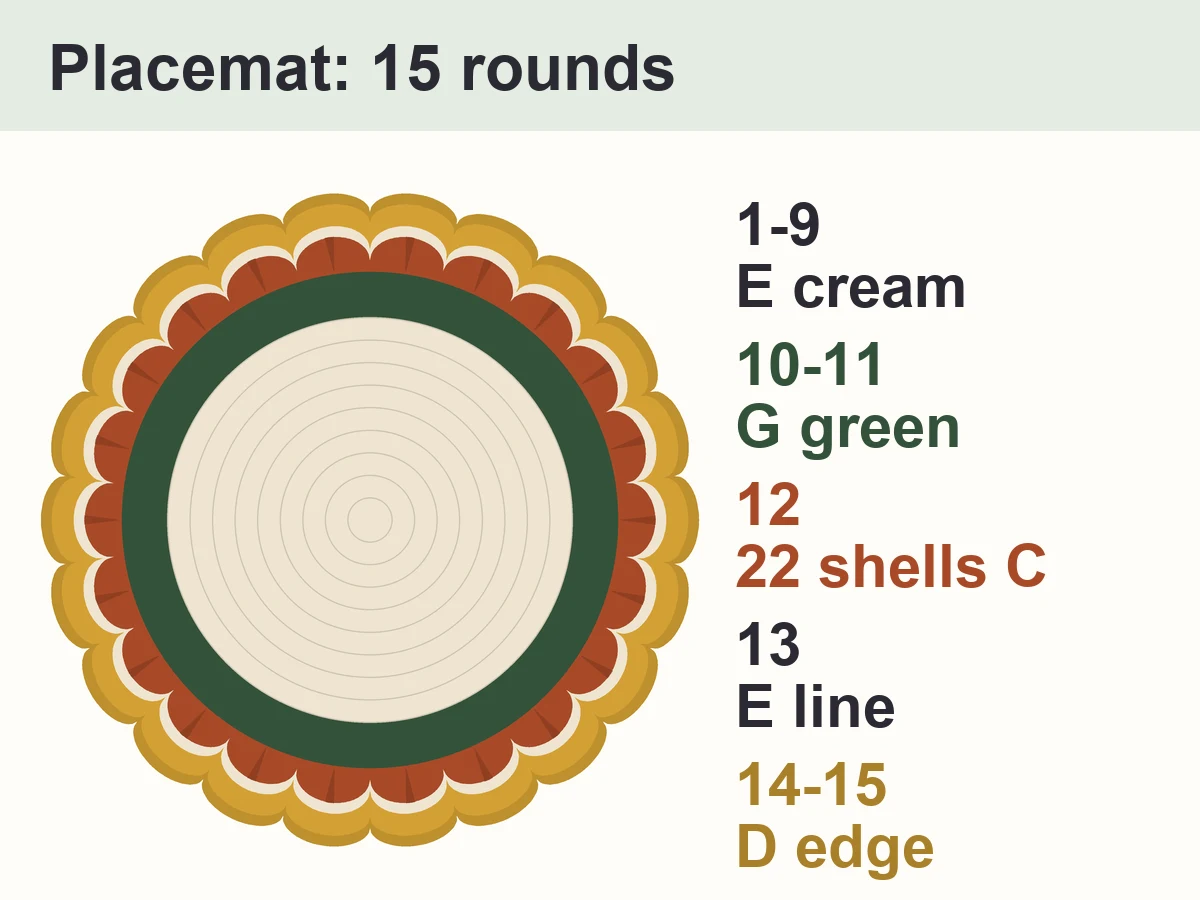
Use the H-8 hook. C is the shell color and D the edge color: rust and mustard for Placemat A, hunter green and rust for Placemat B (see the Sizes cards).
- With E (cream) and the H-8 hook, make a magic ring. Ch 2 (does not count as a stitch), 12 dc in the ring. Pull the tail to close the ring. Join with sl st in first dc (12 dc). 12 dc
- Ch 2 (does not count as a stitch), 2 dc in each st around, starting in the same st as the join. Join with sl st in first dc (24 dc). 24 dc
- Ch 2 (does not count as a stitch), dc in the same st as the join, 2 dc in next st, *dc in next st, 2 dc in next st; rep from * 10 more times. Join with sl st in first dc (36 dc: 12 more than the round before). 36 dc
- Ch 2 (does not count as a stitch), dc in the same st as the join, 2 dc in next st, dc in next st, *dc in next st, 2 dc in next st, dc in next st; rep from * 10 more times. Join with sl st in first dc (48 dc: 12 more than the round before). 48 dc
- Ch 2 (does not count as a stitch), dc in the same st as the join and in each of next 2 sts, 2 dc in next st, *dc in each of next 3 sts, 2 dc in next st; rep from * 10 more times. Join with sl st in first dc (60 dc: 12 more than the round before). 60 dc
- Ch 2 (does not count as a stitch), dc in the same st as the join and in next st, 2 dc in next st, dc in each of next 2 sts, *dc in each of next 2 sts, 2 dc in next st, dc in each of next 2 sts; rep from * 10 more times. Join with sl st in first dc (72 dc: 12 more than the round before). 72 dc
- Ch 2 (does not count as a stitch), dc in the same st as the join and in each of next 4 sts, 2 dc in next st, *dc in each of next 5 sts, 2 dc in next st; rep from * 10 more times. Join with sl st in first dc (84 dc: 12 more than the round before). 84 dc
- Ch 2 (does not count as a stitch), dc in the same st as the join and in each of next 2 sts, 2 dc in next st, dc in each of next 3 sts, *dc in each of next 3 sts, 2 dc in next st, dc in each of next 3 sts; rep from * 10 more times. Join with sl st in first dc (96 dc: 12 more than the round before). 96 dc
- Ch 2 (does not count as a stitch), dc in the same st as the join and in each of next 6 sts, 2 dc in next st, *dc in each of next 7 sts, 2 dc in next st; rep from * 10 more times. Join with sl st in first dc (108 dc: 12 more than the round before). Fasten off E. 108 dc
- Join G (hunter green) with sl st in any st. Ch 2 (does not count as a stitch), dc in the same st as the join and in each of next 3 sts, 2 dc in next st, dc in each of next 4 sts, *dc in each of next 4 sts, 2 dc in next st, dc in each of next 4 sts; rep from * 10 more times. Join with sl st in first dc (120 dc: 12 more than the round before). 120 dc
- Ch 2 (does not count as a stitch), dc in the same st as the join and in each of next 8 sts, 2 dc in next st, *dc in each of next 9 sts, 2 dc in next st; rep from * 10 more times. Join with sl st in first dc (132 dc: 12 more than the round before). Fasten off G. 132 dc
- Join C (shell color) with sl st in any st. Ch 1 (does not count as a stitch), sc in the same st as the join, skip 2 sts, 9 tr in next st, skip 2 sts, *sc in next st, skip 2 sts, 9 tr in next st, skip 2 sts; rep from * 20 more times. Join with sl st in first sc (22 shells: 22 sc, 198 tr). Fasten off C. 22 sc, 198 tr
- Join E with sl st in the first tr of any shell. Ch 1 (does not count as a stitch), sc in the same st as the join and in each of next 8 tr, skip next sc, *sc in each of next 9 tr, skip next sc; rep from * 20 more times. Join with sl st in first sc (198 sc: 9 over each shell; never work into the sc between two shells). Fasten off E. 198 sc
- Join D (edge color) with sl st in the first sc over any shell (the sc right after a gap). Ch 1 (does not count as a stitch), sc in the same st as the join, hdc in next st, dc in next st, 2 dc in next st, 3 dc in next st, 2 dc in next st, dc in next st, hdc in next st, sc in next st, *sc in next st, hdc in next st, dc in next st, 2 dc in next st, 3 dc in next st, 2 dc in next st, dc in next st, hdc in next st, sc in next st; rep from * 20 more times. Join with sl st in first sc (22 scallops of 13 sts: 44 sc, 44 hdc, 198 dc). Do not fasten off. 44 sc, 44 hdc, 198 dc
- Do not turn. Sl st in next st (the hdc). Ch 1 (does not count as a stitch), sc in the same hdc, sc in each of next 4 dc, 2 sc in next dc (the middle dc of the scallop), sc in each of next 4 dc, sc in next hdc, sc2tog over the next 2 sc (the gap between two scallops), *sc in next hdc, sc in each of next 4 dc, 2 sc in next dc, sc in each of next 4 dc, sc in next hdc, sc2tog over the next 2 sc; rep from * 20 more times. The last sc2tog goes over the last sc of Rnd 14 and the sc that holds its join. Join with sl st in first sc (286 sc: 1 more at each scallop tip, 1 less in each gap). Fasten off D. 286 sc
Back petal (read first: you work it 5 times inside Rnd 3 below)
Use the G-6 hook and R (rust). Read these 3 rows before you start the back layer.
- Ch 10. This chain is the spine of the petal. Inside Rnd 3 of the layer, Row 1 is the ch 10 you make there: do not chain twice. 1 ch-10 sp
- Dc in the 4th ch from hook (the 3 skipped ch fold up beside the dc and make the tip) and in each ch across. You are back at the center (7 dc: this row is the raised vein down the middle). 7 dc
- Ch 1 (does not count as a stitch), turn. Working up the vein row: sc in first dc, hdc in next dc, hdc in next dc, hdc in next dc, sc in next dc, sc in next dc, sc in last dc (7 sts). (Sc, ch 2, sc) in the ch-3 sp at the tip (the 3 ch you skipped at the start of Row 2). Working down the other side of the spine, in the free loop of each ch: sc in each of next 3 ch, hdc in each of next 3 ch, sc in next ch (7 sts). 10 sc, 6 hdc, 1 ch-2 sp
Poinsettia back layer (R, rust)
Rnd 3 grows the 5 petals: each one is Rows 1 to 3 of the back petal just above.
- With R (rust) and the G-6 hook, make a magic ring. Ch 1 (does not count as a stitch), 5 sc in the ring. Pull the tail to close the hole. Join with sl st in first sc (5 sc). 5 sc
- Ch 1 (does not count as a stitch), 2 hdc in each st around, starting in the same st as the join. Join with sl st in first hdc (10 hdc). Do not fasten off. 10 hdc
- Ch 10 for the spine of petal 1 (this is Row 1 of the back petal), straight from the hdc that holds the join of Rnd 2 (that hdc is the first of the 2 hdc under petal 1), then work Rows 2 and 3 of the back petal (just above). Sl st in next hdc. *Sl st in next hdc, work a back petal, sl st in next hdc; rep from * 3 more times (5 petals, each one sitting on 2 hdc: 5 x 2 = 10). The last sl st goes into the 10th hdc, right before the joining st: do not join. Fasten off, leaving a 16 in tail to sew the flower on. 50 sc, 30 hdc, 35 dc, 5 ch-10 sps, 5 ch-2 sps
Front petal (read first: you work it 5 times inside Rnd 3 below)
Use the G-6 hook and O (pumpkin orange).
- Ch 8. This chain is the spine of the petal. Inside Rnd 3 of the layer, Row 1 is the ch 8 you make there: do not chain twice. 1 ch-8 sp
- Dc in the 4th ch from hook (the 3 skipped ch fold up beside the dc and make the tip) and in each ch across. You are back at the center (5 dc: this row is the raised vein down the middle). 5 dc
- Ch 1 (does not count as a stitch), turn. Working up the vein row: sc in first dc, hdc in next dc, hdc in next dc, sc in next dc, sc in last dc (5 sts). (Sc, ch 2, sc) in the ch-3 sp at the tip (the 3 ch you skipped at the start of Row 2). Working down the other side of the spine, in the free loop of each ch: sc in each of next 2 ch, hdc in each of next 2 ch, sc in next ch (5 sts). 8 sc, 4 hdc, 1 ch-2 sp
Poinsettia front layer (O, pumpkin orange)
Same as the back layer, with the front petal just above.
- With O (pumpkin orange) and the G-6 hook, make a magic ring. Ch 1 (does not count as a stitch), 5 sc in the ring. Pull the tail to close the hole. Join with sl st in first sc (5 sc). 5 sc
- Ch 1 (does not count as a stitch), 2 hdc in each st around, starting in the same st as the join. Join with sl st in first hdc (10 hdc). Do not fasten off. 10 hdc
- Ch 8 for the spine of petal 1 (this is Row 1 of the front petal), straight from the hdc that holds the join of Rnd 2 (that hdc is the first of the 2 hdc under petal 1), then work Rows 2 and 3 of the front petal (just above). Sl st in next hdc. *Sl st in next hdc, work a front petal, sl st in next hdc; rep from * 3 more times (5 petals, each one sitting on 2 hdc: 5 x 2 = 10). The last sl st goes into the 10th hdc, right before the joining st: do not join. Fasten off, leaving a 6 in tail. 40 sc, 20 hdc, 25 dc, 5 ch-8 sps, 5 ch-2 sps
Leaves (make 4: 2 in L, 2 in S)
Use the G-6 hook. The leaf is made like a petal, on its own.
- With L (olive green) for 2 leaves or S (sage green) for 2 leaves, and the G-6 hook: ch 12. This chain is the spine of the leaf. 1 ch-12 sp
- Dc in the 4th ch from hook (the 3 skipped ch fold up beside the dc and make the tip) and in each ch across. You are back at the base of the leaf (9 dc: this row is the raised vein down the middle). 9 dc
- Ch 1 (does not count as a stitch), turn. Working up the vein row: sc in first dc, hdc in next dc, dc in next dc, dc in next dc, dc in next dc, dc in next dc, hdc in next dc, sc in next dc, sc in last dc (9 sts). (Sc, ch 2, sc) in the ch-3 sp at the tip (the 3 ch you skipped at the start of Row 2). Working down the other side of the spine, in the free loop of each ch: sc in each of next 2 ch, hdc in next ch, dc in each of next 4 ch, hdc in next ch, sc in next ch (9 sts). Fasten off, leaving a 12 in tail for sewing. 8 sc, 4 hdc, 8 dc, 1 ch-2 sp
Berries (make 6: 3 in R, 3 in W)
Use the G-6 hook.
- With R (rust) or W (chocolate brown) and the G-6 hook, leaving a 12 in tail, make a magic ring. Ch 1 (does not count as a stitch), 6 sc in the ring. Pull the tail to close the hole. Join with sl st in first sc (6 sc). 6 sc
- Ch 1 (does not count as a stitch), 2 sc in each st around, starting in the same st as the join. Join with sl st in first sc (12 sc). 12 sc
- Ch 1 (does not count as a stitch), sc2tog 6 times, starting in the same st as the join. Join with sl st in first st (6 sc). Fasten off, leaving a 6 in tail. Push the starting tail inside as stuffing, thread the end on a yarn needle, pass it through the front loop of each st and pull tight: the berry closes into a round ball. 6 sc
Finishing and assembly
1 Block the placemat
2 Stack the two flower layers
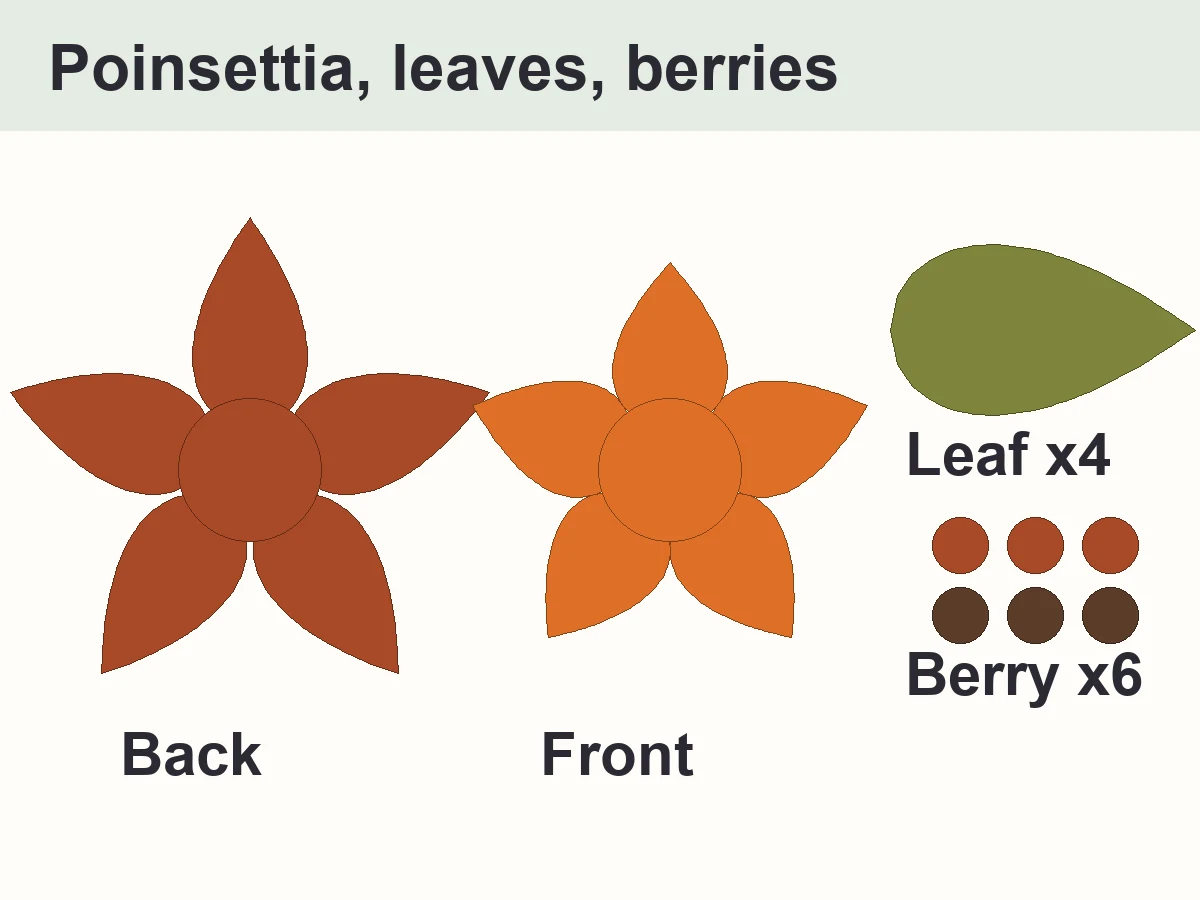
3 Build the bouquet on felt
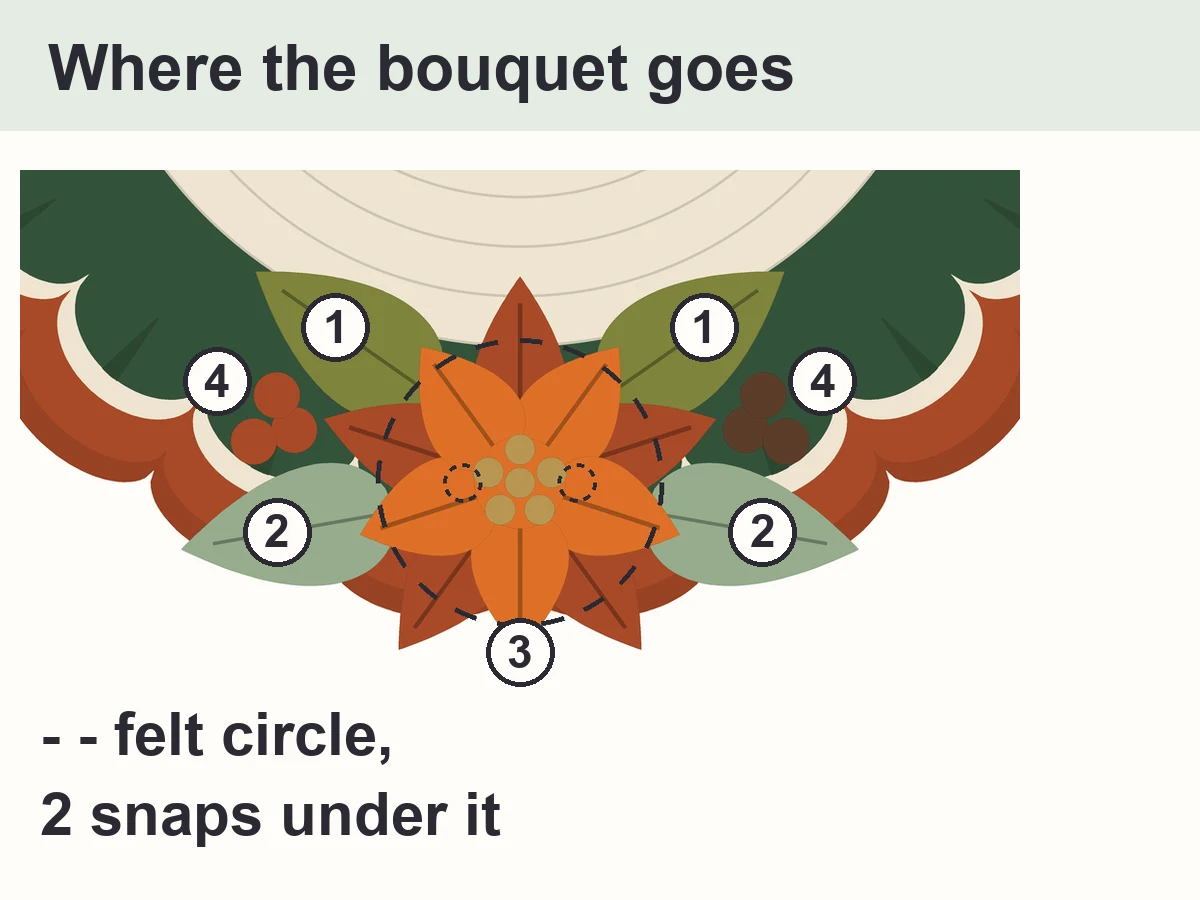
4 Add the snaps (removable bouquet)
5 Or sew it straight on
6 Weave in the ends
Finishing
Wash the finished placemats once, by hand or in a laundry bag on a gentle cold cycle, and dry them flat: a first wash relaxes the cotton and evens out the stitches.
Design notes
- The center grows by 12 dc every round, so Rnd 9 has 108 dc and the last green round has 132: 132 / 6 = 22 shells.
- Each shell sits on 6 sts (sc in 1, skip 2, 9 tr in 1, skip 2), and each scallop sits on the 9 sc over one shell, so the 22 scallops line up with the 22 shells.
- Two green rounds instead of one keep the cream center at about 62 % of the radius, close to the placemats in the pin.
- The rim adds 1 sc at the tip of each scallop and takes 1 away in each gap (sc2tog): the total stays 286, and the edge lies flat around the curves.
- The flower is a cousin of our Layered Poinsettia Ornament: 5 long petals per layer with a solid dc vein, about 4 3/4 in across.
Tips for a flat, round crochet Christmas placemat
- Measure after Rnd 4: about 4 1/4 in across. Much bigger? Try a US G-6 (4.0 mm) hook. Smaller? Try a US I-9 (5.5 mm).
- If the center starts to ripple, your tension is loose: go down a hook size. If it cups, go up one.
- Put a stitch marker in the first stitch of every round: that is where the round closes.
- Count the shells before you close Rnd 12: 22. One too many or too few and the scallops will not line up.
- Make all the flowers, leaves and berries for the set in one go, in front of a movie: they are quick.
- Sew the bouquet with the long tails you left: matching colors make the stitches invisible.
Common mistakes
- Counting the ch 2 at the start of a round as a stitch: you end up with 13 sts too many.
- Stacking the increases in the same place every round: the circle turns into a hexagon.
- Working the cream line into the sc between the shells: the shells lose their outline.
- Pulling the tr of a shell tight: the shells curl. Keep the loops relaxed.
- Blocking after the bouquet is on: block the placemat first, it is easier to pat flat.
- Working the rim 1 sc per st with no sc2tog in the gaps: the scallop tips pull and the gaps ripple.
Make it your own
- Colors as written: cream center, hunter green ring, rust or green shells, mustard or rust edge, a rust and pumpkin poinsettia.
- Thanksgiving table: snap on a bouquet of only the 4 leaves and the berries, in rust, mustard and olive, then switch to the poinsettia in December.
- Classic red Christmas: cream center, green ring, red shells, green edge and a red poinsettia.
- Snowy: white center, silver-gray ring and shells, white edge and a white poinsettia with silver beads.
- No appliques: the placemat alone works all year as a round table mat.
Care
- Hand wash in cool water, or machine wash in a laundry bag on a gentle cold cycle.
- Dry flat and pat the scallops back into shape while the placemat is damp.
- Beads: check the threads after washing. If the placemats go in the machine every week, use French knots instead.
- Do not iron the appliques: press only the placemat, from the back, with a warm iron on cotton.
More crochet patterns for your table
- Layered Poinsettia Ornament — the bigger 8-petal version of this flower, as a tree ornament
- Scalloped Heart Placemat — a scalloped placemat for your Valentine's Day table
- Daisy Placemat and Napkin Ring — the same flat dc circle, with a ring of daisies for spring
- Christmas Granny Square Blanket — a red, green and gold blanket to match your holiday table
FAQ
Is this crochet Christmas placemat pattern good for beginners?
It suits an adventurous beginner. The center is plain double crochet in the round; the border adds treble crochet shells and a scalloped edge, and the flower is made of small pieces. Every stitch is explained on this page, and every round shows its stitch count.
How big is the placemat?
About 15 in (38 cm) across with worsted weight cotton and a US H-8 hook. That size is an estimate from a suggested gauge: measure after Rnd 4 and change your hook if needed.
How much yarn do I need for a set of four?
About 255 yd for each Placemat A and 255 yd for each Placemat B, so about 1020 yd for 2 of each, mostly cream. These are estimates with a 20 % margin; the yardage per color is in the Sizes cards.
Will a plate sit flat with the flower on it?
Not quite: the bouquet reaches about 3 3/4 in from the center, and a dinner plate covers about 5 in. That is why the bouquet sits on a felt circle with snaps: leave it on for decoration and photos, take it off for dinner.
Can I make these placemats for Thanksgiving?
Yes. The rust, mustard and olive colors already suit a fall table. Make a second felt bouquet with only the leaves and berries for Thanksgiving, then snap on the poinsettia in December.
Is the photo a real placemat?
No. The picture is an AI-generated illustration (the image of our Pinterest pin). The pattern on this page reproduces its design with real stitch counts; the caption under the picture lists the differences.
Can I sell the placemats I make?
Yes, you may sell the placemats you crochet yourself. Please don't sell or repost the pattern; link to this page instead.
Copyright
© 2026 CookZya — original design. Free for personal use: you may make and sell the placemats you crochet. Please don't sell, copy or repost this pattern; link to this page instead.