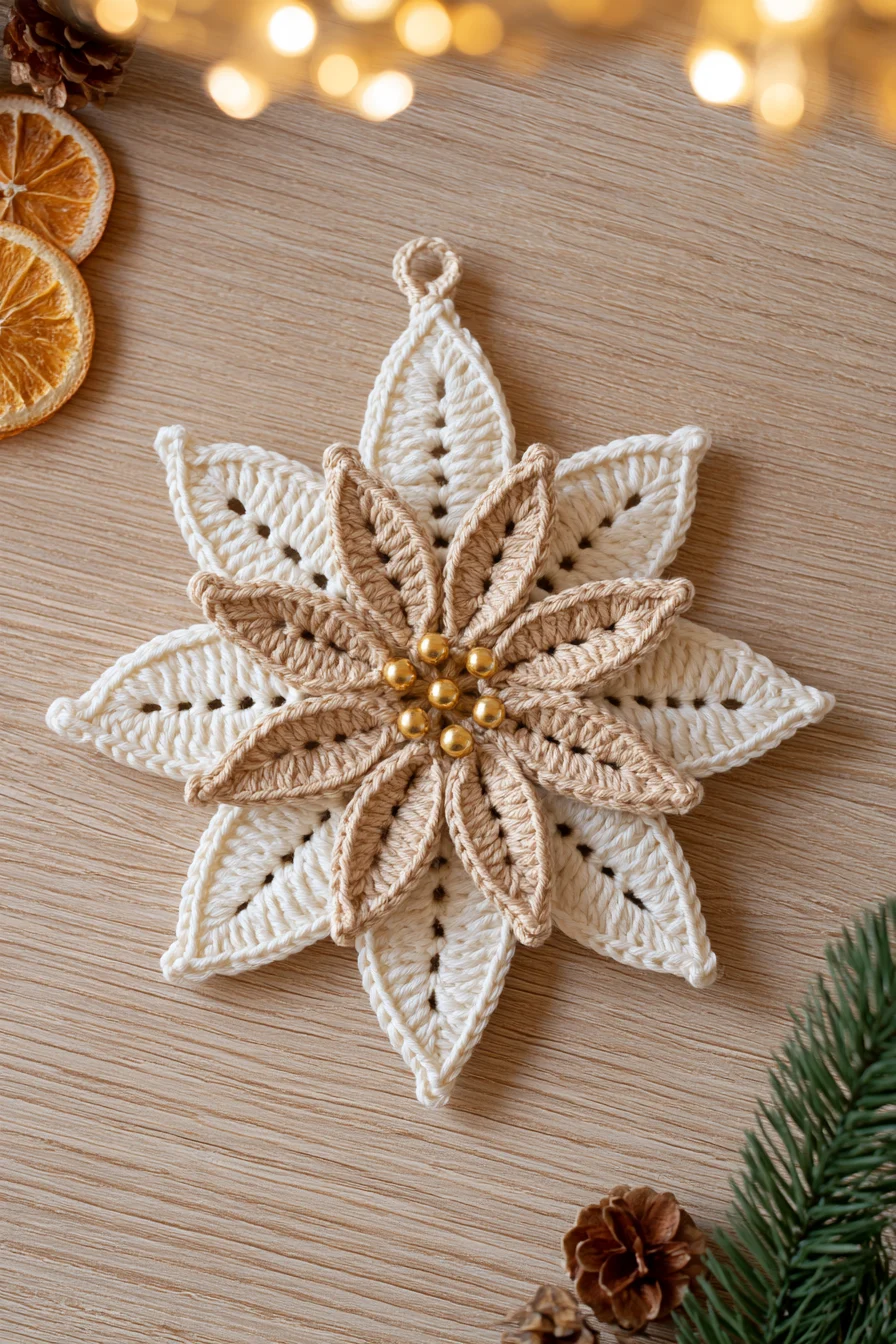
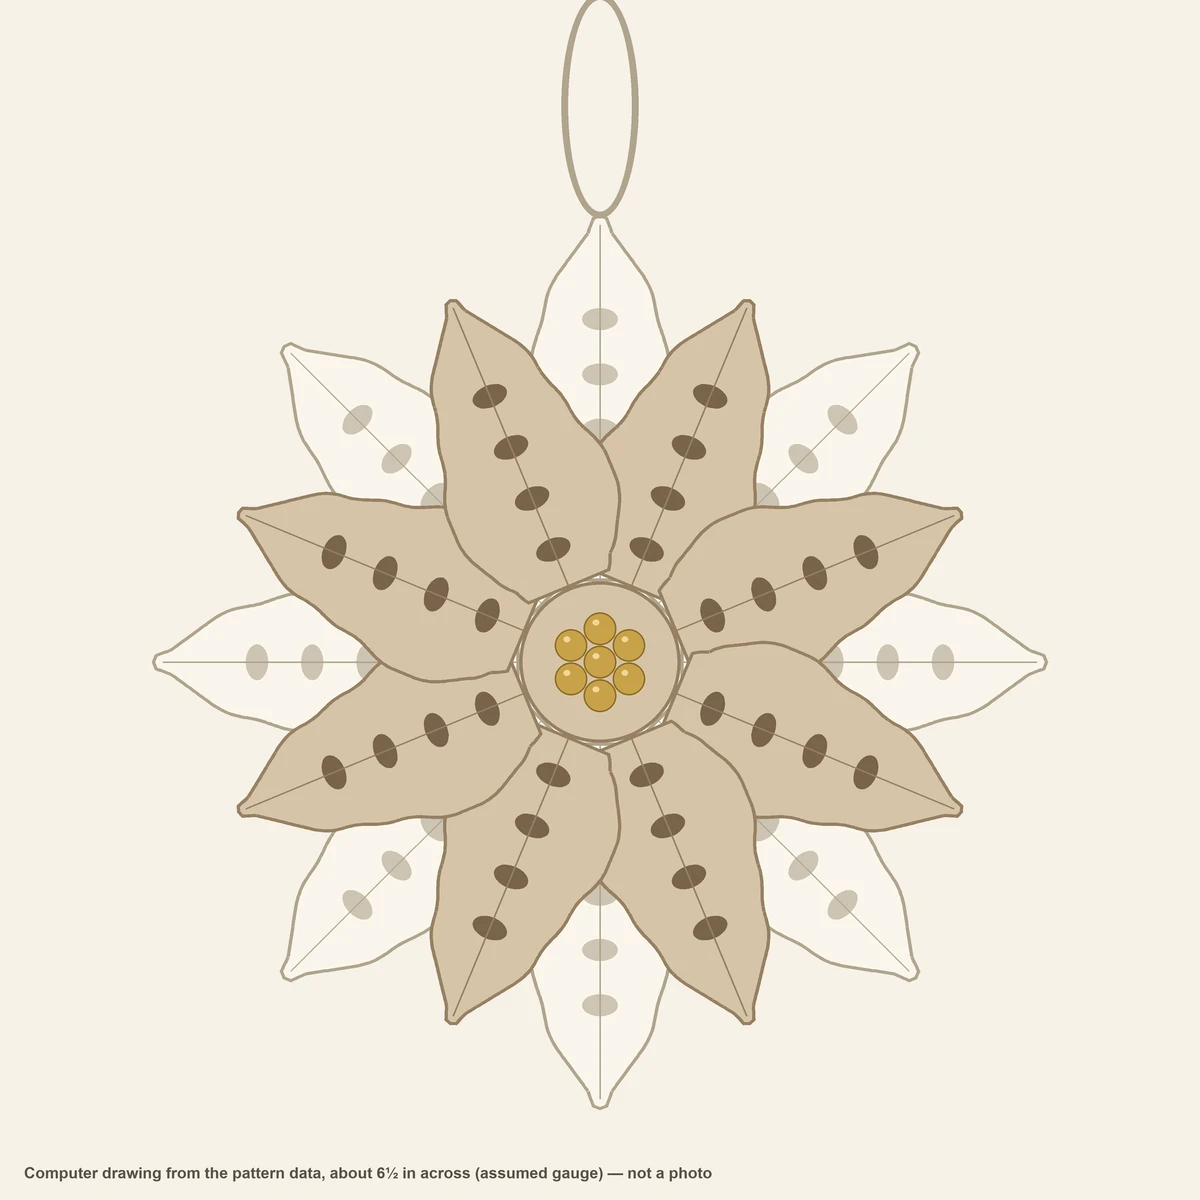
This free crochet christmas ornament pattern makes a layered poinsettia in soft neutral colors: 8 long ivory petals at the back, 8 shorter oatmeal petals in front, and a cluster of 7 gold beads in the middle. It is an original CookZya design, about 6½ in across, made for a calm, neutral Christmas tree.
Each layer starts the same way: a magic ring, 2 small rounds for the centre, then 8 petals worked right off the centre. Every petal is crocheted on its own chain, in 3 short rows. Row 2 leaves a line of small holes down the middle of the petal: that is the open vein, made by the stitches themselves.
Each petal sits on exactly 2 stitches of the centre, so 8 petals use all 16 stitches and the round closes right. Make the two layers, stack them half a petal apart, sew on the beads and add the loop. Every round and row below was checked by our stitch simulator; this layered poinsettia crochet ornament has not been crochet-tested yet. Tick each row as you go — your progress stays saved in this browser.
- Finished size
- About 6½ in across tip to tip (front layer about 5¾ in), approximate
- Level
- Easy+ — you need ch, sl st, sc, hdc and dc, and working into both sides of a chain
- Time
- About 2 h 40 min for one ornament, estimated (not timed)
- Yarn
- Worsted weight (#4): about 35 yd ivory (A) and 30 yd oatmeal (B)
- Hook
- US G-6 (4.0 mm), one size under the usual worsted hook, for a firm ornament
- Gauge
- Suggested only, not swatched: 18 sc and 20 rows of sc = 4 in; the centre (Rnds 1-2) is about 1¼ in across
Sizes
Mini — about 4¾ in across
- Yarn
- sport weight (#2)
- Hook
- US C-2 (2.75 mm)
- Stitches per row
- same stitch counts; suggested gauge 24 sc = 4 in (assumed, not swatched)
- Yarn needed
- A ivory 25 yd · B oatmeal 20 yd
- Finished size
- about 4¾ in (12 cm) tip to tip, front layer about 4¼ in, approximate
Standard (as written) — about 6½ in across
- Yarn
- worsted weight (#4)
- Hook
- US G-6 (4.0 mm)
- Stitches per row
- same stitch counts; suggested gauge 18 sc = 4 in (assumed, not swatched)
- Yarn needed
- A ivory 35 yd · B oatmeal 30 yd
- Finished size
- about 6½ in (16 cm) tip to tip, front layer about 5¾ in, approximate
Large (tree topper) — about 9 in across
- Yarn
- bulky weight (#5)
- Hook
- US I-9 (5.5 mm)
- Stitches per row
- same stitch counts; suggested gauge 13 sc = 4 in (assumed, not swatched)
- Yarn needed
- A ivory 50 yd · B oatmeal 40 yd
- Finished size
- about 9 in (23 cm) tip to tip, front layer about 7¾ in, approximate
✓ CookZya original design · Stitch counts checked row by row — shape and size not tested. All 12 rounds and rows — the centre rounds, the petal round and the 3 rows of each petal, for both layers — were replayed by our stitch simulator, the petal charts were counted against the text symbol by symbol, and a second reading made from the written text alone matched it stitch by stitch. This pattern has not been crochet-tested: tension, gauge and final size are up to your hands.
Materials
- Color A — ivory, for the back layer and the hanging loop, about 35 yd
- Color B — oatmeal (light beige), for the front layer, about 30 yd
- Yardage is estimated from the stitch counts with a 20 % margin, and includes the tails and the loop. A mini skein of each color is plenty.
- A smooth worsted cotton or cotton blend shows the stitches and the vein holes best, and holds the petal shape. Acrylic works too.
- US G-6 (4.0 mm) hook. A hook one or two sizes smaller than the yarn label asks for makes a dense, firm fabric, so the petals stand on the tree instead of drooping.
- 7 round gold beads, 6 mm (1/4 in), with a hole big enough for a sewing needle; strong beige or gold sewing thread and a sharp needle (yarn will not go through a bead this size).
- Yarn needle, scissors, rust-proof pins and a towel for blocking; spray starch (optional).
Notes
- US crochet terms. ch = chain, sl st = slip stitch, sc = single crochet, hdc = half double crochet, dc = double crochet, sp = space, st(s) = stitch(es), rep = repeat, Rnd = round.
- Sc: insert the hook, yarn over, pull up a loop, yarn over and pull through both loops. Hdc: yarn over, insert, pull up a loop, yarn over and pull through all 3 loops. Dc: yarn over, insert, pull up a loop, then (yarn over, pull through 2 loops) twice.
- Magic ring: wrap the yarn around two fingers, insert the hook under the strands, pull up a loop and ch 1. Work Rnd 1 over the ring, then pull the tail to close the hole.
- A ch 1 that "does not count as a stitch" is only there to lift the yarn: never work into it.
- The petals are worked on their own chain (the spine). Row 2 goes back down the chain toward the centre; Row 3 goes up one side, around the tip and down the other side, into the free loop of each chain.
- Free loop: when you work Row 2 into a chain, one loop of each chain is left unused on the other side. In Row 3 you work into that loop.
- Vein: in Row 3, when you come to a ch 1 of Row 2, put the hook into the chain itself (under its top loop), not into the hole below it. The holes stay open and make the vein.
Crochet Christmas ornament chart
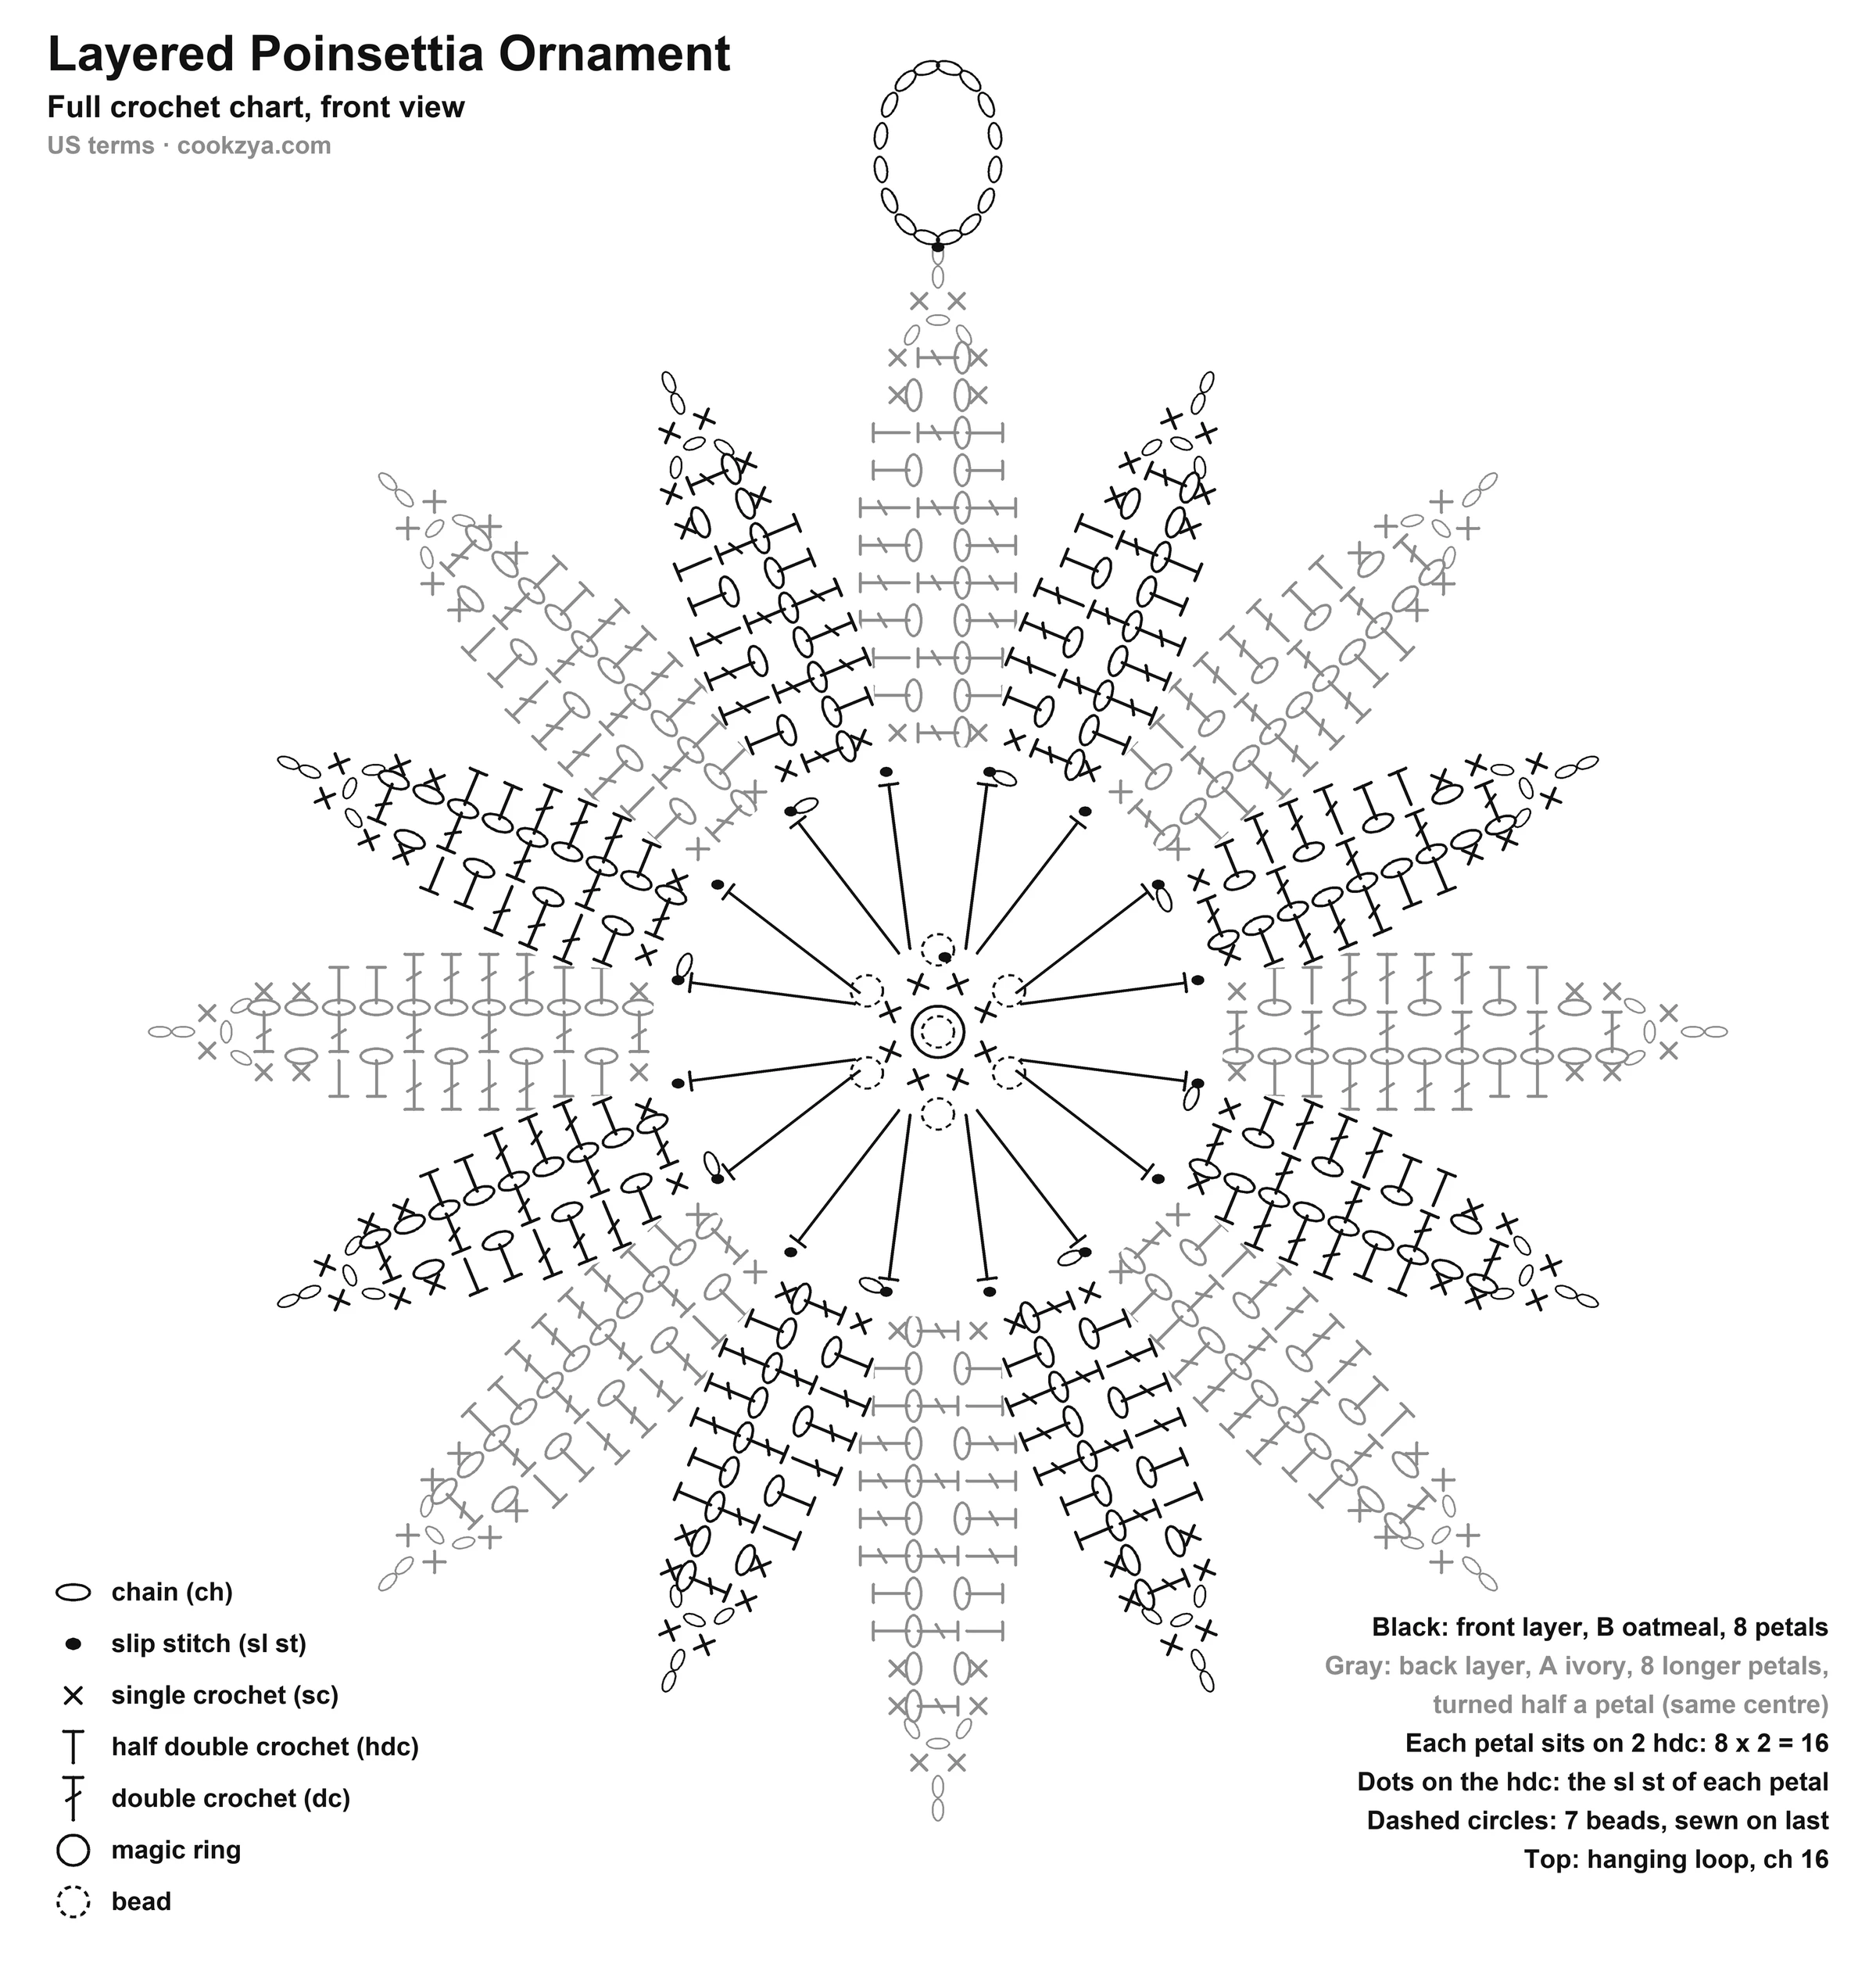
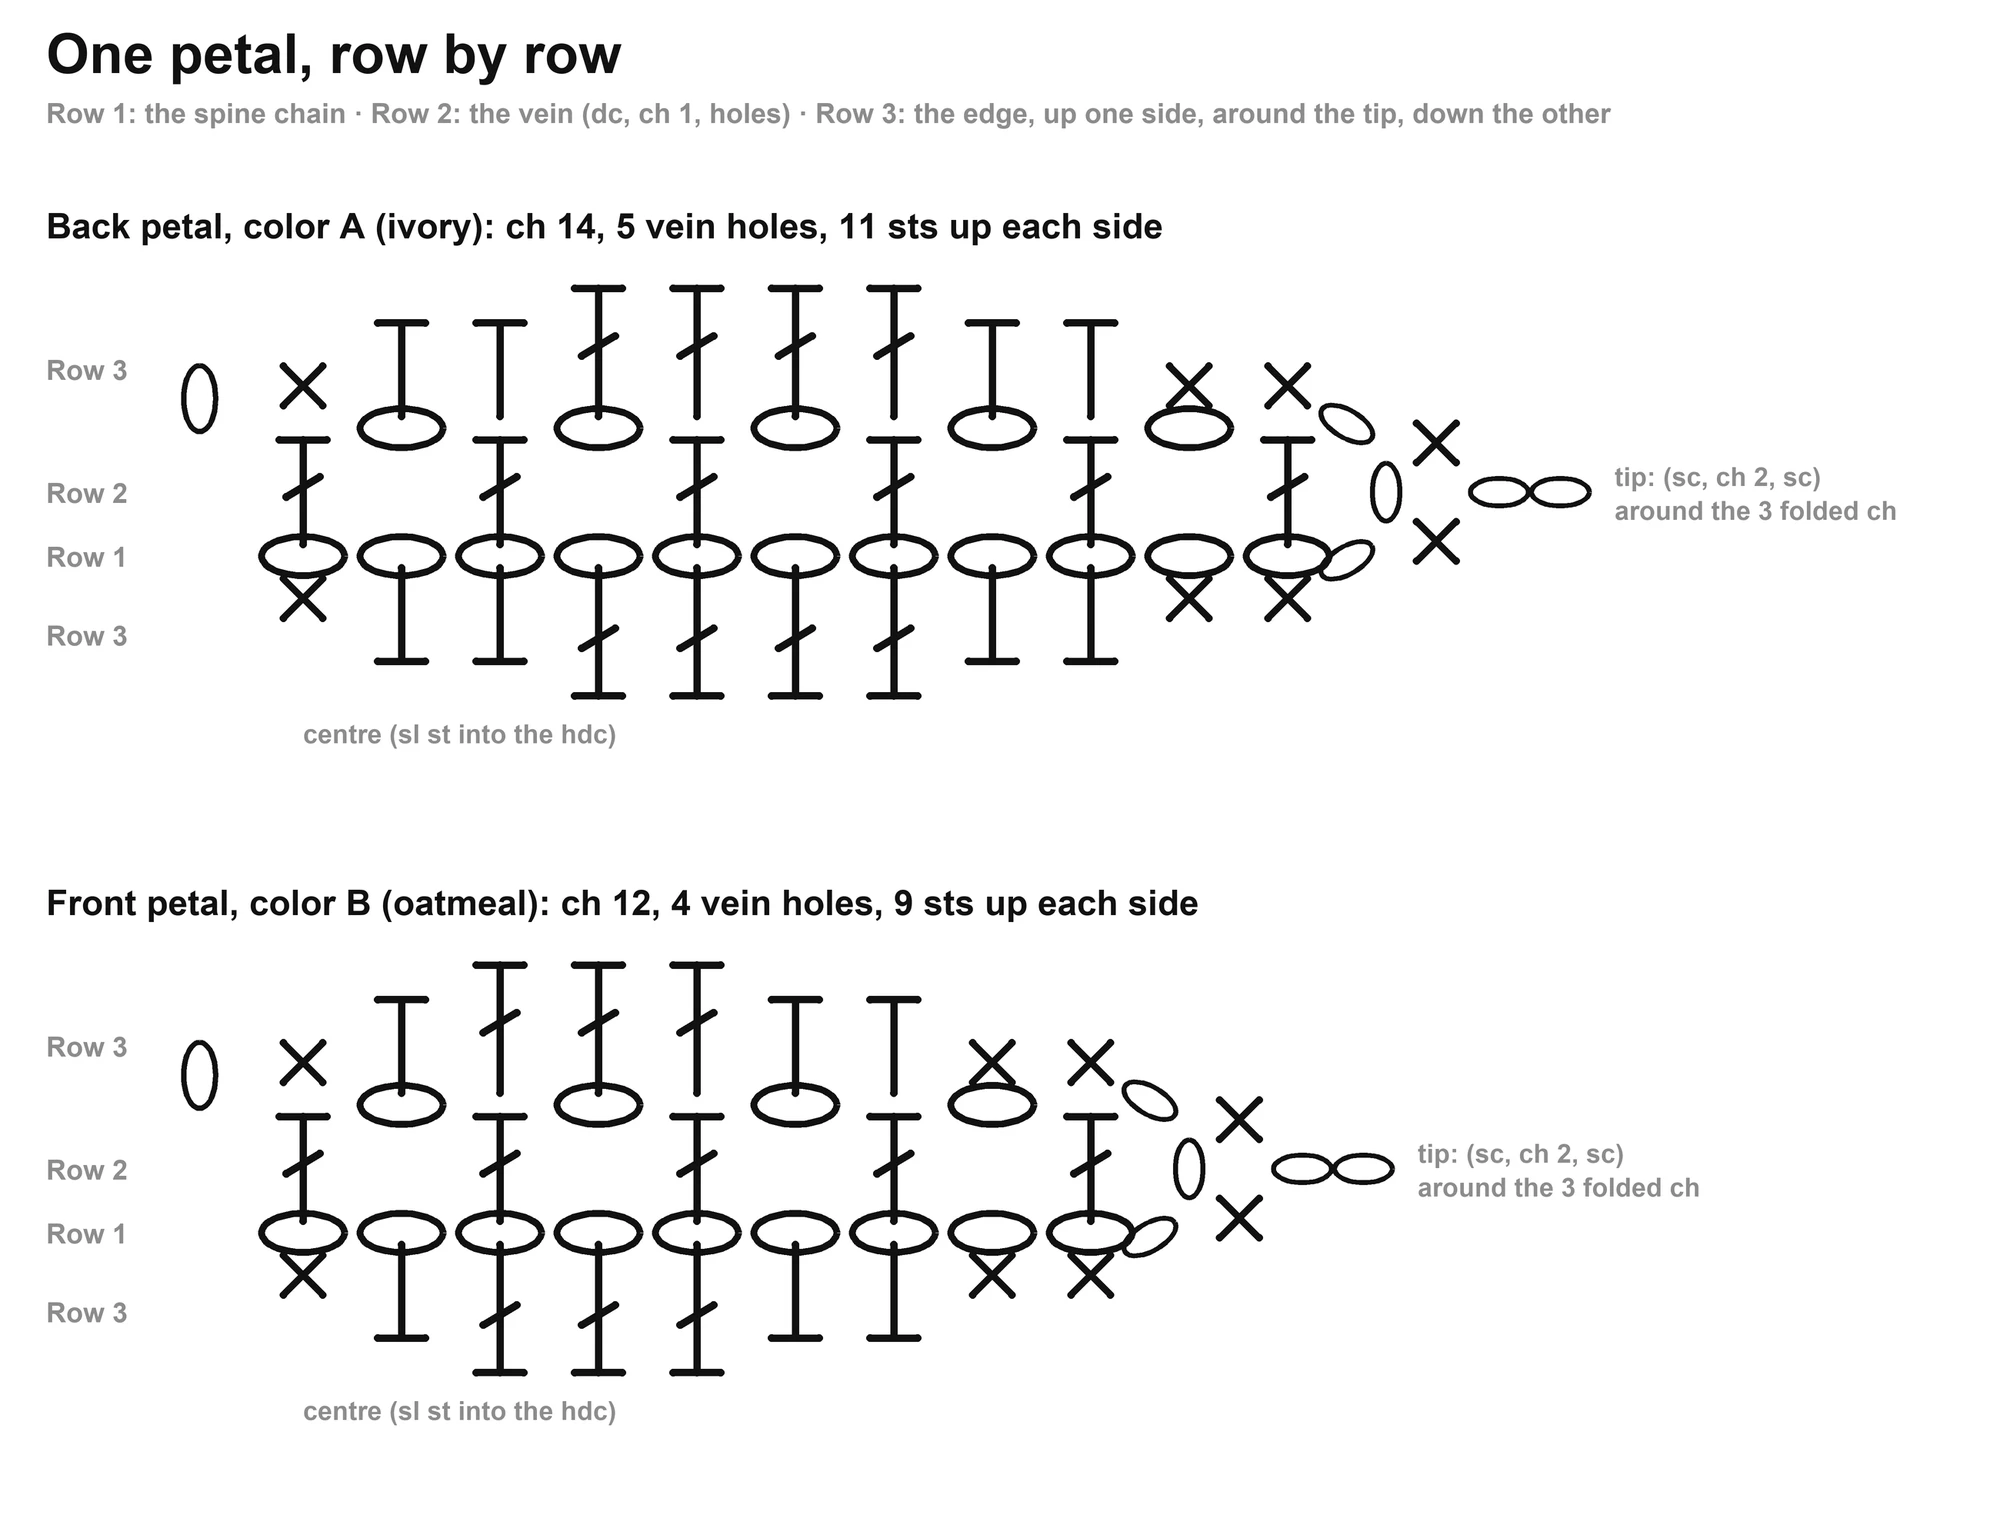
Back layer (A, ivory)
Back petals: ch 14, 5 vein holes, 11 sts up each side. Petal Rows 1 to 3 are worked 8 times inside Rnd 3.
- With A (ivory), make a magic ring. Ch 1 (does not count as a stitch), 8 sc in the ring. Pull the tail to close the hole. Join with sl st in first sc (8 sc). 8 sc
- Ch 1 (does not count as a stitch), 2 hdc in each st around, starting in the same st as the join. Join with sl st in first hdc (16 hdc). Do not fasten off. 16 hdc
- Ch 14. This chain is the spine of the petal. 14 ch
- Dc in the 4th ch from hook (the 3 skipped ch fold up beside the dc and make the tip), [ch 1, skip 1 ch, dc in next ch] 5 times. You are back at the centre (6 dc, 5 ch-1 sps: the 5 holes are the vein). 6 dc, 5 ch-1 sps = 5 vein holes
- Ch 1 (does not count as a stitch), turn. Working up the vein row: sc in first dc, hdc in next ch, hdc in next dc, dc in next ch, dc in next dc, dc in next ch, dc in next dc, hdc in next ch, hdc in next dc, sc in next ch, sc in last dc (11 sts; work into each ch itself, not into the hole under it, so the vein stays open). (Sc, ch 2, sc) in the ch-3 sp at the tip (the 3 ch you skipped at the start of Row 2). Working down the other side of the spine, in the free loop of each ch: sc in each of next 2 ch, hdc in each of next 2 ch, dc in each of next 4 ch, hdc in each of next 2 ch, sc in next ch (11 sts). 8 sc, 8 hdc, 8 dc, 1 ch-2 sp: 11 up, the tip, 11 down
- Work a back petal (Rows 1 to 3): its ch 14 grows out of the hdc that holds the join of Rnd 2, so that hdc is the first of the 2 hdc under petal 1. Sl st in next hdc. *Sl st in next hdc, work a back petal, sl st in next hdc; rep from * 6 more times (8 petals, each one sitting on 2 hdc: 8 x 2 = 16). The last sl st goes into the 16th hdc, right before the joining st: do not join. Fasten off, leaving a 16 in tail to sew the layers together. 8 petals, 2 hdc under each (8 x 2 = 16)
Front layer (B, oatmeal)
Same centre, shorter petals: ch 12, 4 vein holes, 9 sts up each side.
- With B (oatmeal), make a magic ring. Ch 1 (does not count as a stitch), 8 sc in the ring. Pull the tail to close the hole. Join with sl st in first sc (8 sc). 8 sc
- Ch 1 (does not count as a stitch), 2 hdc in each st around, starting in the same st as the join. Join with sl st in first hdc (16 hdc). Do not fasten off. 16 hdc
- Ch 12. This chain is the spine of the petal. 12 ch
- Dc in the 4th ch from hook (the 3 skipped ch fold up beside the dc and make the tip), [ch 1, skip 1 ch, dc in next ch] 4 times. You are back at the centre (5 dc, 4 ch-1 sps: the 4 holes are the vein). 5 dc, 4 ch-1 sps = 4 vein holes
- Ch 1 (does not count as a stitch), turn. Working up the vein row: sc in first dc, hdc in next ch, dc in next dc, dc in next ch, dc in next dc, hdc in next ch, hdc in next dc, sc in next ch, sc in last dc (9 sts; work into each ch itself, not into the hole under it, so the vein stays open). (Sc, ch 2, sc) in the ch-3 sp at the tip (the 3 ch you skipped at the start of Row 2). Working down the other side of the spine, in the free loop of each ch: sc in each of next 2 ch, hdc in each of next 2 ch, dc in each of next 3 ch, hdc in next ch, sc in next ch (9 sts). 8 sc, 6 hdc, 6 dc, 1 ch-2 sp: 9 up, the tip, 9 down
- Work a front petal (Rows 1 to 3): its ch 12 grows out of the hdc that holds the join of Rnd 2, so that hdc is the first of the 2 hdc under petal 1. Sl st in next hdc. *Sl st in next hdc, work a front petal, sl st in next hdc; rep from * 6 more times (8 petals, each one sitting on 2 hdc: 8 x 2 = 16). The last sl st goes into the 16th hdc, right before the joining st: do not join. Fasten off, leaving a 6 in tail. 8 petals, 2 hdc under each (8 x 2 = 16)
Assemble the layers, add the beads and the loop
1 Weave in the ends
2 Block the petals
3 Stack the layers
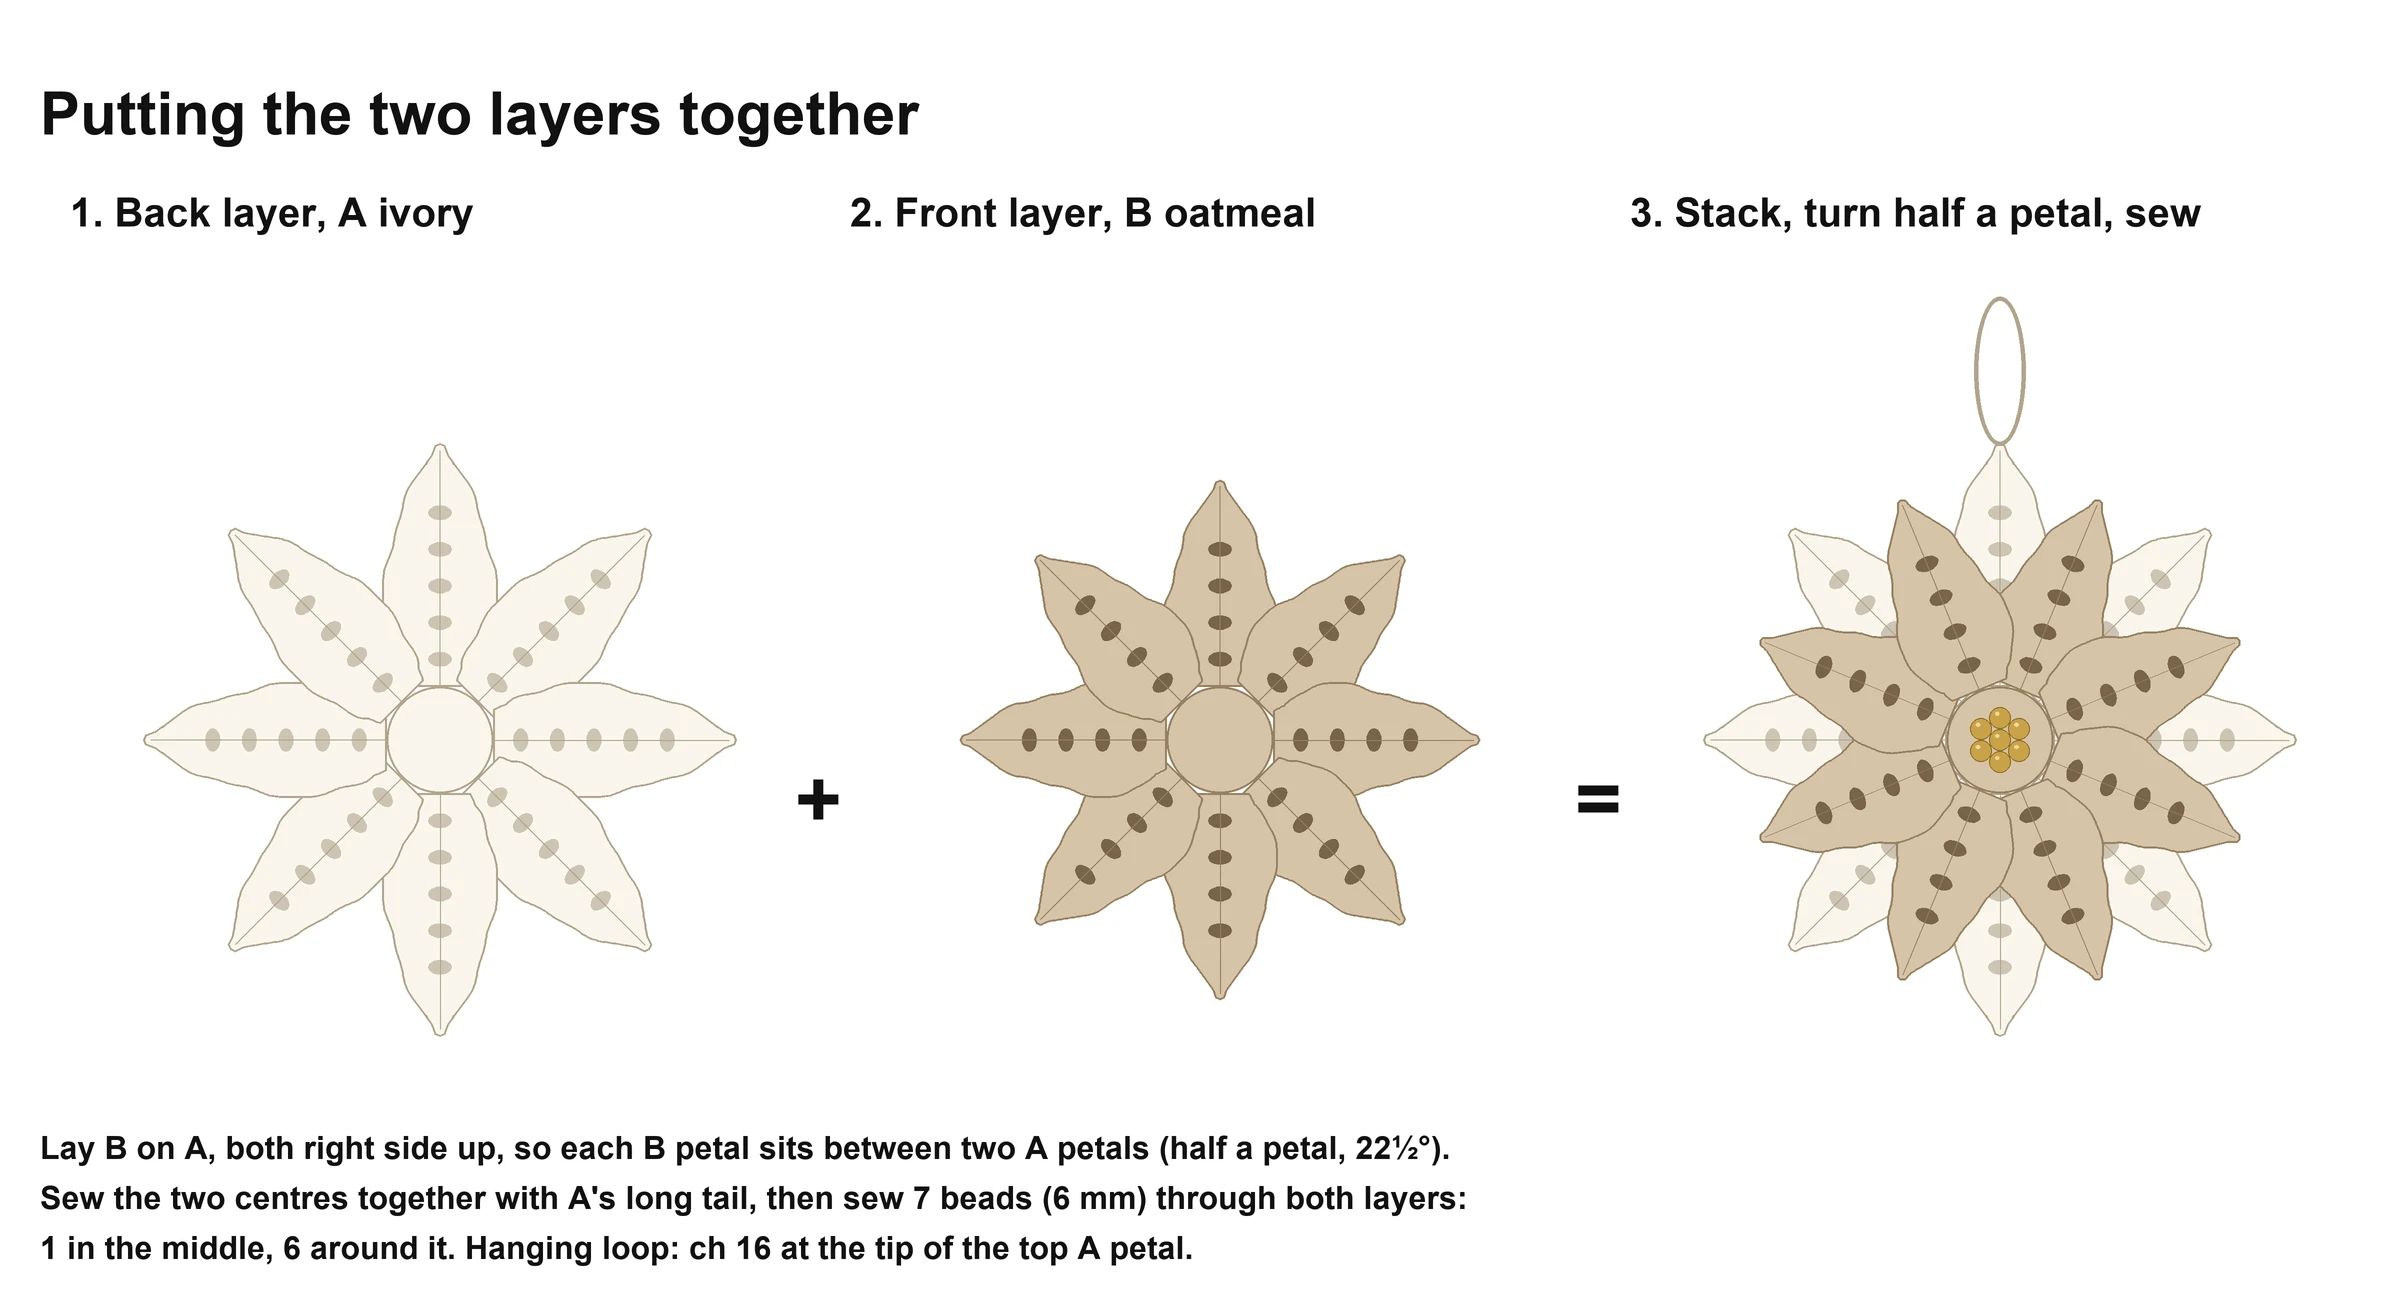
4 Sew the centres together
5 Sew on the beads
6 Add the hanging loop
Finishing
Fluff the petals with your fingers so the back petals show between the front ones, and hang the ornament from the loop.
Design notes
- Why it closes: each petal starts and ends with a sl st in the centre, on 2 hdc next to each other. 8 petals x 2 hdc = 16 hdc, the exact number of stitches in Rnd 2. A pattern that puts 8 petals on 4 stitches each would need 32 stitches in the centre, not 16.
- The centre is 8 sc, then 16 hdc: hdc are just tall enough for 16 stitches to lie flat (our geometry check gives 103 % of a flat circle).
- The open vein is real: Row 2 is a line of dc with a ch 1 between them, worked into every other chain of the spine. Each ch 1 leaves a hole, and Row 3 is worked into the chain above the hole, not into it.
- The petal shape comes from the stitch heights in Row 3: low sc near the centre and at the tip, tall dc in the middle. The back petals are 2 chains longer, so they reach about 0.4 in past the front tips.
- Where the 6½ in comes from: at the suggested gauge, the centre is about 1.17 in across and a back petal about 2.66 in long, so the ornament is about 6.49 in from tip to tip. The petals overlap near the centre, like a real poinsettia: they only part from each other about 1.5 in out.
Tips for this crochet Christmas ornament
- Make one back petal, then stop and check it against the petal chart before you go on: 11 stitches up, the tip, 11 stitches down.
- Place a stitch marker in the hdc that holds the join of Rnd 2: petal 1 starts there, and the last sl st of Rnd 3 goes into the hdc just before it.
- Keep the spine chain loose. A tight chain makes Row 2 hard to work and curls the petal.
- Count the chains of Row 1 twice. One chain more or less changes the number of vein holes.
- For crisp points, pull the ch-2 tip gently while the petal is still wet from blocking.
- Make several ornaments in a row: all the back layers first, then all the front layers.
Common mistakes
- Working Row 3 into the vein holes instead of into the ch above them: the holes close up and the vein disappears.
- Starting each petal on the next hdc without a sl st: the petals then sit on 1 stitch, and the round ends with 8 hdc left over.
- Skipping the ch 1 turn at the start of Row 3, or counting it as a stitch: the first side ends one stitch off.
- Stacking the layers with the petals on top of each other: the back layer disappears. Turn the front layer half a petal.
Make it your own
- Three sizes, same stitch counts: mini in sport weight yarn with a US C-2 (2.75 mm) hook, about 4¾ in; standard as written, about 6½ in; tree topper in bulky yarn with a US I-9 (5.5 mm) hook, about 9 in. See the size cards above.
- Ribbon instead of a loop: skip the crochet loop and thread an 8 in satin or linen ribbon through the ch-2 tip of one back petal, then tie a bow.
- No beads, for a home with babies or toddlers: leave the beads off and embroider 7 French knots with gold or mustard yarn instead. Beads are a choking hazard; a crochet ornament is still not a toy, so hang it out of reach.
- Classic red: red back layer, cream front layer, gold beads.
- Snowy: both layers in white, with pearl beads.
- Gift topper: sew a pin back or a hair clip behind the centre instead of the loop.
Care
- Spot clean only, with a damp cloth.
- Store flat in a box between sheets of tissue paper, so the petals keep their shape.
- If the petals soften, spray them lightly with water or starch and block again.
More views
More crochet patterns for your table
- Easy Granny Square Blanket — a cozy beginner blanket to crochet for the holidays, with every round counted
- Daisy Granny Square Blanket — more crochet flowers: 8 petals around a small centre, turned into a square
- Easy Crochet Pumpkin — a quick seasonal decoration in three sizes
- Autumn Leaves Table Runner — small leaves worked on their own chain, the same idea as these petals
FAQ
Is this crochet Christmas ornament good for beginners?
It is easy with a little practice. You need ch, sl st, sc, hdc and dc, and you work into both sides of a chain. If you have made a granny square, you can make this. Start with one petal and check it against the petal chart.
How big is the layered poinsettia crochet ornament?
About 6½ in across, tip to tip, with worsted weight yarn and a US G-6 (4.0 mm) hook. The front layer is about 5¾ in. This is an estimate from a suggested gauge, not a measured sample.
How much yarn do I need?
About 35 yd of ivory and 30 yd of oatmeal worsted weight yarn for one ornament, tails and loop included (estimated, with a 20 % margin).
How do you make the open vein in the petals?
Row 2 of each petal is a dc, then [ch 1, skip 1 ch, dc in next ch] along the spine. Each ch 1 leaves a small hole. In Row 3, work into the ch itself, not into the hole, so the line of holes stays open down the middle of the petal.
Why do the 8 petals fit exactly?
Rnd 2 has 16 hdc and each petal sits on 2 of them: one sl st where the petal starts and one where it ends. 8 x 2 = 16, so the round closes with no stitch left over.
Can I make this crochet poinsettia pattern without beads?
Yes. Embroider 7 French knots in gold or mustard yarn, or sew on a single large button. For a home with babies, skip the beads and buttons.
How do I make the ornament stiff?
Use cotton yarn and the smaller hook, then block the petals with spray starch and let them dry flat. For a very stiff finish, use a fabric stiffener and dry it pinned out.
Can I sell the ornaments I make from this pattern?
Yes, you may sell the ornaments you crochet yourself. Please don't sell or repost the pattern; link to this page instead.
Copyright
© 2026 CookZya — original design. Free for personal use: you may make and sell the ornaments you crochet. Please don't sell, copy or repost this pattern; link to this page instead.