
Free pattern · Easy · about 6 in tall · about 80 minutes · worsted weight scraps in green, gold and brown. Make 3 squares, fold, seam, stack.
This granny square Christmas tree is made of three small granny squares, folded in half on the diagonal and stacked into tiers. On each folded square the rounds turn into chevrons, so the gold round becomes a garland across the two lower tiers and a little gold peak on the top one. A crochet star sits on top and a little trunk hangs below. It is a free, original CookZya design, in US terms.
If you can make a granny square, you can make this tree: chains, slip stitches, single, half double and double crochet, all explained below. It uses only scraps, so it is a quick gift tag, a tree ornament or a garland to make in an evening before Christmas.
Every round and seam was checked by our stitch simulator (19 of 19); the ornament has not been crochet-tested yet. Tick each round as you go — your progress stays saved in this browser.
- Finished size
- About 5 3/4 in wide and 6 in tall with the star and trunk (approximate)
- Level
- Easy: you need ch, sl st, sc, hdc (for the star) and dc
- Time
- About 80 minutes, estimated, not timed
- Yarn
- Worsted weight (#4): about 30 yd pine green, 15 yd gold, 5 yd brown
- Hook
- US G-6 (4.0 mm), a size smaller than usual so the tiers stay firm
- Gauge
- Suggested only: Rnds 1-4 = about 4 in side to side
- Notions
- Yarn needle, 1 stitch marker
✓ CookZya original design · Stitch counts checked round by round and row by row — size not tested. All 19 rounds, seams and rows were replayed by our stitch simulator. This ornament has not been crochet-tested: your tension decides the final size.
Materials
- Color B — pine green, about 30 yd
- Color G — antique gold, about 15 yd
- Color T — chocolate brown, about 5 yd
- Yardage is estimated from the stitch counts with a 20 % margin: one tree uses only scraps. Leftovers from our Christmas Granny Square Blanket are the right colors.
- A metallic gold works for the garland round and the star; keep the tension loose.
Notes
- US crochet terms. ch = chain, sl st = slip stitch, sc = single crochet, hdc = half double crochet, dc = double crochet, sp = space, st(s) = stitch(es), rep = repeat, Rnd = round, RS = right side.
- Double crochet (dc): yarn over, insert the hook, yarn over and pull up a loop, [yarn over and pull through 2 loops] 2 times. Single crochet (sc): insert the hook, pull up a loop, yarn over and pull through both loops. Half double crochet (hdc, only in the star): yarn over, insert the hook, pull up a loop (3 loops on the hook), yarn over and pull through all 3 loops.
- Magic ring: wrap the yarn around two fingers, insert the hook under the strands and pull up a loop, then work Rnd 1 over the ring exactly as written (it starts with ch 3). Pull the tail hard: the ring must close completely, because it sits right on the fold.
- The MARKED CORNER: every round starts in the same corner, and every new color is joined there. After folding, that corner is at the back of the point, so all the joins hide behind the tree.
- A group is 3 dc in the same space. A corner is (3 dc, ch 2, 3 dc) in a ch-2 sp. Each round adds one group per side.
- Working through both layers: insert the hook under the top loops of the stitch in front AND of the matching stitch right behind it, then work the sc as usual.
- No stuffing: white fiberfill would show through the holes of the granny square.
How the granny square Christmas tree is built
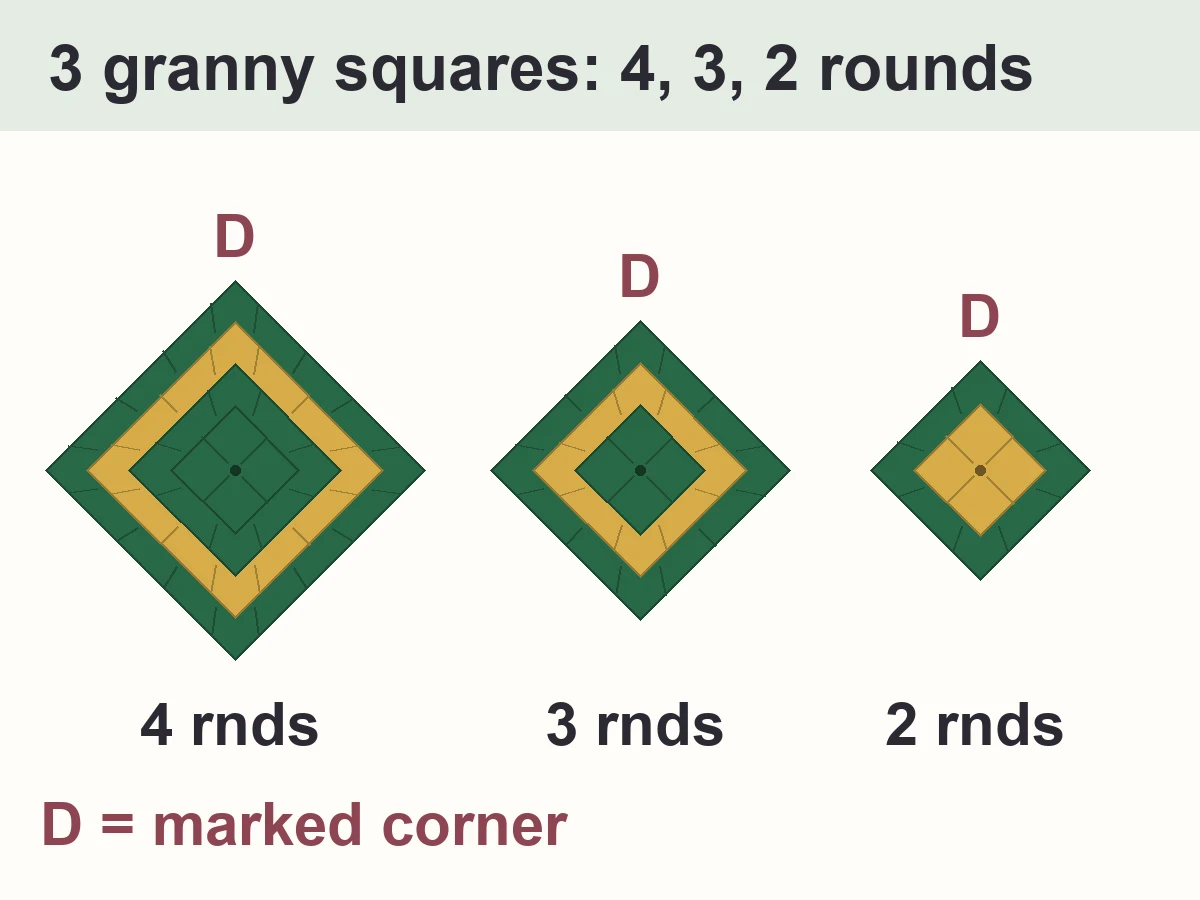
Bottom tier (4 rounds)
Rnd 1 pine green, Rnd 2 pine green, Rnd 3 antique gold, Rnd 4 pine green. The gold round is always the second-to-last, so it shows as a garland on the folded tier.
- With B (pine green), make a magic ring. Ch 3 (counts as the first dc), 2 dc in the ring, ch 2, *3 dc in the ring, ch 2; rep from * 2 more times. Pull the tail very tight, so the ring closes completely (it sits on the fold later). Join with sl st in the top of the beginning ch-3 (12 dc in 4 groups, 4 ch-2 corner sps). Place a marker in the first ch-2 sp you made: this is the MARKED CORNER; every round starts there. 12 dc, 4 ch-2 sps
- Sl st in each of next 2 dc and in the next ch-2 sp (the marked corner). Ch 3 (counts as a dc), (2 dc, ch 2, 3 dc) in the same ch-2 sp, ch 1, *(3 dc, ch 2, 3 dc) in the next ch-2 sp, ch 1; rep from * 2 more times. Join with sl st in the top of the beginning ch-3 (24 dc in 8 groups, 4 ch-2 corner sps, 4 ch-1 sps). Move the marker up to this round's first corner. 24 dc, 4 ch-2 sps, 4 ch-1 sps
- Fasten off B. Join G (antique gold) with sl st in the marked corner. Ch 3 (counts as a dc), (2 dc, ch 2, 3 dc) in the same sp, ch 1, *3 dc in the next ch-1 sp, ch 1, (3 dc, ch 2, 3 dc) in the next ch-2 sp, ch 1; rep from * 2 more times. 3 dc in the next ch-1 sp, ch 1. Join with sl st in the top of the beginning ch-3 (36 dc in 12 groups, 4 ch-2 corner sps, 8 ch-1 sps). Move the marker up to this round's first corner. 36 dc, 4 ch-2 sps, 8 ch-1 sps
- Fasten off G. Join B (pine green) with sl st in the marked corner. Ch 3 (counts as a dc), (2 dc, ch 2, 3 dc) in the same sp, ch 1, *[3 dc in the next ch-1 sp, ch 1] 2 times, (3 dc, ch 2, 3 dc) in the next ch-2 sp, ch 1; rep from * 2 more times. [3 dc in the next ch-1 sp, ch 1] 2 times. Join with sl st in the top of the beginning ch-3 (48 dc in 16 groups, 4 ch-2 corner sps, 12 ch-1 sps). Fasten off, leaving a 6 in tail. Leave the marker in this round's first corner: it is the marked corner you fold onto. 48 dc, 4 ch-2 sps, 12 ch-1 sps
Bottom tier seam
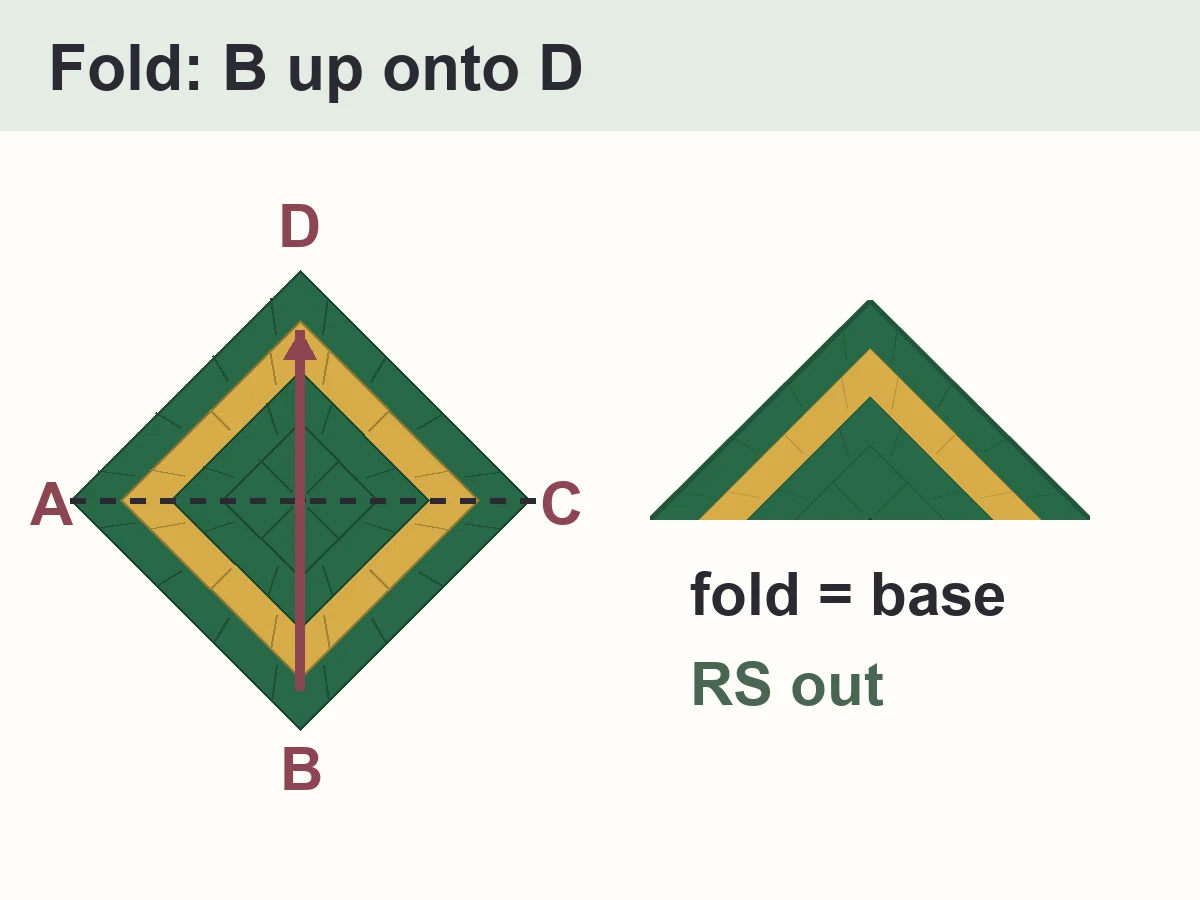
Fold first (see the Folding diagram), then close the two sides.
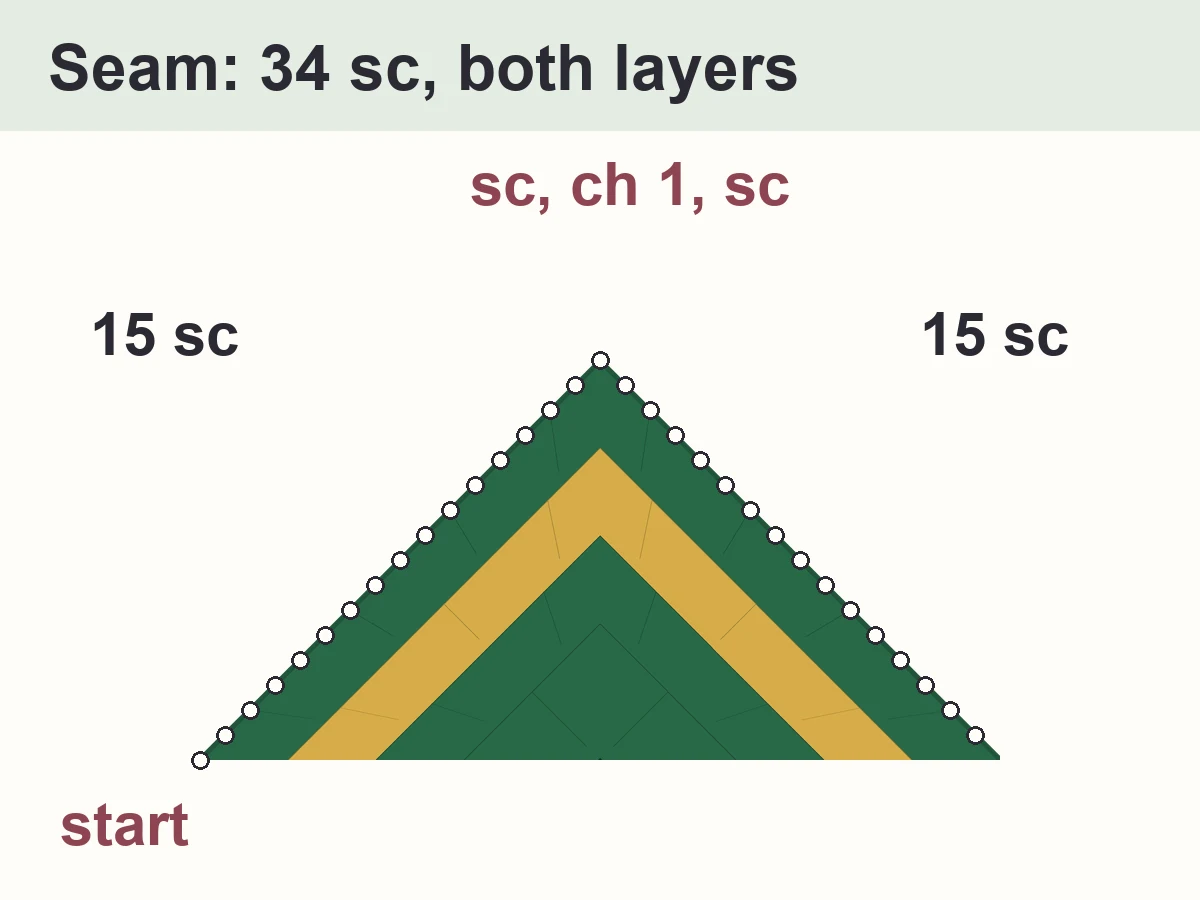
- Fold the square in half on the diagonal, right side out: right side down, marked corner (D) at the top, fold the opposite corner (B) up onto D (see Folding). The fold is the base and the marked corner is at the back of the point. Hold the triangle point up. With B, join with sl st in the ch-2 corner sp at the bottom left, where the fold runs through it. Ch 1 (does not count as a st), sc in the same sp. Now work through both layers at once — into the stitch in front and the matching stitch right behind it; for a ch-1 sp, through the two stacked ch-1 sps: sc in each of next 3 dc, *sc in the next ch-1 sp, sc in each of next 3 dc; rep from * 2 more times (15 sc up the side, after the corner sc). (sc, ch 1, sc) in the 2 stacked corner sps at the point. Down the other side: sc in each of next 3 dc, *sc in the next ch-1 sp, sc in each of next 3 dc; rep from * 2 more times (15 sc). Sc in the ch-2 corner sp at the bottom right, where the fold runs through it (34 sc in all). Fasten off, leaving a 12 in tail to sew the tiers together. 34 sc, 1 ch-1 sp
Middle tier (3 rounds)
Rnd 1 pine green, Rnd 2 antique gold, Rnd 3 pine green. The gold round is always the second-to-last, so it shows as a garland on the folded tier.
- With B (pine green), make a magic ring. Ch 3 (counts as the first dc), 2 dc in the ring, ch 2, *3 dc in the ring, ch 2; rep from * 2 more times. Pull the tail very tight, so the ring closes completely (it sits on the fold later). Join with sl st in the top of the beginning ch-3 (12 dc in 4 groups, 4 ch-2 corner sps). Place a marker in the first ch-2 sp you made: this is the MARKED CORNER; every round starts there. 12 dc, 4 ch-2 sps
- Fasten off B. Join G (antique gold) with sl st in the marked corner. Ch 3 (counts as a dc), (2 dc, ch 2, 3 dc) in the same sp, ch 1, *(3 dc, ch 2, 3 dc) in the next ch-2 sp, ch 1; rep from * 2 more times. Join with sl st in the top of the beginning ch-3 (24 dc in 8 groups, 4 ch-2 corner sps, 4 ch-1 sps). Move the marker up to this round's first corner. 24 dc, 4 ch-2 sps, 4 ch-1 sps
- Fasten off G. Join B (pine green) with sl st in the marked corner. Ch 3 (counts as a dc), (2 dc, ch 2, 3 dc) in the same sp, ch 1, *3 dc in the next ch-1 sp, ch 1, (3 dc, ch 2, 3 dc) in the next ch-2 sp, ch 1; rep from * 2 more times. 3 dc in the next ch-1 sp, ch 1. Join with sl st in the top of the beginning ch-3 (36 dc in 12 groups, 4 ch-2 corner sps, 8 ch-1 sps). Fasten off, leaving a 6 in tail. Leave the marker in this round's first corner: it is the marked corner you fold onto. 36 dc, 4 ch-2 sps, 8 ch-1 sps
Middle tier seam
Fold first (see the Folding diagram), then close the two sides.
- Fold the square in half on the diagonal, right side out: right side down, marked corner (D) at the top, fold the opposite corner (B) up onto D (see Folding). The fold is the base and the marked corner is at the back of the point. Hold the triangle point up. With B, join with sl st in the ch-2 corner sp at the bottom left, where the fold runs through it. Ch 1 (does not count as a st), sc in the same sp. Now work through both layers at once — into the stitch in front and the matching stitch right behind it; for a ch-1 sp, through the two stacked ch-1 sps: sc in each of next 3 dc, *sc in the next ch-1 sp, sc in each of next 3 dc; rep from * 1 more time (11 sc up the side, after the corner sc). (sc, ch 1, sc) in the 2 stacked corner sps at the point. Down the other side: sc in each of next 3 dc, *sc in the next ch-1 sp, sc in each of next 3 dc; rep from * 1 more time (11 sc). Sc in the ch-2 corner sp at the bottom right, where the fold runs through it (26 sc in all). Fasten off, leaving a 12 in tail to sew the tiers together. 26 sc, 1 ch-1 sp
Top tier (2 rounds)
Rnd 1 antique gold, Rnd 2 pine green. The gold round is always the second-to-last, so it shows as a garland on the folded tier.
- With G (antique gold), make a magic ring. Ch 3 (counts as the first dc), 2 dc in the ring, ch 2, *3 dc in the ring, ch 2; rep from * 2 more times. Pull the tail very tight, so the ring closes completely (it sits on the fold later). Join with sl st in the top of the beginning ch-3 (12 dc in 4 groups, 4 ch-2 corner sps). Place a marker in the first ch-2 sp you made: this is the MARKED CORNER; every round starts there. 12 dc, 4 ch-2 sps
- Fasten off G. Join B (pine green) with sl st in the marked corner. Ch 3 (counts as a dc), (2 dc, ch 2, 3 dc) in the same sp, ch 1, *(3 dc, ch 2, 3 dc) in the next ch-2 sp, ch 1; rep from * 2 more times. Join with sl st in the top of the beginning ch-3 (24 dc in 8 groups, 4 ch-2 corner sps, 4 ch-1 sps). Fasten off, leaving a 6 in tail. Leave the marker in this round's first corner: it is the marked corner you fold onto. 24 dc, 4 ch-2 sps, 4 ch-1 sps
Top tier seam
Fold first (see the Folding diagram), then close the two sides. The point makes the hanging loop.
- Fold the square in half on the diagonal, right side out: right side down, marked corner (D) at the top, fold the opposite corner (B) up onto D (see Folding). The fold is the base and the marked corner is at the back of the point. Hold the triangle point up. With B, join with sl st in the ch-2 corner sp at the bottom left, where the fold runs through it. Ch 1 (does not count as a st), sc in the same sp. Now work through both layers at once — into the stitch in front and the matching stitch right behind it; for a ch-1 sp, through the two stacked ch-1 sps: sc in each of next 3 dc, sc in the next ch-1 sp, sc in each of next 3 dc (7 sc up the side, after the corner sc). (sc, ch 14, sl st in the same corner sps to close the loop, sc) in the 2 stacked corner sps at the point: the ch-14 loop is the hanging loop. Down the other side: sc in each of next 3 dc, sc in the next ch-1 sp, sc in each of next 3 dc (7 sc). Sc in the ch-2 corner sp at the bottom right, where the fold runs through it (18 sc in all). Fasten off, leaving a 12 in tail to sew the tiers together. 18 sc, 1 ch-14 sp
Star
The same star as our Crochet Christmas Tree Ornament.
- With G (antique gold), leaving a 12 in tail, make a magic ring. Ch 1 (does not count as a stitch), 5 sc in the ring. Pull the tail to close the hole. Join with sl st in first sc (5 sc). 5 sc
- Do not turn. Start in the same sc as the join: *ch 3, sc in 2nd ch from hook, hdc in next ch (1 point made), sl st in next sc; rep from * 4 more times. The last sl st goes in the first sc (5 points). Fasten off, leaving a 6 in tail. 5 sc, 5 hdc, 5 ch-3 sps
Trunk
- With T (chocolate brown), leaving a 12 in tail, ch 5. 1 ch-5 sp
- Sc in 2nd ch from hook and in each ch across (4 sc). 4 sc
- Ch 1 (does not count as a stitch), turn. Sc in each sc across (4 sc). 4 sc
- Ch 1 (does not count as a stitch), turn. Sc in each sc across (4 sc). 4 sc
- Ch 1 (does not count as a stitch), turn. Sc in each sc across (4 sc). Fasten off, leaving a 6 in tail. 4 sc
How to assemble the tree
1 Weave in the ends
2 Stack the middle tier
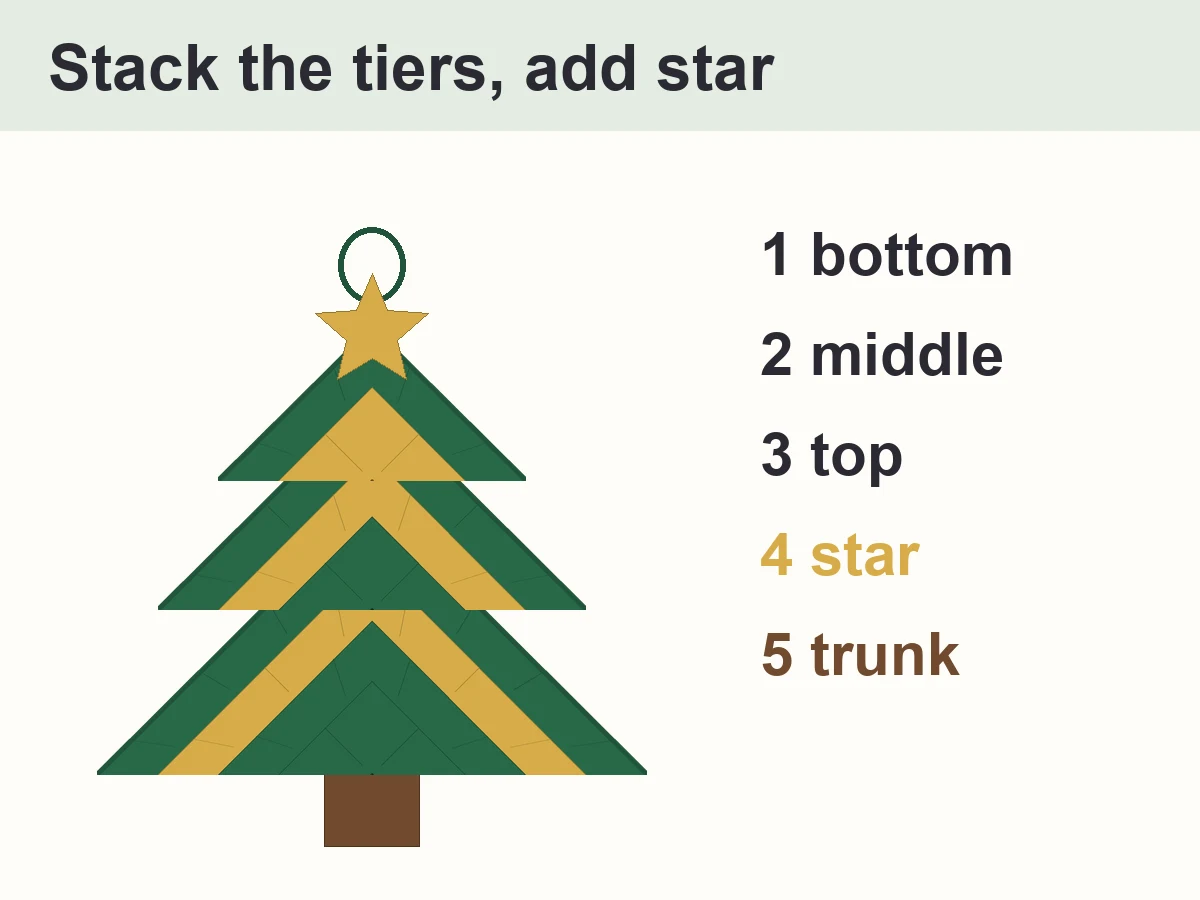
3 Stack the top tier
4 Sew on the star
5 Sew on the trunk
Finishing
Press the tree under a heavy book for an hour, or hold a steam iron just above it without touching (never touch acrylic with the iron): the tiers lie flat and the points stay sharp.
Design notes
- On a granny square folded on the diagonal, each round shows as a V-shaped band: half of each round is on the front and half on the back, so both faces look the same.
- The seams have 34, 26, 18 sc: 1 in each folded corner, 1 in every pair of stitches or spaces up each side, and 2 at the point.
- Three tiers instead of one big folded square: one square folded in half makes a wide, flat triangle; stacked tiers make a real tree shape, taller than it is wide.
Tips for a neat granny square Christmas tree
- Pull the magic ring closed as tight as you can, and weave its tail in twice: it sits on the fold.
- Keep your marker in the marked corner and move it up every round: that one habit hides all the joins.
- Block the squares flat before folding them: the fold lands right on the diagonal.
- Make a whole forest from scraps: change the green, or make the garland red.
Common mistakes
- Joining a new color in a different corner: the join then shows on the front of the tree.
- Folding with the right side in: the rounds look rough on the outside.
- Seaming through one layer only: the tier opens at the edges.
- Stuffing the tiers: the fiberfill shows through the holes.
Make it your own
- Colors as written: pine green with an antique gold garland, a gold star, a brown trunk.
- Snowy tree: white rounds with a silver garland.
- Candy cane: red and white rounds.
- Garland: make several bottom tiers only and slip them on a chain of gold yarn.
- Gift tag: make the top two tiers only and tie the loop to a ribbon.
Care
- Hand wash in cool water and dry flat.
- Store flat, wrapped in tissue, with your ornaments.
More crochet patterns for your table
- Christmas Granny Square Blanket — the same square and the same green and gold: use the leftovers from your blanket
- Crochet Christmas Tree Ornament — a flat tree with scalloped tiers, the same star
- Granny Heart Ornament — another little granny project to hang
- Layered Poinsettia Ornament — a red and green ornament to hang next to your trees
FAQ
Is this granny square Christmas tree easy for beginners?
Yes. Each square is a plain granny square of 2 to 4 rounds, and the seam is single crochet. If you have made one granny square, you can make this tree.
How big is the tree?
About 5 3/4 in wide and 6 in tall with worsted yarn and a G-6 hook — an estimate from a suggested gauge.
How much yarn does it take?
About 30 yd of green, 15 yd of gold and 5 yd of brown: scraps are enough.
How long does it take?
About 80 minutes for one tree, estimated: a quick last-minute gift.
Can I sell the ornaments I make?
Yes, you may sell the trees you crochet yourself. Please don't sell or repost the pattern; link to this page instead.
Copyright
© 2026 CookZya — original design. Free for personal use: you may make and sell the ornaments you crochet. Please don't sell, copy or repost this pattern; link to this page instead.