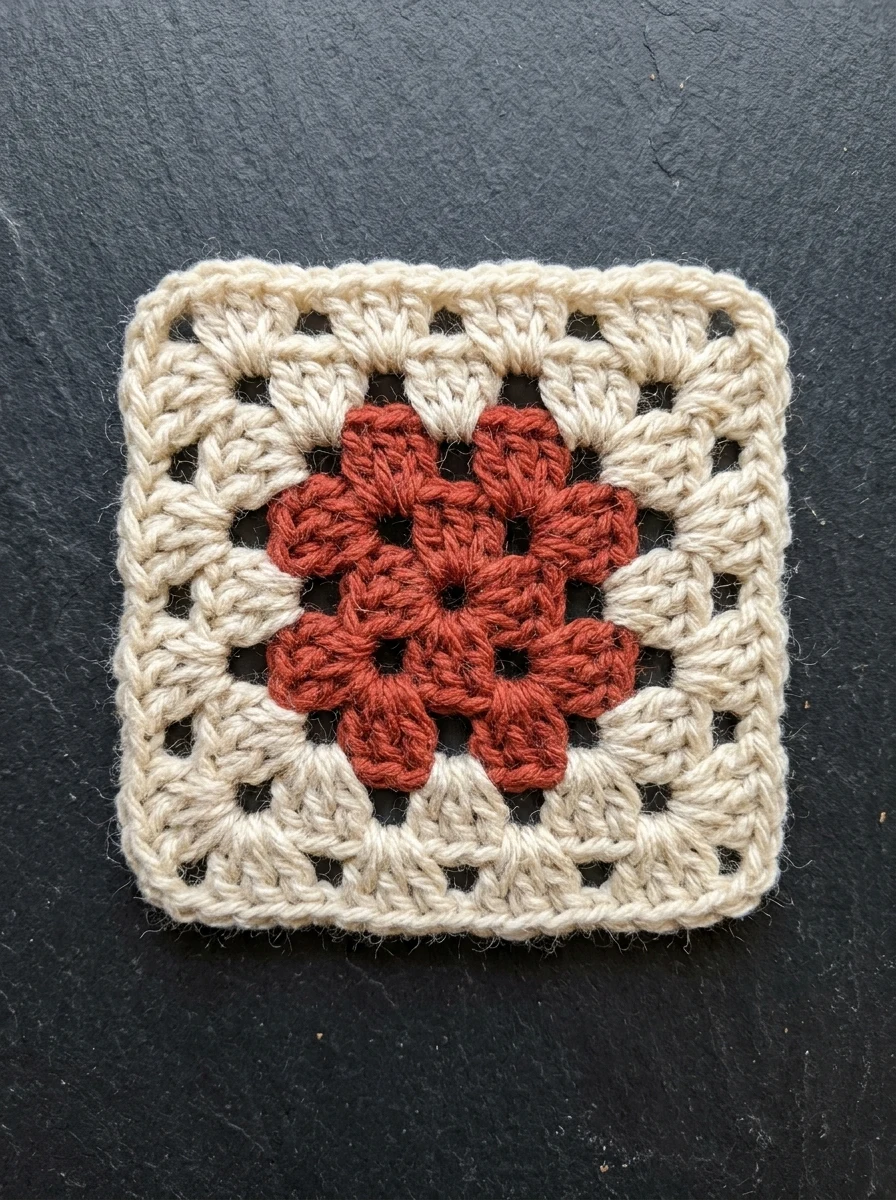
Free pattern · Beginner · about 5 in · about 30-45 minutes for a first square · worsted yarn in 2 colors, US H-8 hook. One chart per round below.
This is how to crochet a granny square, step by step: the classic square made of little groups of 3 double crochet, worked in the round from a magic ring. Once you can make it, you can make blankets, bags, cardigans and Christmas ornaments — they are all this same square, repeated or folded.
You need only 3 stitches: chain, slip stitch and double crochet, each explained below. You work every group into a space, never into a stitch, which makes the granny square very forgiving.
Every round was checked by our stitch simulator. Tick each round as you go — your progress stays saved in this browser.
- Finished size
- About 5 in (approximate, depends on your tension)
- Level
- Beginner: ch, sl st and dc
- Time
- About 30-45 minutes for a first square, estimated, not timed
- Yarn
- Worsted weight (#4), 2 colors: about 10 yd of A and 15 yd of B
- Hook
- US H-8 (5.0 mm)
- Rounds
- 4 rounds: 12, 24, 36 and 48 dc
✓ CookZya original design · Stitch counts checked round by round — All 4 rounds were replayed by our stitch simulator; your tension decides the final size.
Materials
- Color A — color A (terracotta in our drawings), about 10 yd
- Color B — color B (cream in our drawings), about 15 yd
- Pick a smooth, light-colored acrylic or cotton for your first square: you can see the stitches and the spaces clearly.
- Yarn needle, scissors.
Notes
- US crochet terms. ch = chain, sl st = slip stitch, dc = double crochet, sp = space, st(s) = stitch(es), rep = repeat, Rnd = round.
- Chain (ch): yarn over and pull through the loop on your hook.
- Slip stitch (sl st): insert the hook, yarn over and pull through the stitch and the loop on the hook in one go. It joins a round and moves you without adding height.
- Double crochet (dc): yarn over, insert the hook, yarn over and pull up a loop (3 loops on the hook), yarn over and pull through 2 loops, yarn over and pull through the last 2 loops.
- Magic ring: wrap the yarn twice around two fingers, insert the hook under the strands, pull up a loop and ch 1 to lock it. Work Round 1 over the ring. To close it: pull the tail a little, see which of the 2 loops moves, pull that loop tight, then pull the tail again. Prefer a chain ring? Ch 4, sl st in the first ch, and work Round 1 into that ring.
- Ch 3 (counts as a dc): the 3 chains at the start of a round stand in for the first dc. "The top of the beginning ch-3" is the 3rd of those chains: that is where you join with a sl st.
- A group = 3 dc in the same space. A corner = (3 dc, ch 2, 3 dc) in a ch-2 corner space. A side space = the ch-1 space between two groups.
- *…; rep from * 2 more times means: work the part after the * 3 times in all.
- Joining a new color: make a slip knot with the new color, insert the hook in the corner space, yarn over and pull through the space and the slip knot.
Step by step: one picture per round
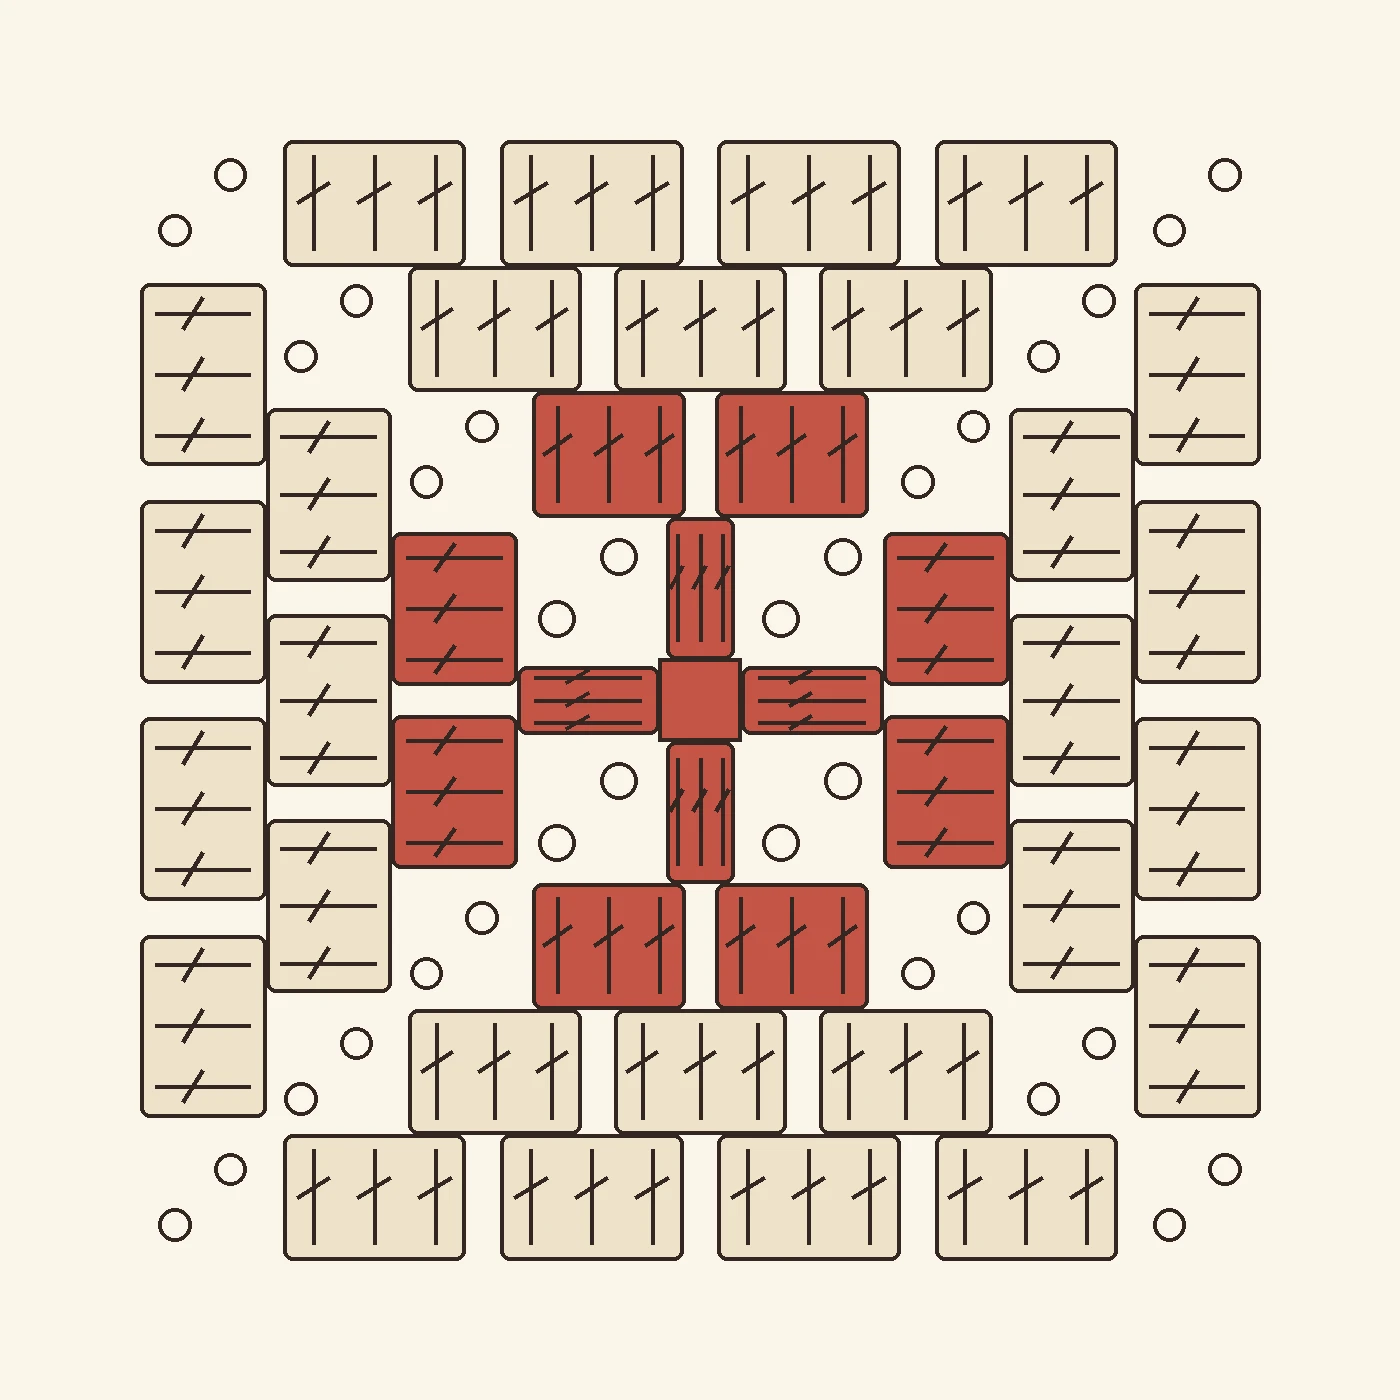
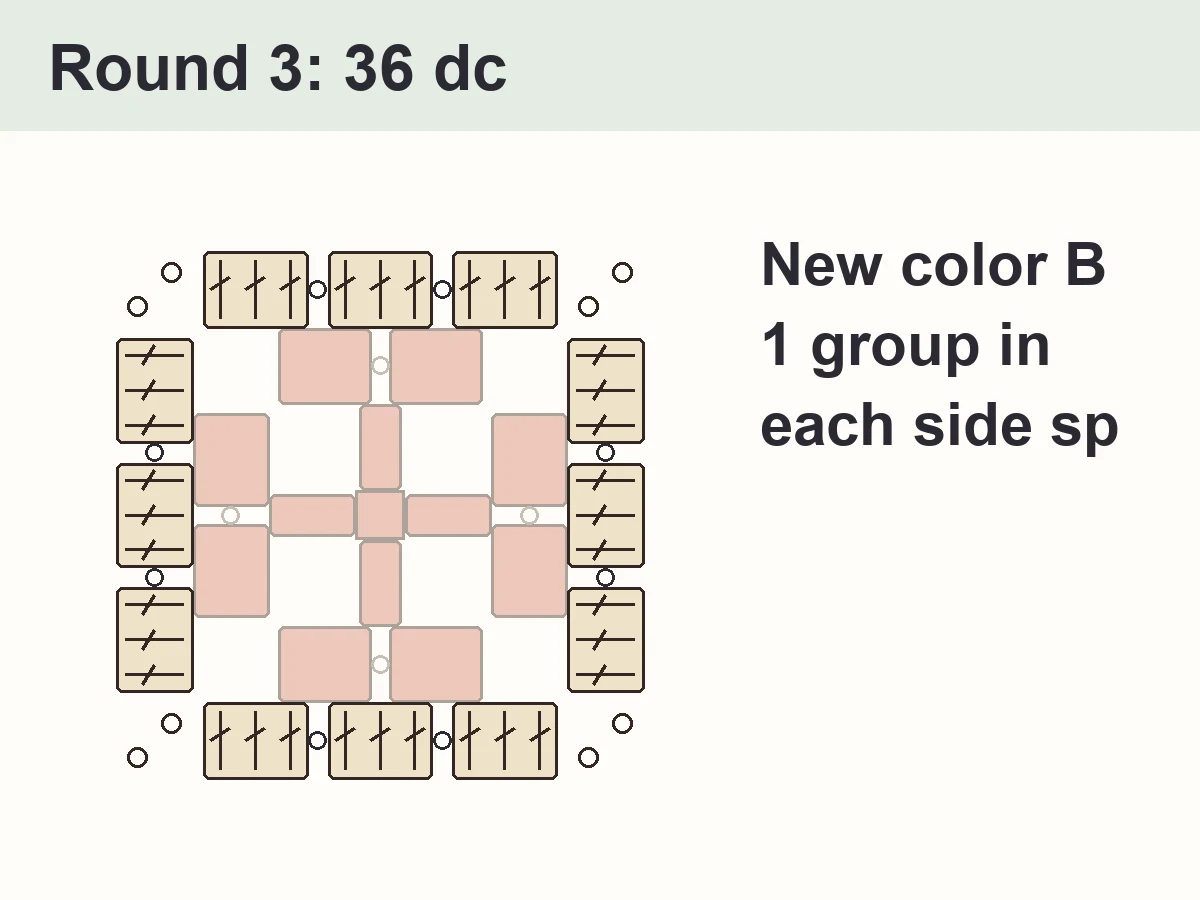
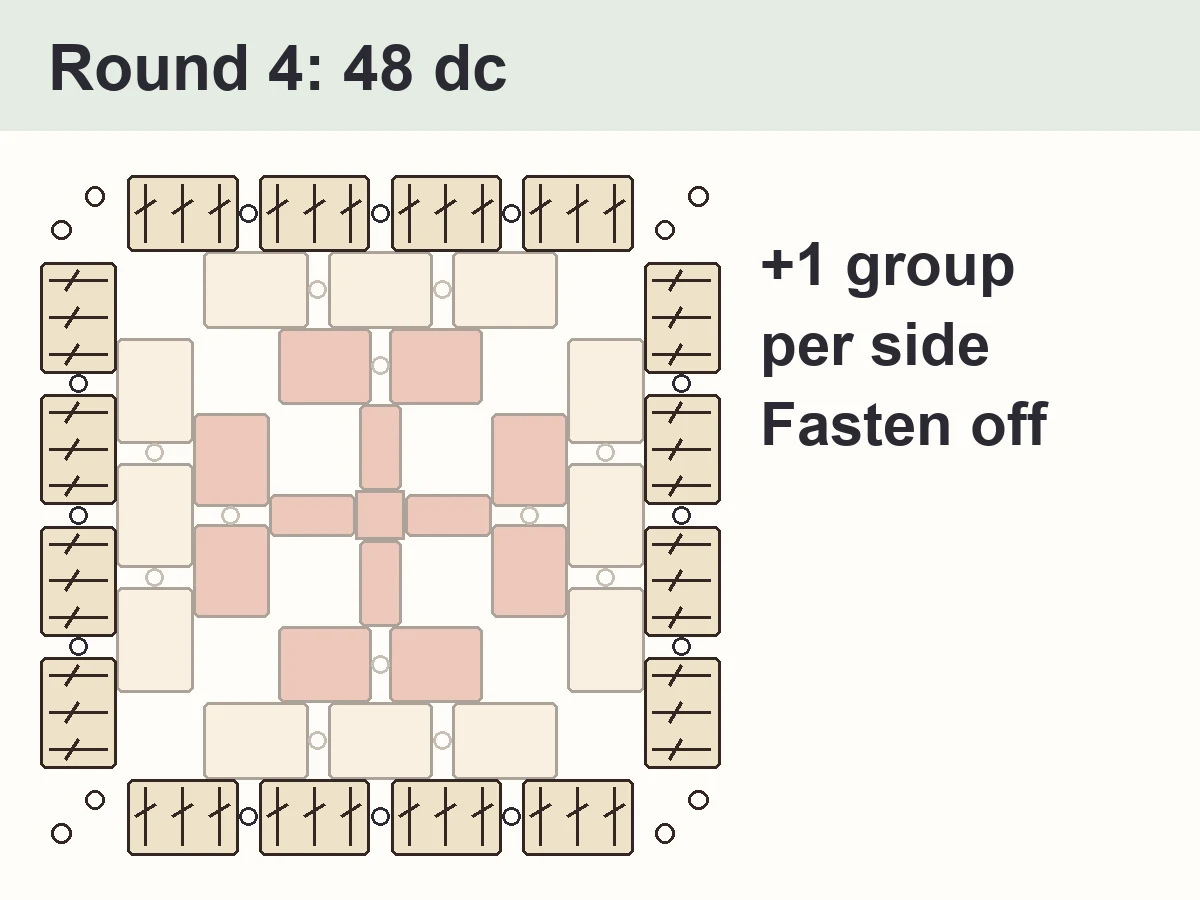
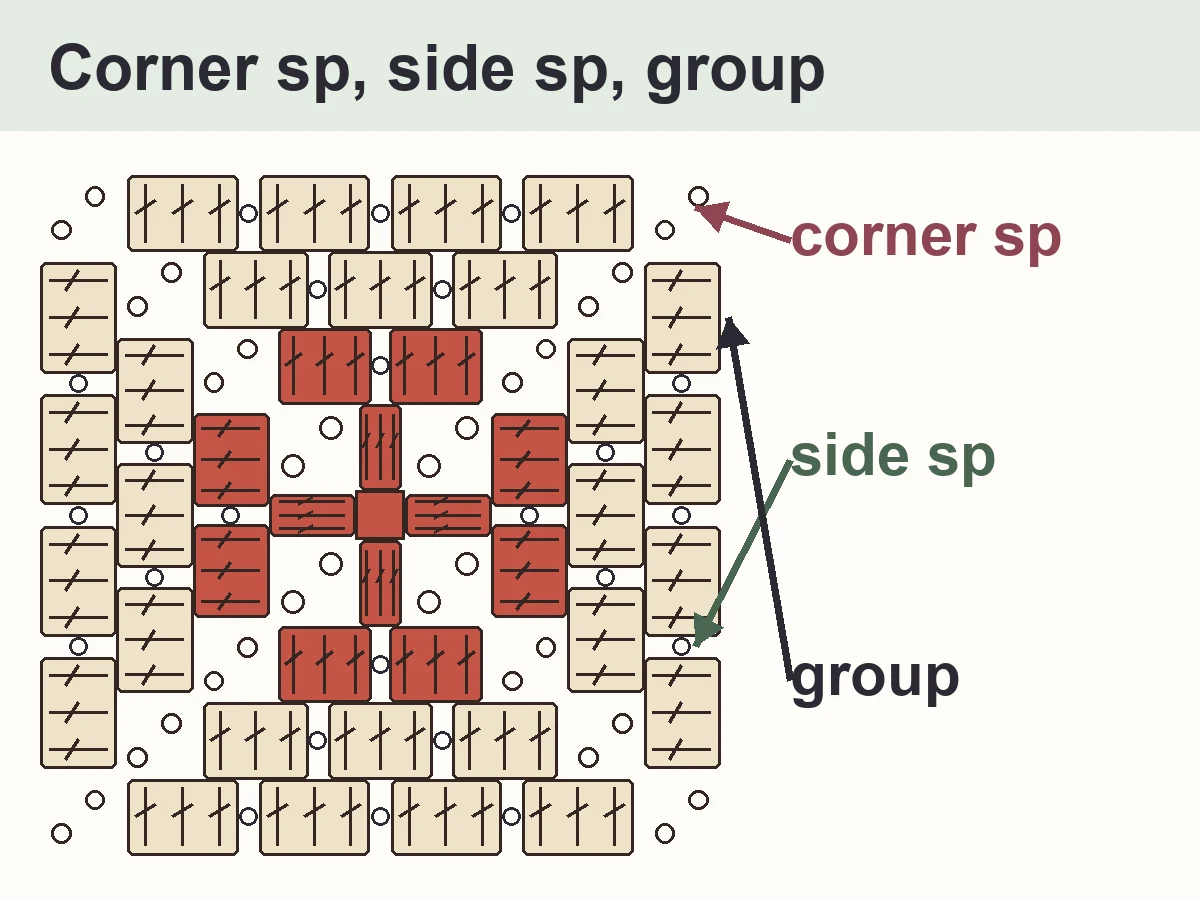
Granny square
Work with the right side facing you; you never turn the square.
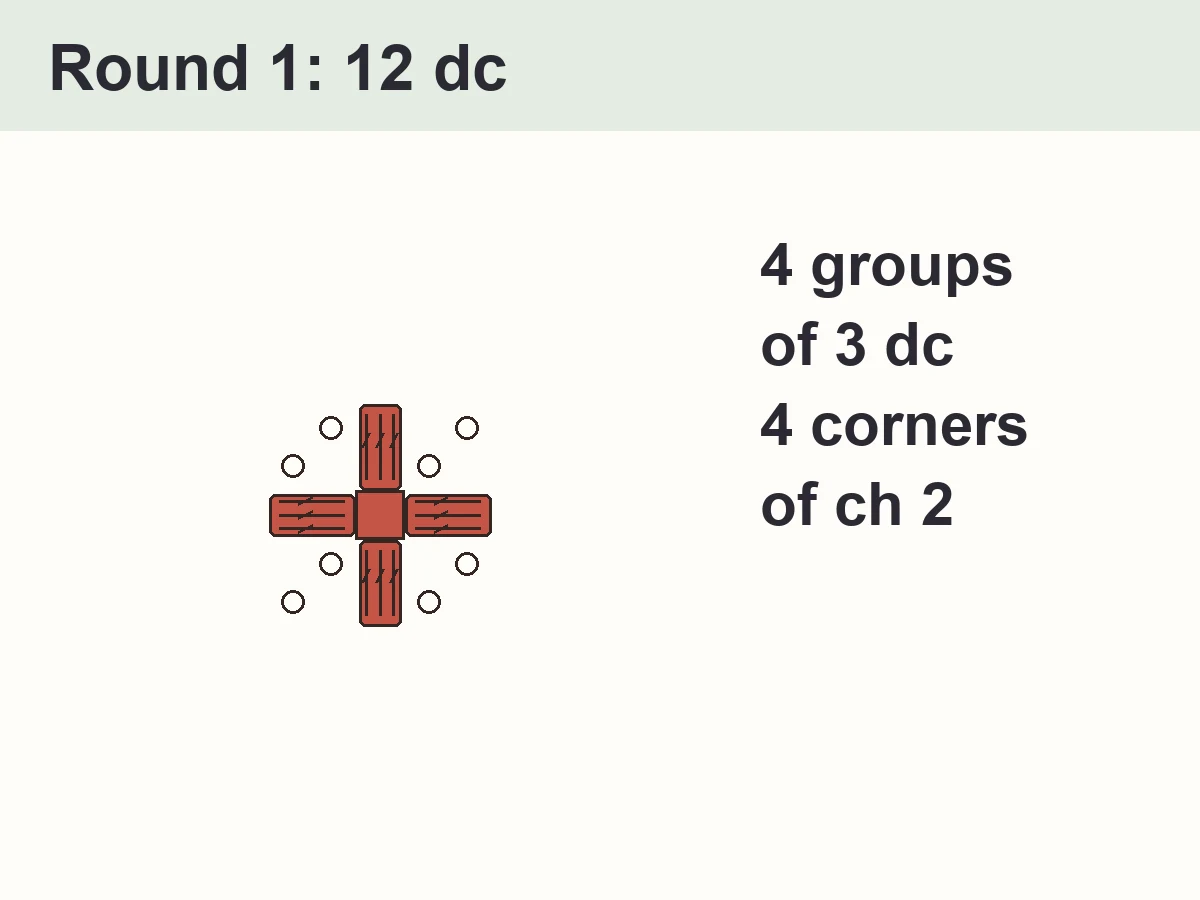
- With A, make a magic ring. Ch 3 (counts as the first dc), 2 dc in the ring: your first group. Ch 2: your first corner. *3 dc in the ring, ch 2; rep from * 2 more times. Pull the tail to close the ring. Join with sl st in the top of the beginning ch-3 (12 dc in 4 groups, 4 ch-2 corner sps). 12 dc, 4 ch-2 sps
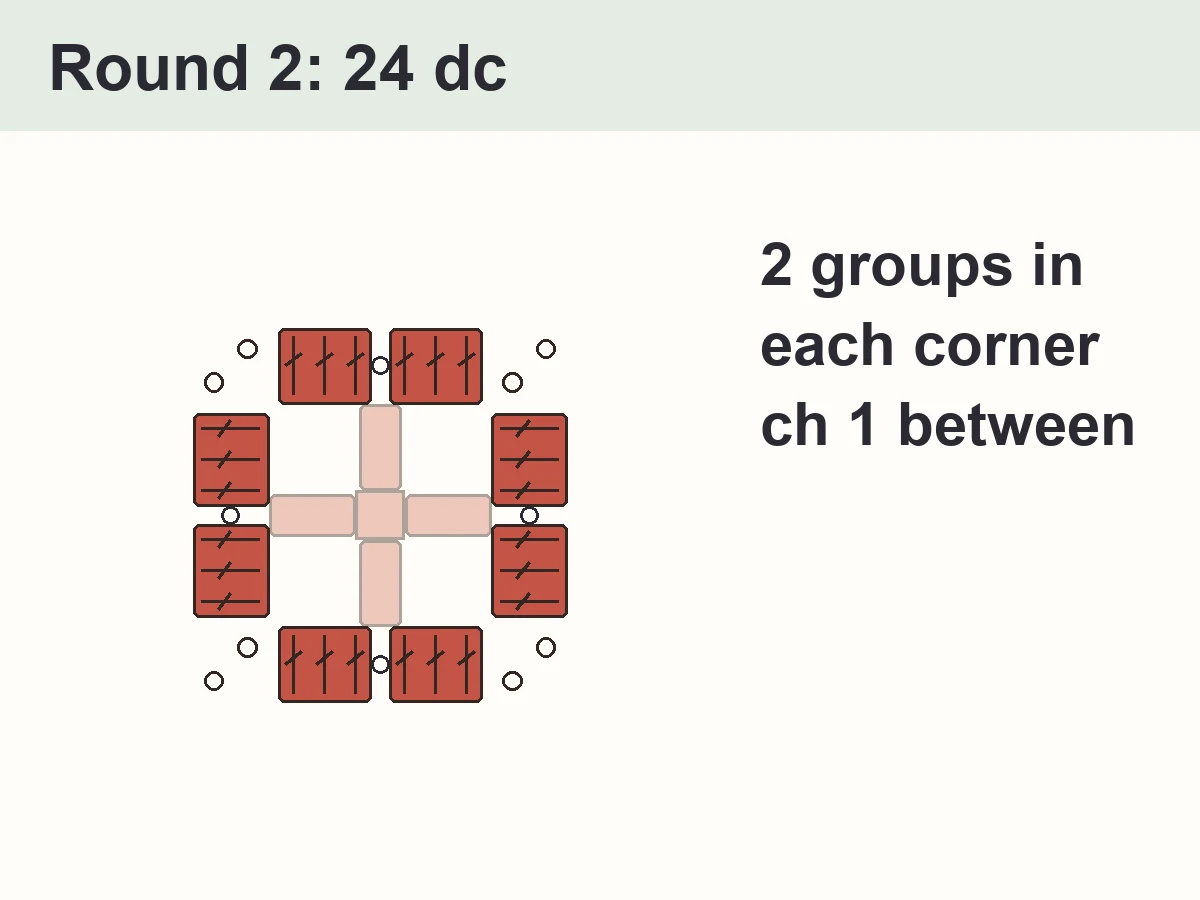
- Sl st in each of next 2 dc and in the next ch-2 sp, to move to a corner without adding height. Ch 3 (counts as a dc, so only 2 more dc complete the group), (2 dc, ch 2, 3 dc) in the same ch-2 sp: your first corner, ch 1, *(3 dc, ch 2, 3 dc) in the next ch-2 sp, ch 1; rep from * 2 more times. Join with sl st in the top of the beginning ch-3 (24 dc in 8 groups, 4 ch-2 corner sps, 4 ch-1 sps). 24 dc, 4 ch-2 sps, 4 ch-1 sps
- Fasten off A, leaving a 6-inch tail. Join B with sl st in any ch-2 corner sp. Ch 3 (counts as a dc, so only 2 more dc complete the group), (2 dc, ch 2, 3 dc) in the same sp: your first corner, ch 1, *3 dc in the next ch-1 sp, ch 1, (3 dc, ch 2, 3 dc) in the next ch-2 sp, ch 1; rep from * 2 more times. Last side: 3 dc in the next ch-1 sp, ch 1. Join with sl st in the top of the beginning ch-3 (36 dc in 12 groups, 4 ch-2 corner sps, 8 ch-1 sps). 36 dc, 4 ch-2 sps, 8 ch-1 sps
- Sl st in each of next 2 dc and in the next ch-2 sp, to move to a corner without adding height. Ch 3 (counts as a dc, so only 2 more dc complete the group), (2 dc, ch 2, 3 dc) in the same ch-2 sp: your first corner, ch 1, *[3 dc in the next ch-1 sp, ch 1] 2 times, (3 dc, ch 2, 3 dc) in the next ch-2 sp, ch 1; rep from * 2 more times. Last side: [3 dc in the next ch-1 sp, ch 1] 2 times. Join with sl st in the top of the beginning ch-3 (48 dc in 16 groups, 4 ch-2 corner sps, 12 ch-1 sps). Fasten off, leaving a 6-inch tail. 48 dc, 4 ch-2 sps, 12 ch-1 sps
Finishing
Weave in the ends: thread each tail on a yarn needle and run it through 2 inches of stitches of the same color on the back, then back the other way. Trim close. Block the square flat if you will join it to others.
Design notes
- Each round adds one group of 3 dc on every side: Round n has n groups per side, 12 x n dc in all.
- The ch 1 between groups keeps the square flat; the ch 2 in the corners lets it turn the corner.
- Rounds without a color change start with slip stitches over to a corner, so the joins stay in a corner.
Beginner tips for your first granny square
- Count the groups after every round: 4, 8, 12, 16.
- If your square cups like a bowl, you forgot a ch 1 or a ch 2; if it ripples, check for an extra group.
- Put a stitch marker in the top of the beginning ch-3: it shows exactly where to join.
- Make 5 squares the same day: by the 5th one you will not need the pattern any more.
Common mistakes
- Working a group into the top of a stitch instead of into the space: the square grows crooked.
- Forgetting the ch 1 between groups: the square cups.
- Forgetting the ch 2 in a corner: the corner pulls into a dome.
- Joining in the wrong place: always join in the top of the beginning ch-3.
Make it your own
- One color: skip the color change and work Round 3 in A, starting with slip stitches like Round 2.
- Bigger square: keep going — every round adds one group per side (Round 5 has 60 dc and is about 6 in).
- Blanket: make many squares and join them; see our Easy Granny Square Blanket for sizes and joining.
Care
- Follow the yarn label; most acrylic squares can go in the washing machine in a laundry bag.
More crochet patterns for your table
- Easy Granny Square Blanket — turn your squares into a blanket, with sizes and the joining steps
- Christmas Granny Square Blanket — the same square in red, green and gold
- Granny Square Christmas Tree Ornament — fold 3 little squares into a tree: a perfect second project
- Granny Heart Ornament — another small granny project
FAQ
Is a granny square good for a total beginner?
Yes. It uses only chains, slip stitches and double crochet, and you always work into spaces, which are easy to see. Count on about 30-45 minutes for a first square (an estimate).
Why is my granny square not flat?
Cupping usually means a missing ch 1 between groups or a missing ch 2 in a corner; rippling means an extra group or chains that are too long. Count the groups after each round: 4, 8, 12, 16.
How big is a granny square?
This 4-round square is about 5 in with worsted yarn and a US H-8 hook. Each extra round adds about 1 in.
How many granny squares do I need for a blanket?
It depends on the square and the blanket size. With 5-round squares of about 6 in (one more round than this one, see Variations), a baby blanket takes about 30 squares and a throw about 80; our Easy Granny Square Blanket lists the counts for 3 sizes.
Can I sell what I make with this square?
Yes, you may sell the things you crochet. Please don't sell or repost this page; link to it instead.
Copyright
© 2026 CookZya. Free for personal use: you may make and sell what you crochet. Please don't sell, copy or repost this page; link to it instead.