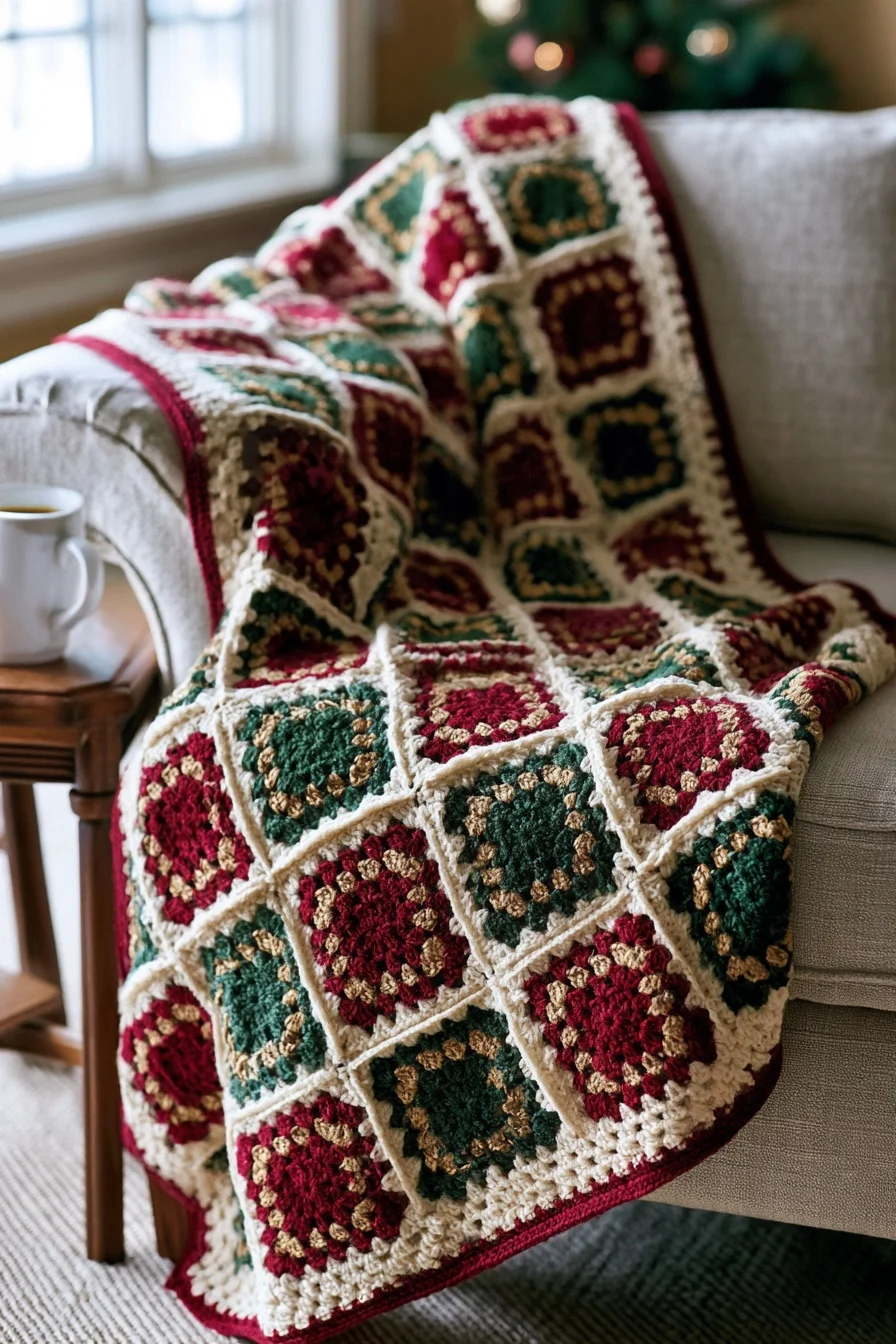
This Christmas granny square blanket pattern is made of one small square, repeated. Each square has a cranberry red or pine green center, a thin ring of gold and a cream frame, and when red and green squares alternate like a checkerboard, the blanket looks like a wrapped holiday gift. It is a free, original CookZya design, written for beginners, in three sizes: baby, throw and twin.
Every square uses only chains, slip stitches and double crochet, worked in little groups of three, and the border uses single crochet. If you can make a chain and a double crochet, you can make this blanket, and each stitch is explained below. One square takes about 22 minutes, estimated, once you know it, so the baby size is about 13 hours in all: a realistic handmade gift if you start now.
Here is the plan: make the squares (5 rounds, about 6 in each), join them with a slip stitch seam, then add a two-round border. You need worsted weight yarn in 4 colors and a US H-8 (5.0 mm) hook. Every round below was checked by our stitch simulator; the blanket has not been crochet-tested yet. Tick each round as you go — your progress stays saved in this browser.
- Finished size
- Baby about 31 x 37 in, throw about 49 x 61 in, twin about 67 x 91 in (approximate)
- Level
- Easy — beginner. You need ch, sl st, dc and sc, all explained below
- Time
- About 13 hours (baby), 34 hours (throw) or 69 hours (twin), estimated, not timed
- Yarn
- Worsted weight (#4), 4 colors: about 880 yd (baby), 2240 yd (throw) or 4560 yd (twin) in all
- Hook
- US H-8 (5.0 mm)
- Gauge
- Suggested only, not swatched: one square (5 rounds) = 6 in (15 cm) from side to side; Rnds 1-2 = about 2 3/4 in
- Squares
- 30 (baby), 80 (throw) or 165 (twin)
Sizes
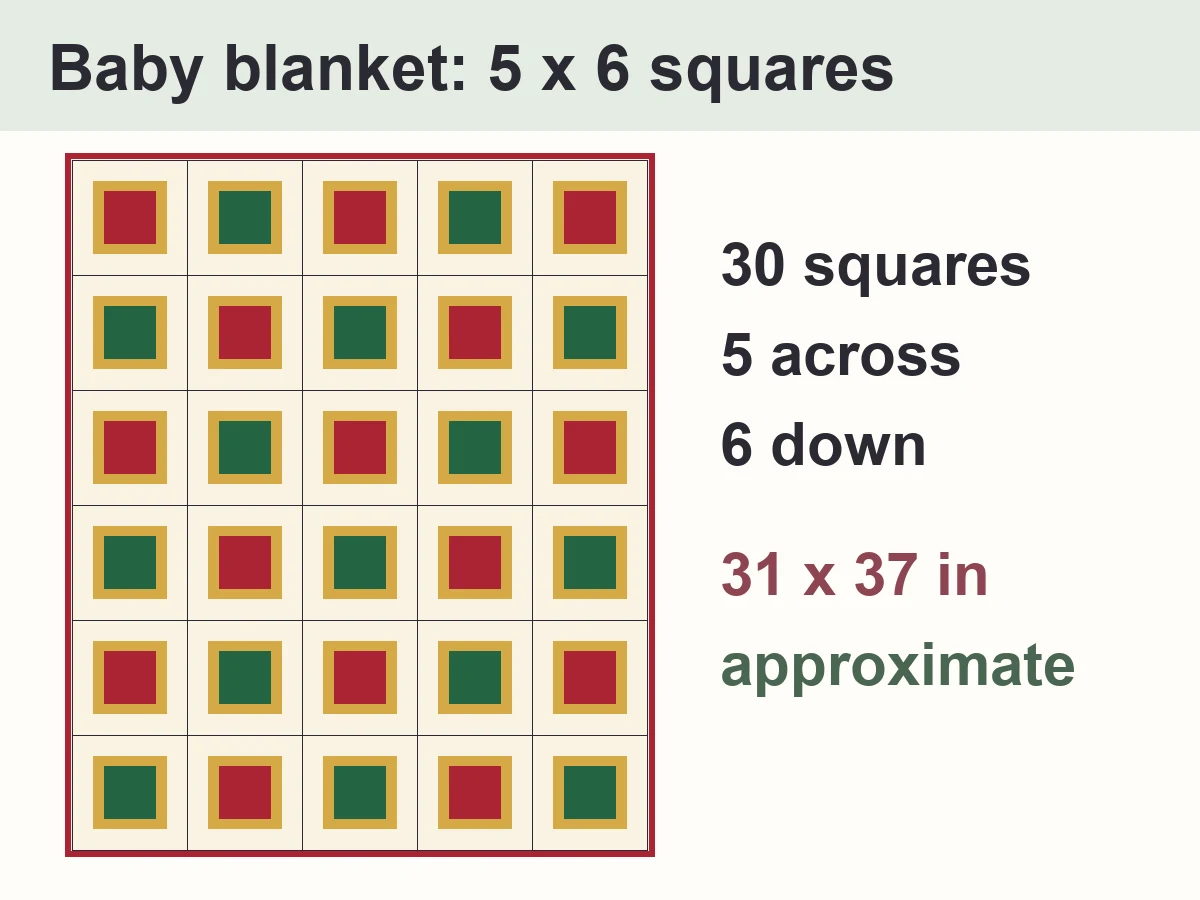
Baby blanket — 5 x 6 squares, about 31 x 37 in
- Yarn
- Worsted weight (#4), 4 colors
- Hook
- US H-8 (5.0 mm)
- Yarn needed
- cranberry red 120 yd · pine green 90 yd · antique gold 160 yd · cream 510 yd — about 880 yd in all (estimated, with a 20 % margin)
- Finished size
- about 31 x 37 in (79 x 94 cm), approximate
- Check before seaming
- 30 squares (5 across x 6 down): 15 cranberry red, 15 pine green. Border Rnd 1: 103 sc on each short edge, 124 sc on each long edge, 3 sc in each corner. About 13 hours in all, estimated.
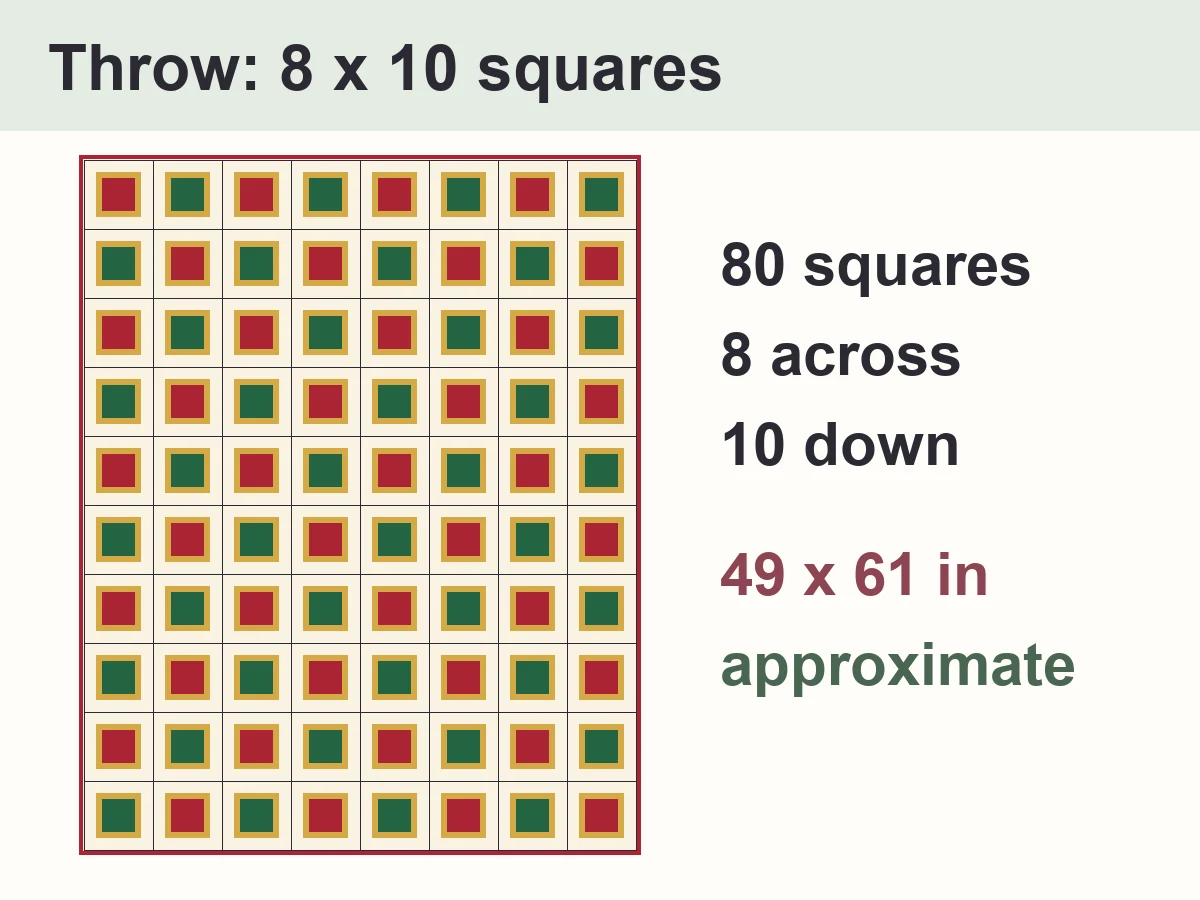
Throw — 8 x 10 squares, about 49 x 61 in
- Yarn
- Worsted weight (#4), 4 colors
- Hook
- US H-8 (5.0 mm)
- Yarn needed
- cranberry red 270 yd · pine green 220 yd · antique gold 420 yd · cream 1330 yd — about 2240 yd in all (estimated, with a 20 % margin)
- Finished size
- about 49 x 61 in (124 x 155 cm), approximate
- Check before seaming
- 80 squares (8 across x 10 down): 40 cranberry red, 40 pine green. Border Rnd 1: 166 sc on each short edge, 208 sc on each long edge, 3 sc in each corner. About 34 hours in all, estimated.
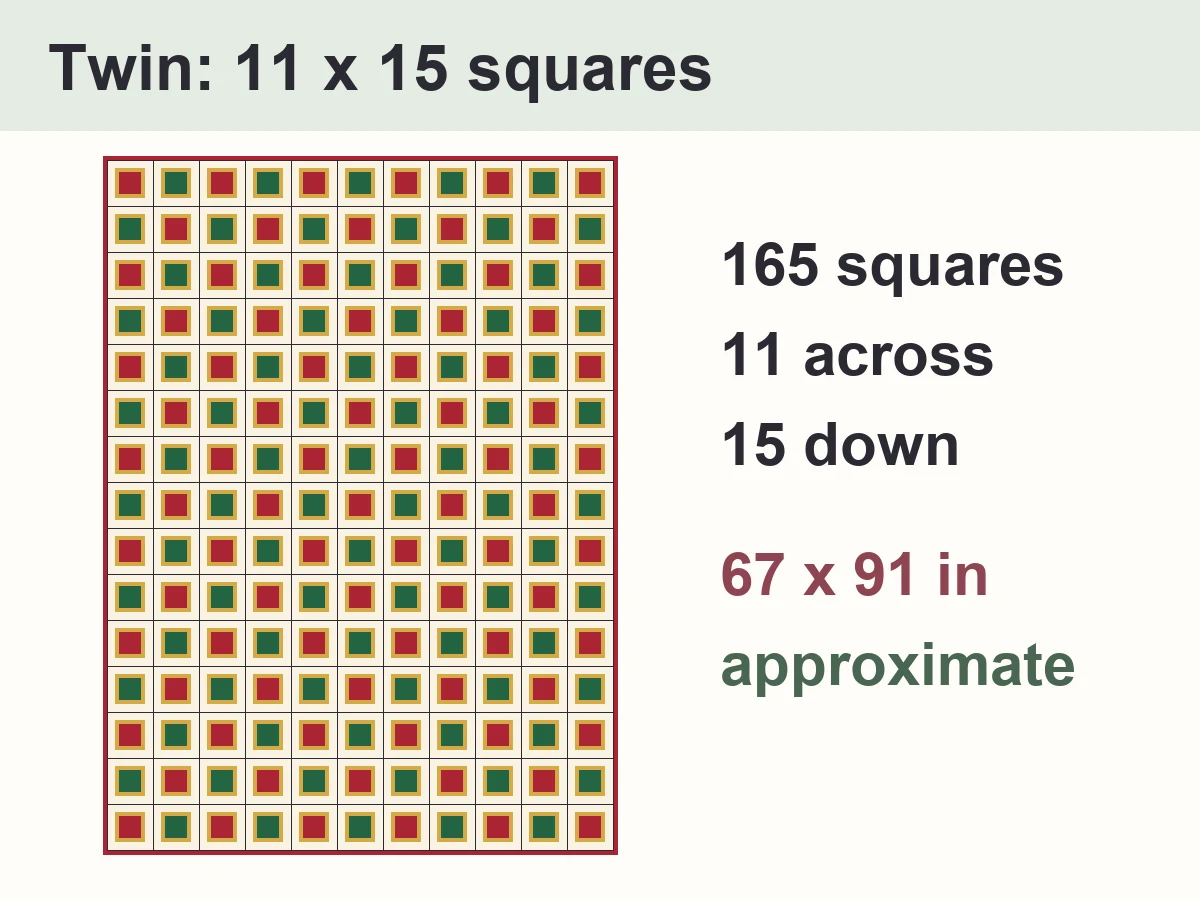
Twin — 11 x 15 squares, about 67 x 91 in
- Yarn
- Worsted weight (#4), 4 colors
- Hook
- US H-8 (5.0 mm)
- Yarn needed
- cranberry red 530 yd · pine green 450 yd · antique gold 870 yd · cream 2710 yd — about 4560 yd in all (estimated, with a 20 % margin)
- Finished size
- about 67 x 91 in (170 x 231 cm), approximate
- Check before seaming
- 165 squares (11 across x 15 down): 83 cranberry red, 82 pine green. Border Rnd 1: 229 sc on each short edge, 313 sc on each long edge, 3 sc in each corner. About 69 hours in all, estimated.
✓ CookZya original design · Stitch counts checked row by row — shape and size not tested. All 11 rounds — the 5 rounds of the square and the 2 border rounds for each of the 3 sizes — were replayed by our stitch simulator, and a second reading made from the written text alone matched it stitch by stitch. This blanket has not been crochet-tested: your tension decides the final size.
Materials
- Color A — cranberry red, for Rnds 1-2 of 1 square in 2 and Border Rnd 2, about 120 / 270 / 530 yd
- Color B — pine green, for Rnds 1-2 of 1 square in 2, about 90 / 220 / 450 yd
- Color G — antique gold, for Rnd 3 of every square, about 160 / 420 / 870 yd
- Color E — cream, for Rnds 4-5 of every square, the joining and Border Rnd 1, about 510 / 1330 / 2710 yd
- Yardage is given as baby / throw / twin. It is estimated from the stitch counts with a 20 % margin, for about 6 in squares.
- Soft acrylic or an acrylic blend is easy to wash and kind to a beginner budget; cotton makes a cooler, heavier blanket. For the gold, a plain mustard-gold worsted works as well as a metallic one, and a metallic yarn is thinner, so hold it with care and keep your tension loose.
- US H-8 (5.0 mm) hook, yarn needle, scissors, a few stitch markers.
Notes
- US crochet terms. ch = chain, sl st = slip stitch, dc = double crochet, sc = single crochet, sp = space, st(s) = stitch(es), rep = repeat, Rnd = round.
- Chain (ch): yarn over and pull the yarn through the loop on your hook. A ch-2 sp or ch-1 sp is the little hole under 2 or 1 chains: you work into the hole, not into the chains.
- Double crochet (dc): yarn over, insert the hook, yarn over and pull up a loop (3 loops on the hook), yarn over and pull through 2 loops, yarn over and pull through the last 2 loops.
- Single crochet (sc): insert the hook, yarn over and pull up a loop (2 loops on the hook), yarn over and pull through both loops. You use it only for the border.
- Slip stitch (sl st): insert the hook, yarn over and pull the loop through the stitch and the loop on your hook in one go. It closes a round, it moves you to the next corner without adding height, and it joins the squares.
- Magic ring: wrap the yarn twice around two fingers, insert the hook under the strands, pull up a loop and ch 1. Work Rnd 1 over the ring, then pull the tail to close the hole.
- Ch 3 (counts as a dc): the 3 chains at the start of a round stand in for the first dc. Count them as a dc, and close the round with a sl st in the top of these 3 chains.
- A group is 3 dc worked in the same space. A corner is (3 dc, ch 2, 3 dc) in one ch-2 sp. Each round adds one more group on every side.
- *…; rep from * 2 more times means: do the part after the * 3 times in all. [ ] 2 times means: do what is inside the brackets 2 times.
- Joining a new color: make a slip knot on your hook, insert the hook in the corner space, yarn over and pull through the space and the slip knot. You do this twice in every square: for the gold (Rnd 3) and for the cream (Rnd 4).
- All rounds are worked with the right side (the front) facing you: you never turn the square.
How the Christmas granny square blanket is built
Granny square
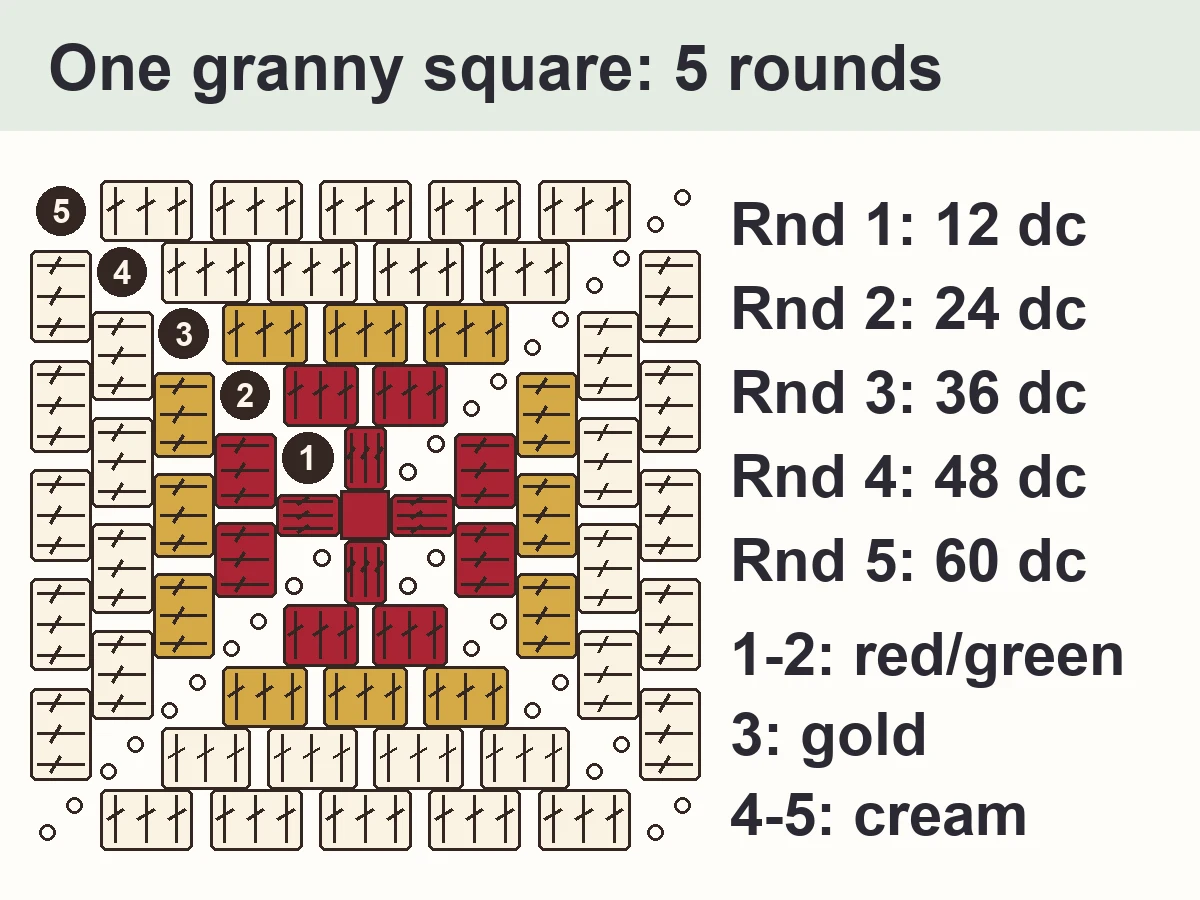
Make 30 squares for the baby size, 80 for the throw or 165 for the twin. Rnds 1-2 are in one center color (cranberry red or pine green, see the layout for how many of each), Rnd 3 is gold and Rnds 4-5 are in cream. You work every group into a space, never into a stitch, which makes this square very forgiving.
- With a center color (red or green), make a magic ring. Ch 3 (counts as the first dc), 2 dc in the ring, ch 2, *3 dc in the ring, ch 2; rep from * 2 more times. Pull the tail to close the ring. Join with sl st in the top of the beginning ch-3 (12 dc in 4 groups, 4 ch-2 corner sps). 12 dc, 4 ch-2 sps
- Sl st in each of the next 2 dc and in the next ch-2 sp. Ch 3 (counts as a dc), (2 dc, ch 2, 3 dc) in the same ch-2 sp: this is your first corner. Ch 1, *(3 dc, ch 2, 3 dc) in the next ch-2 sp, ch 1; rep from * 2 more times. Join with sl st in the top of the beginning ch-3 (24 dc in 8 groups, 4 ch-2 corner sps, 4 ch-1 sps). Fasten off the center color. 24 dc, 4 ch-2 sps, 4 ch-1 sps
- Join gold with sl st in any ch-2 corner sp. Ch 3 (counts as a dc), (2 dc, ch 2, 3 dc) in the same sp: this is your first corner. Ch 1, *3 dc in the next ch-1 sp, ch 1, (3 dc, ch 2, 3 dc) in the next ch-2 sp, ch 1; rep from * 2 more times. 3 dc in the next ch-1 sp, ch 1. Join with sl st in the top of the beginning ch-3 (36 dc in 12 groups, 4 ch-2 corner sps, 8 ch-1 sps). Fasten off gold. 36 dc, 4 ch-2 sps, 8 ch-1 sps
- Join cream with sl st in any ch-2 corner sp. Ch 3 (counts as a dc), (2 dc, ch 2, 3 dc) in the same sp: this is your first corner. Ch 1, *[3 dc in the next ch-1 sp, ch 1] 2 times, (3 dc, ch 2, 3 dc) in the next ch-2 sp, ch 1; rep from * 2 more times. [3 dc in the next ch-1 sp, ch 1] 2 times. Join with sl st in the top of the beginning ch-3 (48 dc in 16 groups, 4 ch-2 corner sps, 12 ch-1 sps). 48 dc, 4 ch-2 sps, 12 ch-1 sps
- Sl st in each of the next 2 dc and in the next ch-2 sp. Ch 3 (counts as a dc), (2 dc, ch 2, 3 dc) in the same ch-2 sp: this is your first corner. Ch 1, *[3 dc in the next ch-1 sp, ch 1] 3 times, (3 dc, ch 2, 3 dc) in the next ch-2 sp, ch 1; rep from * 2 more times. [3 dc in the next ch-1 sp, ch 1] 3 times. Join with sl st in the top of the beginning ch-3 (60 dc in 20 groups, 4 ch-2 corner sps, 16 ch-1 sps). Fasten off, leaving a 6 in tail. 60 dc, 4 ch-2 sps, 16 ch-1 sps
Border (after joining)
Join all your squares first: the joining steps come right after these 2 rounds. Then work the border all the way around the blanket. The total stitch count for each size is at the end of each round.
- With the right side facing you, join cream with sl st in the ch-2 corner sp at the top right corner of the blanket; you will work first along the top edge, which is a short edge. Ch 1 (does not count as a stitch), 3 sc in the same corner sp. *Work along the edge to the next corner of the blanket: sc in each dc and in each ch-1 sp; at a seam, 1 sc in each of the 2 ch-2 corner sps (one on each side) and nothing in the seam itself; then 3 sc in the corner sp of the blanket; rep from * 2 more times (you work a short edge, a long edge, a short edge, each followed by a corner). Work along the last long edge in the same way. Join with sl st in the first sc. The number of sc on each short and long edge is in the Sizes cards. Fasten off cream. Baby 466 sc · Throw 760 sc · Twin 1096 sc
- Join cranberry red with sl st in the first sc of Rnd 1 (the sc where Rnd 1 was joined). Ch 1 (does not count as a stitch), sc in the same st, 3 sc in the next st (the center sc of the corner). *Sc in each st up to the center sc of the next corner, 3 sc in the center sc; rep from * 2 more times. Sc in each st to the end. Join with sl st in the first sc: 8 sc more than Rnd 1. Fasten off. Baby 474 sc · Throw 768 sc · Twin 1104 sc
How to join the squares
1 Lay out your squares
2 Join the columns
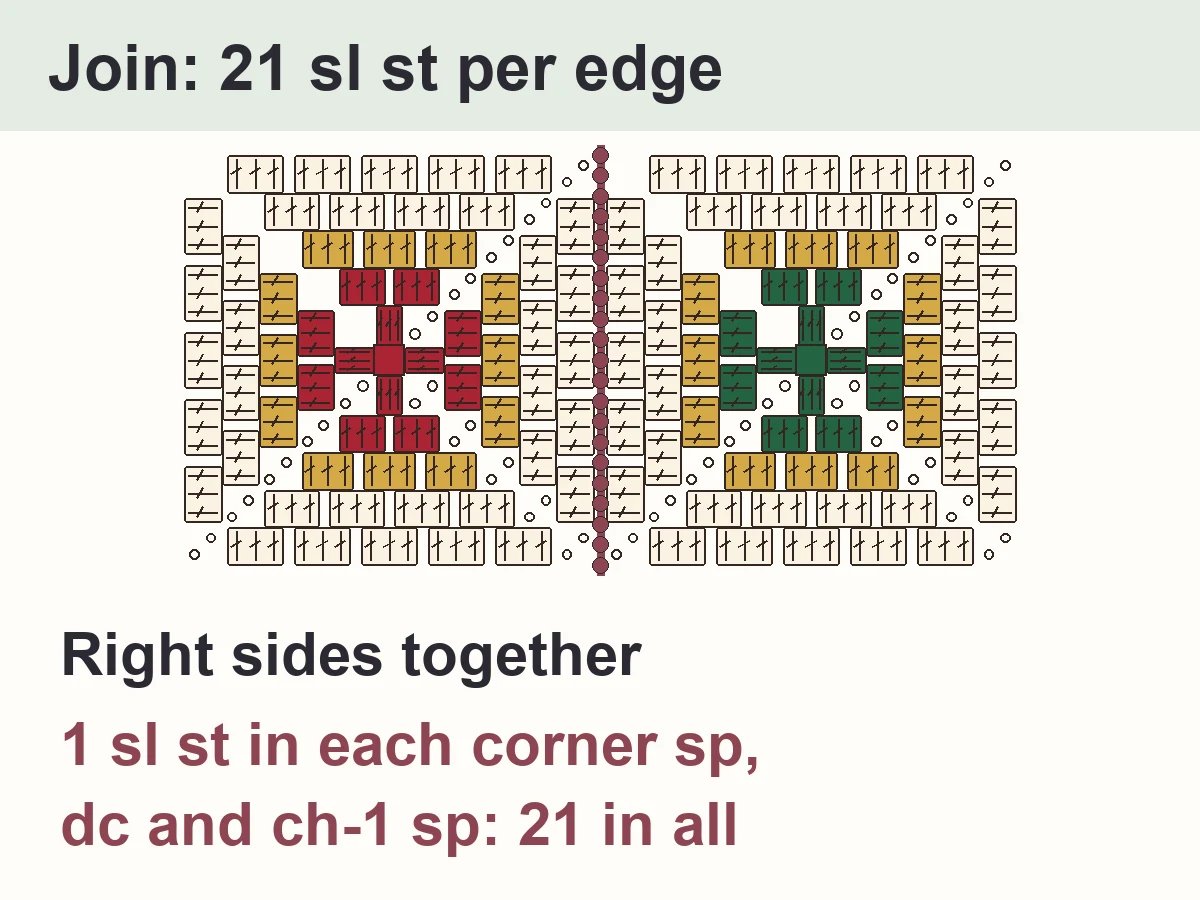
3 Join the rows
4 Add the border
5 Weave in the ends
6 Block the blanket
Finishing
Check that every end is woven in and every seam is closed. Wash and dry the blanket as the yarn label says before you gift it: a first wash softens the stitches.
Design notes
- Each round adds one group of 3 dc on every side: Rnd n has n groups per side, so Rnd 5 ends with 60 dc.
- A finished side has 15 dc and 4 ch-1 sps between 2 corner sps: 21 places for a stitch. That is why the join uses 21 sl st and the border 21 sc per square edge.
- The gold ring is a single round, so it stays thin and sparkles between the colored center and the cream frame; the cream frame (Rnds 4-5) ties the red and the green together.
- Sizes are the nearest whole number of squares to 30 x 36 in (baby), 50 x 60 in (throw) and 66 x 90 in (twin), plus about 1/2 in of border on each side.
Beginner tips for a Christmas granny square blanket
- Make one test square first and measure it. Bigger than 6 1/4 in? Try a US G-6 (4.0 mm) hook. Smaller than 5 3/4 in? Try a US I-9 (5.5 mm).
- Count the groups after each round: Rnd 1 has 4, Rnd 2 has 8, Rnd 3 has 12, Rnd 4 has 16, Rnd 5 has 20.
- Put a stitch marker in the top of the beginning ch-3: it shows you exactly where to join.
- Change colors in the same corner of every square, so the join is always in the same place and the ends are easy to find when you weave them in.
- Weave in the ends of each square as soon as it is done: a pile of finished squares feels great.
- Keep your squares in two bags, red and green, so the checkerboard layout is quick. Lay out the whole blanket before the first seam: two reds side by side break the pattern.
- Work the gold round with a slightly bigger hook if your tension is tight: metallic and glitter yarns pull the stitches in.
Common mistakes
- Working a group into the top of a stitch instead of into the space: the square grows crooked.
- Forgetting the ch 1 between groups: the square cups instead of lying flat.
- Forgetting the ch 2 at a corner: the square pulls into a dome.
- Joining with the wrong sides together: the seam ridge ends up on the front.
- Washing the finished blanket with warm water and no color catcher: red can bleed onto the cream.
- Pulling the joining sl st tight: the seams pucker. Keep them loose.
- Skipping the gold ring to save time: the ring is Rnd 3, so the square would have one round too few and stay smaller than the sizes below.
Make it your own
- Colors as written: cranberry red and pine green centers, antique gold ring, cream frame and a cranberry border.
- Winter berry: burgundy and deep teal centers, silver-gray ring, white frames.
- Cozy cabin: rust red and olive centers, mustard ring, oatmeal frames.
- All one color: make every center forest green for a calm, elegant blanket that works all winter.
- Scrappy: use up red and green leftovers for the centers and keep the gold ring and the cream frame, so it all still matches.
- Any size: each extra square adds about 6 in. One square takes about 5 yd of a center color, 4 yd of gold and 12 yd of cream, estimated.
Care
- Follow the care label of your yarn. Most acrylic yarn can go in the washing machine on a gentle cycle with cool water.
- Wash a red blanket by itself the first time, with a color catcher: dark red can bleed into the cream.
- Dry flat, or tumble dry on low if the label allows it.
- Never iron acrylic: the heat flattens it for good.
More crochet patterns for your table
- Easy Granny Square Blanket — the same 5-round square in four everyday colors, if you want a blanket for the whole year
- Daisy Granny Square Blanket — a flower center for a springtime blanket, once the holidays are over
- Layered Poinsettia Ornament — a small red-and-green Christmas project to match your blanket
- Crochet Christmas Tree Ornament — a quick green gift to crochet from your leftover yarn
FAQ
Is this Christmas granny square blanket pattern good for beginners?
Yes. It uses only 4 stitches: chain, slip stitch and double crochet for the squares, and single crochet for the border, all explained on this page. Each square is 5 short rounds, and you always work into the spaces, which is easier than working into stitches.
How many granny squares do I need for a Christmas blanket?
With 6 in squares, you need 30 squares for a baby blanket (5 x 6), 80 for a throw (8 x 10) and 165 for a twin blanket (11 x 15).
How much yarn do I need for a Christmas granny square blanket?
About 880 yd for the baby size, 2240 yd for the throw and 4560 yd for the twin, in worsted weight yarn. About 58 to 59 % of it is cream, the rest is red, green and a little gold. These are estimates with a 20 % margin; the yardage for each color is in the Sizes cards.
What colors and yarn are best for a Christmas granny square blanket?
Cranberry red and pine green are the classic pair, with cream between them so the colors do not fight. Pick a soft acrylic or acrylic blend in worsted weight: it washes well and holds its color. If you like a different look, the variations below give 4 other palettes.
Can I use metallic gold yarn for the ring?
Yes. Rnd 3 is the only gold round, so a metallic or glitter yarn is a small extra. Metallic yarn is thinner and can split, so work Rnd 3 a little looser than usual. A plain mustard-gold worsted gives the same look without the sparkle.
Will the red bleed onto the cream?
It can, the first time you wash it, because dark red dyes are the most likely to run. Wash the blanket by itself in cool water with a color catcher, and check the label of your red yarn.
How early should I start to finish by Christmas?
The baby size is about 13 hours, the throw about 34 hours and the twin about 69 hours, estimated at about 22 minutes per square plus the joining and the border. At one hour a day, that is about 5 weeks for the throw: start in October or early November and keep the squares in two bags, red and green.
Can I sell the blankets I make?
Yes, you may sell the blankets you crochet yourself. Please don't sell or repost the pattern; link to this page instead.
Copyright
© 2026 CookZya — original design. Free for personal use: you may make and sell the blankets you crochet. Please don't sell, copy or repost this pattern; link to this page instead.